Era 100 Pro


Key features
Key features
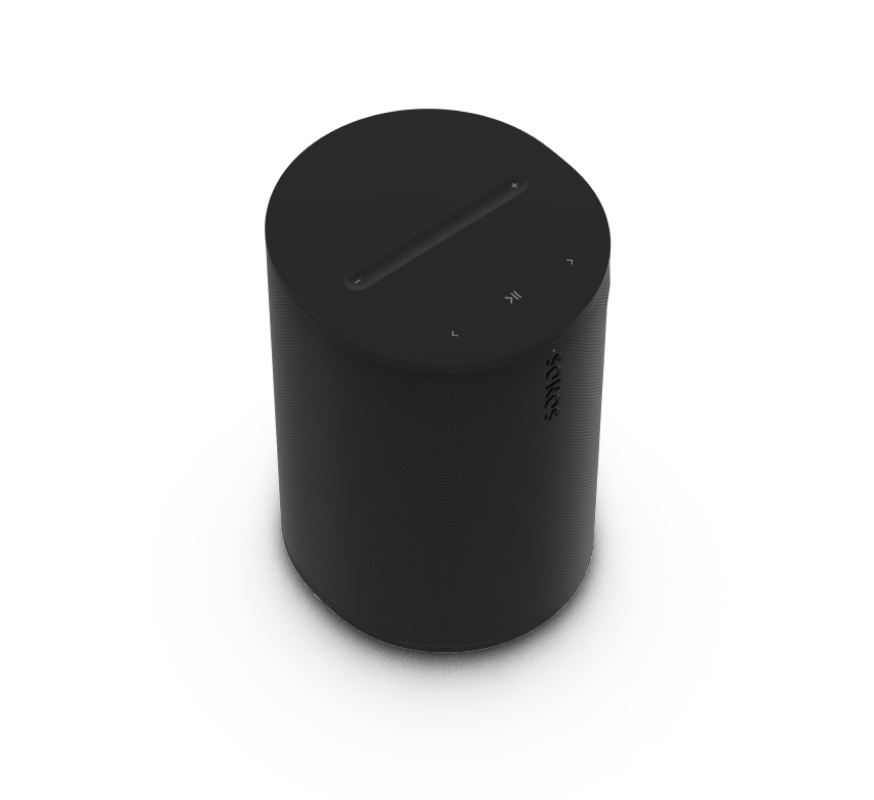
Complete, installed sound system for professionals.
- Hundreds of content streaming partners, including commercial content providers, built-in.
- Airplay 2 and Bluetooth compatible.
- Optimized for PoE+ and compatible with PoE.
- Utilize zones for easier control.
- Pro-grade surface mount with multiple cable routing solutions (sold separately).
- Wired-first networking.
- DSP automatically adjusts based on orientation.
- Optional secondary safety attachment point.
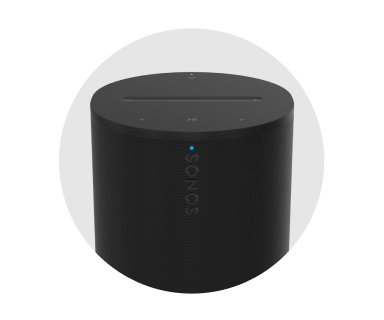
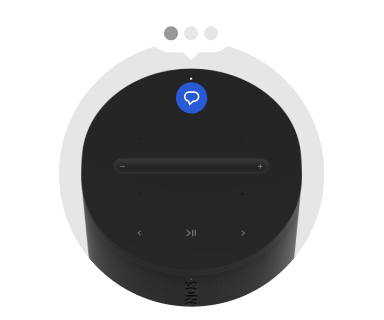
Controls and lights
 | Status light |
|
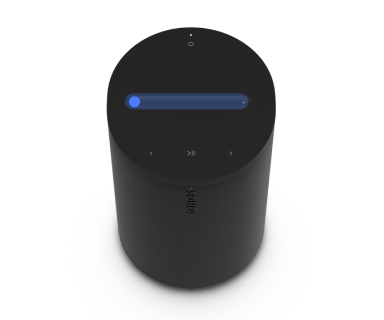 | Volume |
Note: To disable touch controls for all speakers in a room, go to System Settings and select a product >, scroll down to Hardware, and toggle Touch Controls on or off. |
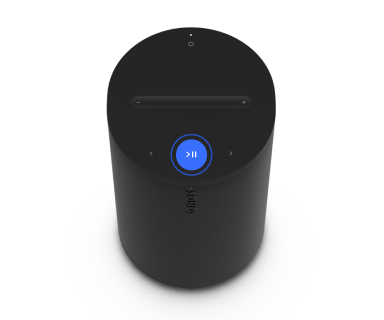 | Play/Pause | PlaybackTap to play or pause audio. GroupWhen other speakers in a system are streaming audio, press and hold Play/Pause to group Era 100 Pro with the nearest Sonos speaker or group that's playing audio. The system will automatically create a temporary group, or cycle this speaker through other existing temporary groups. Release Play/Pause when Era 100 Pro is grouped with the speaker(s) you want and they begin playing the same content. Sound SwapWhen another Sonos speaker is streaming audio, press and hold Play/Pause (about 2 seconds). You’ll hear a tone and content will stop streaming from the other Sonos speaker and start streaming on your Era 100 Pro. |
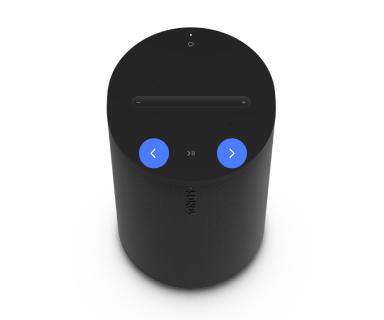 | Next/Previous |
Note: You can’t skip forward or go back when listening to a radio station. |
 | Voice services on/off | Tap the voice services button to turn voice services on or off.
Note: The microphone switch, located on the connector panel (back), must be turned on to use voice services. |
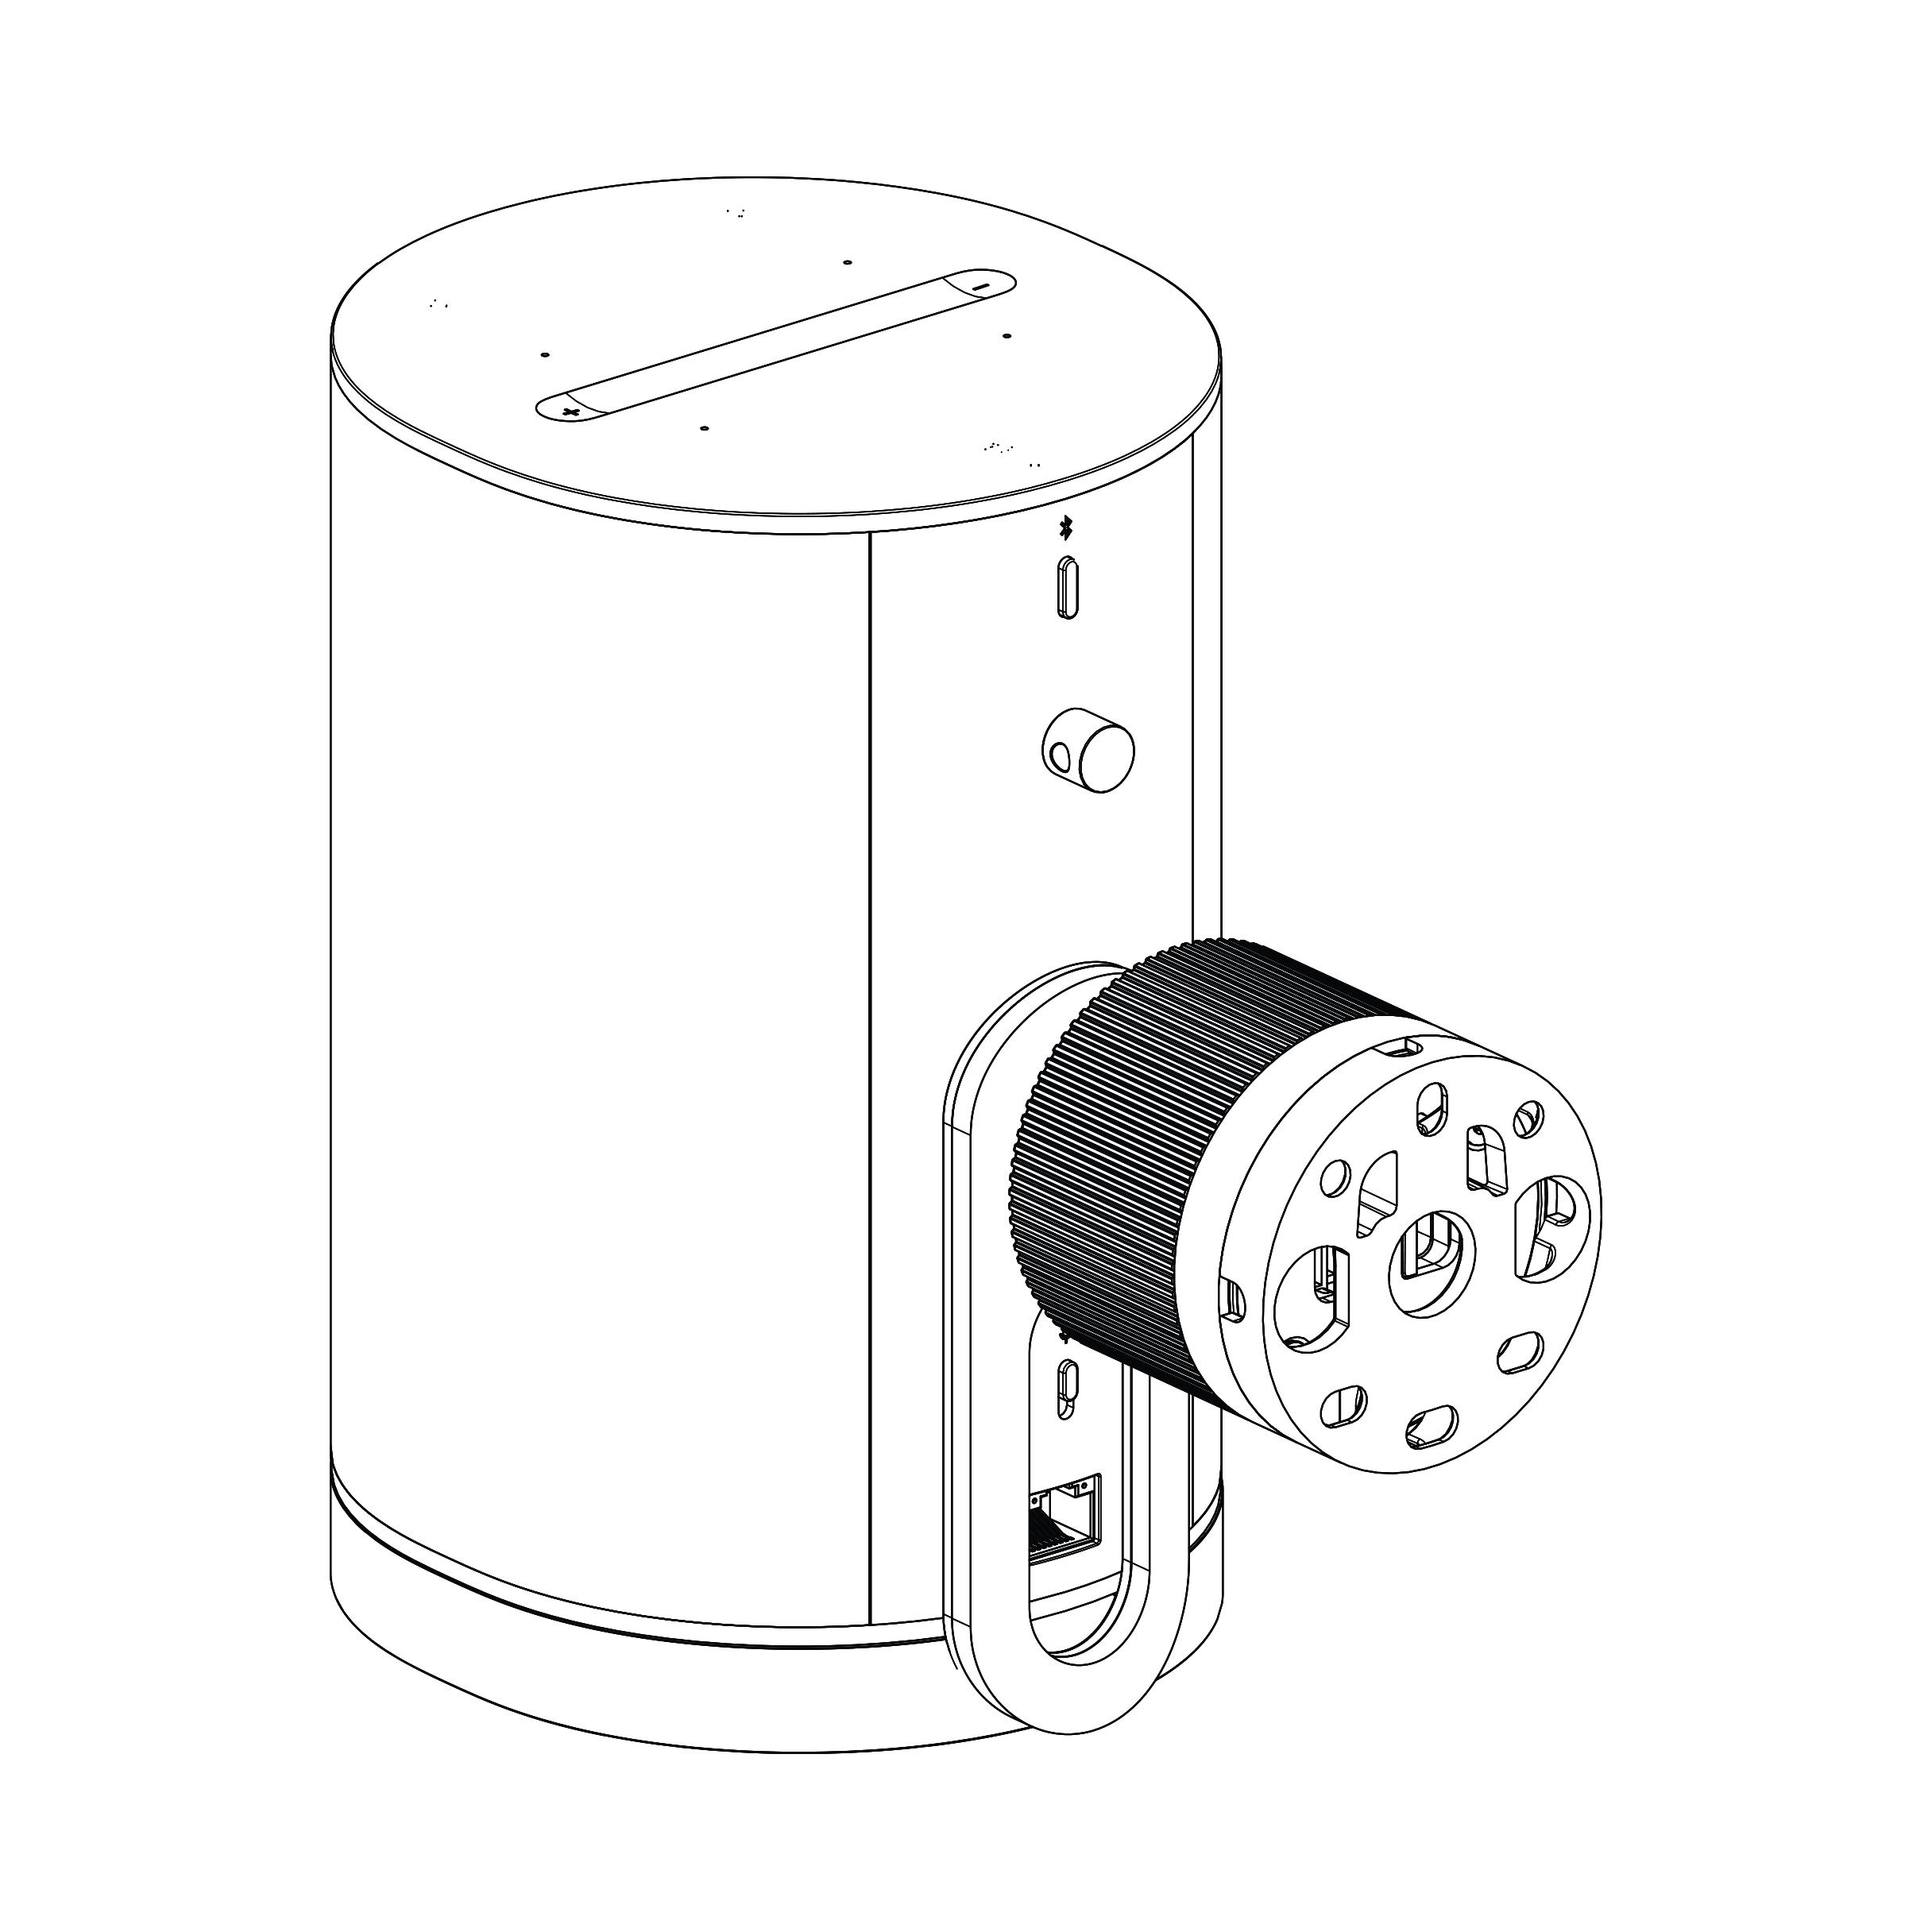
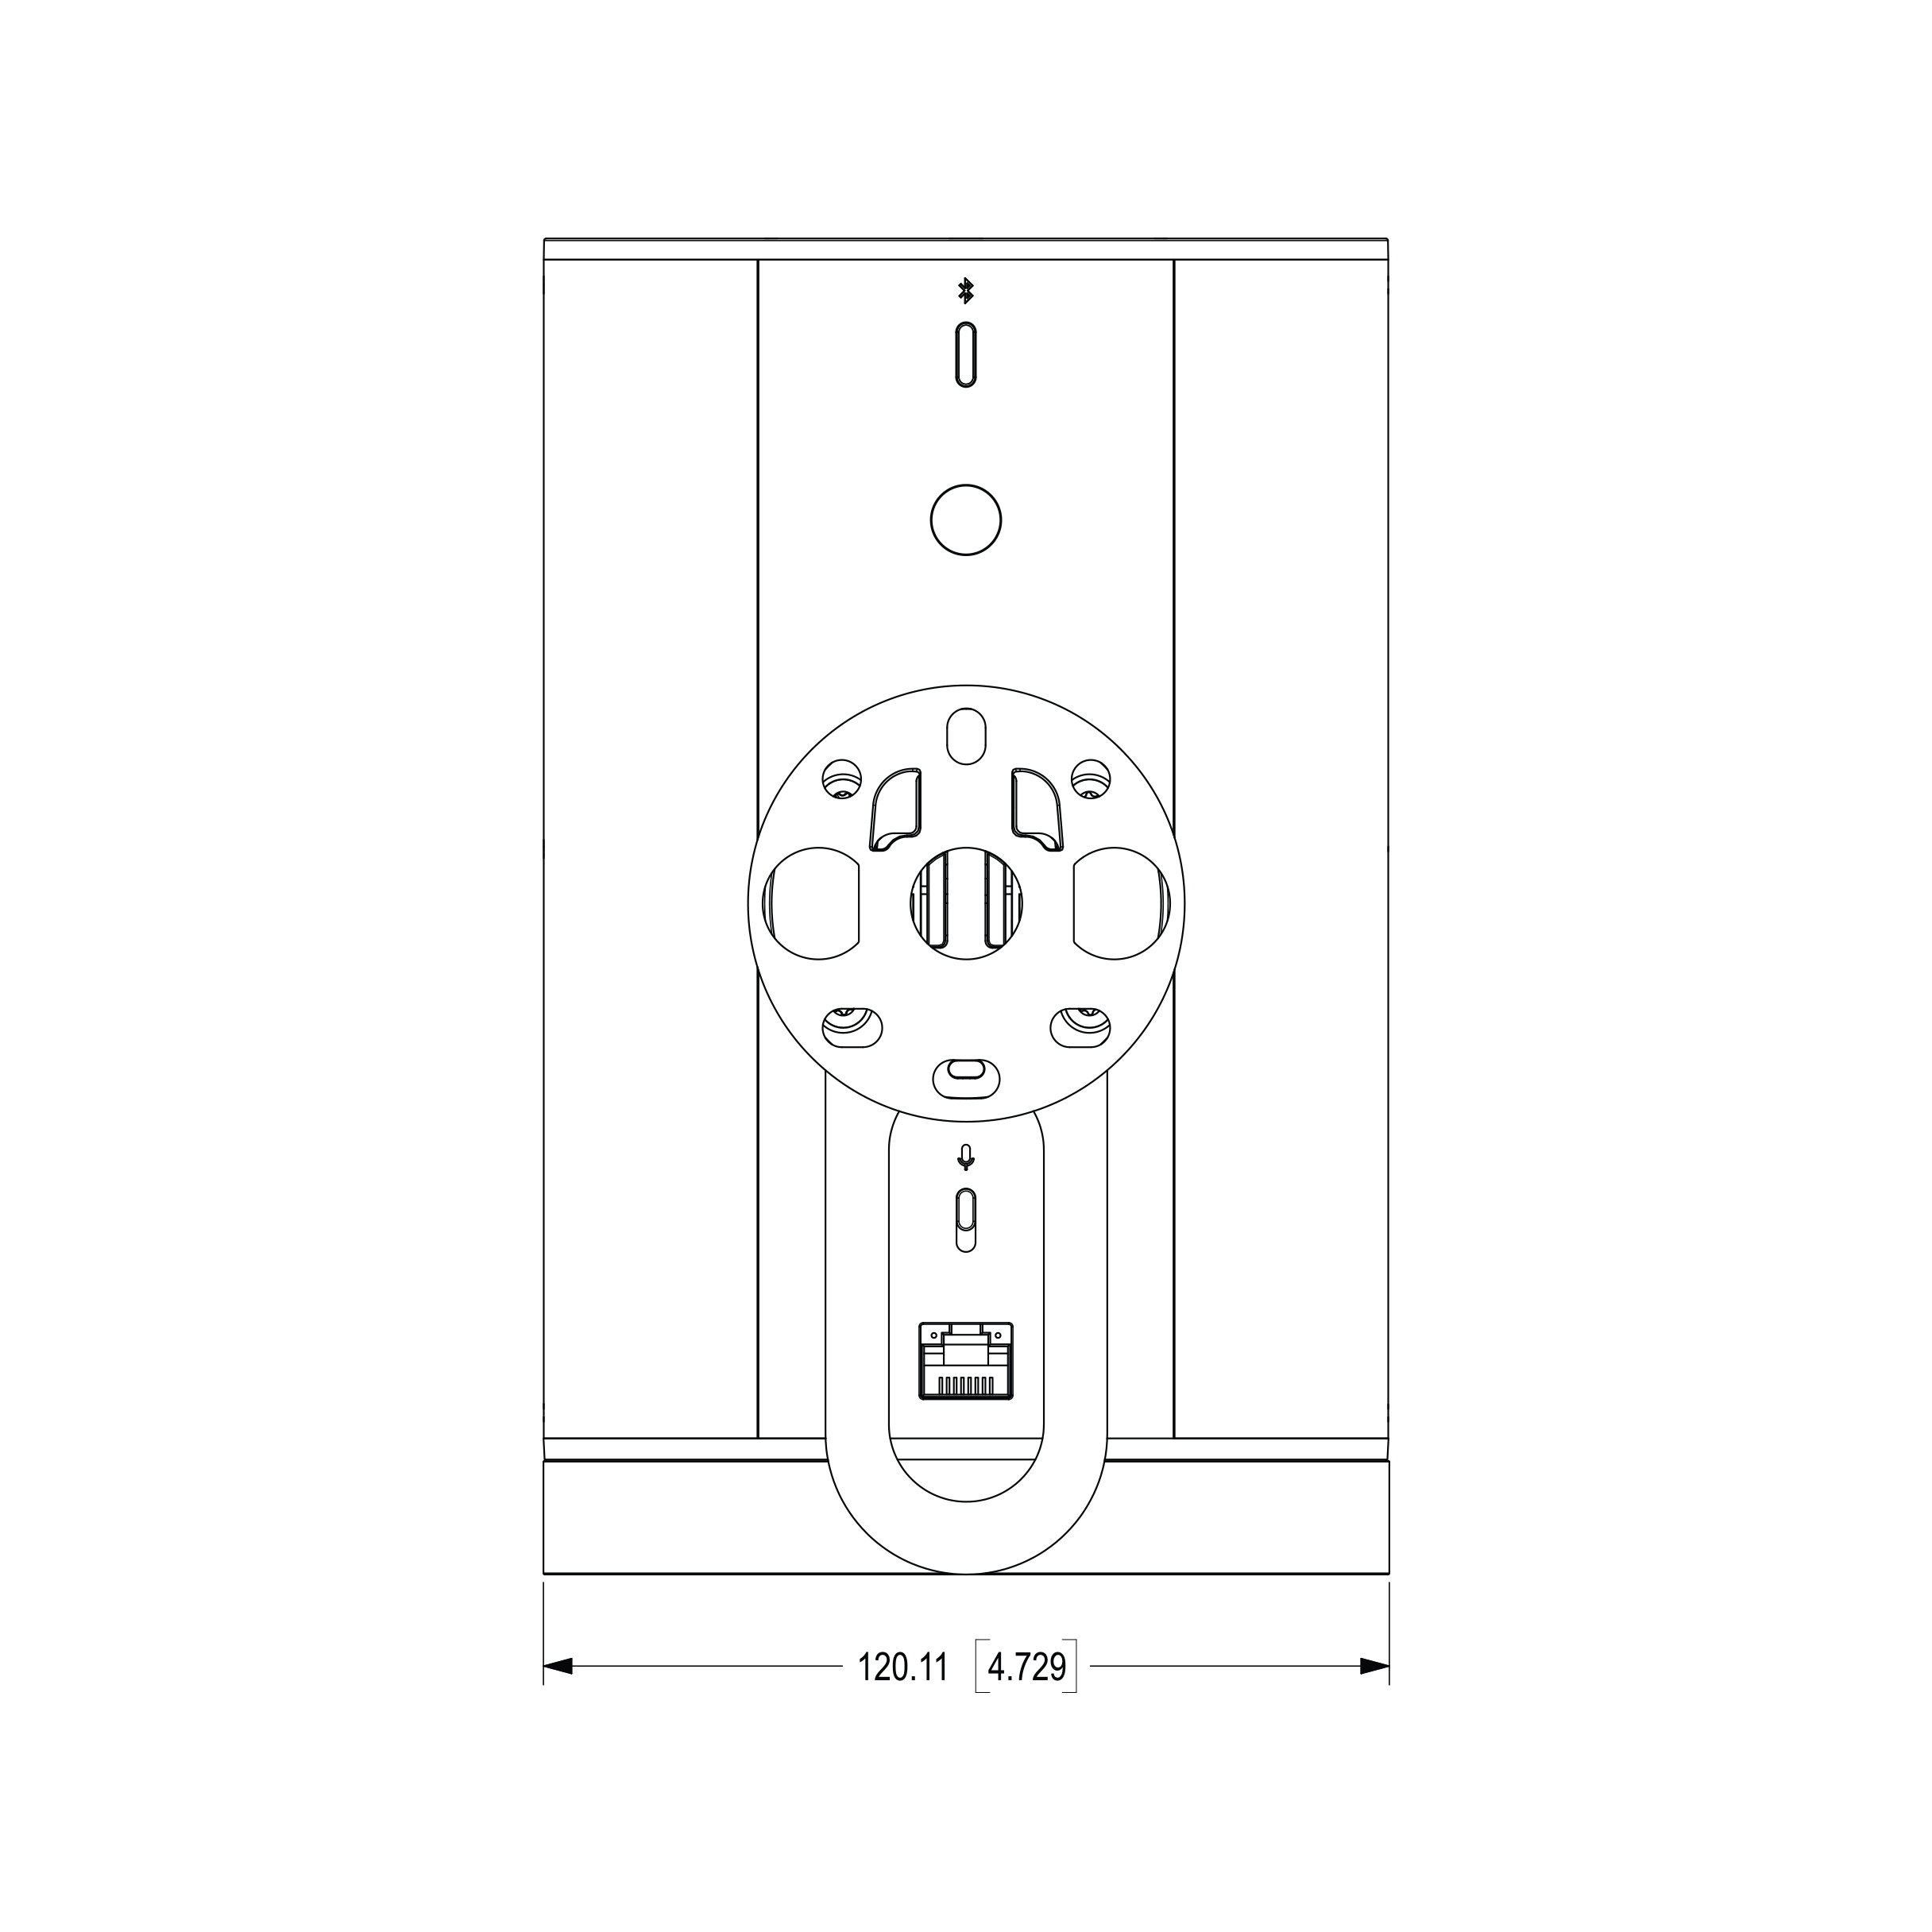
Connector panel
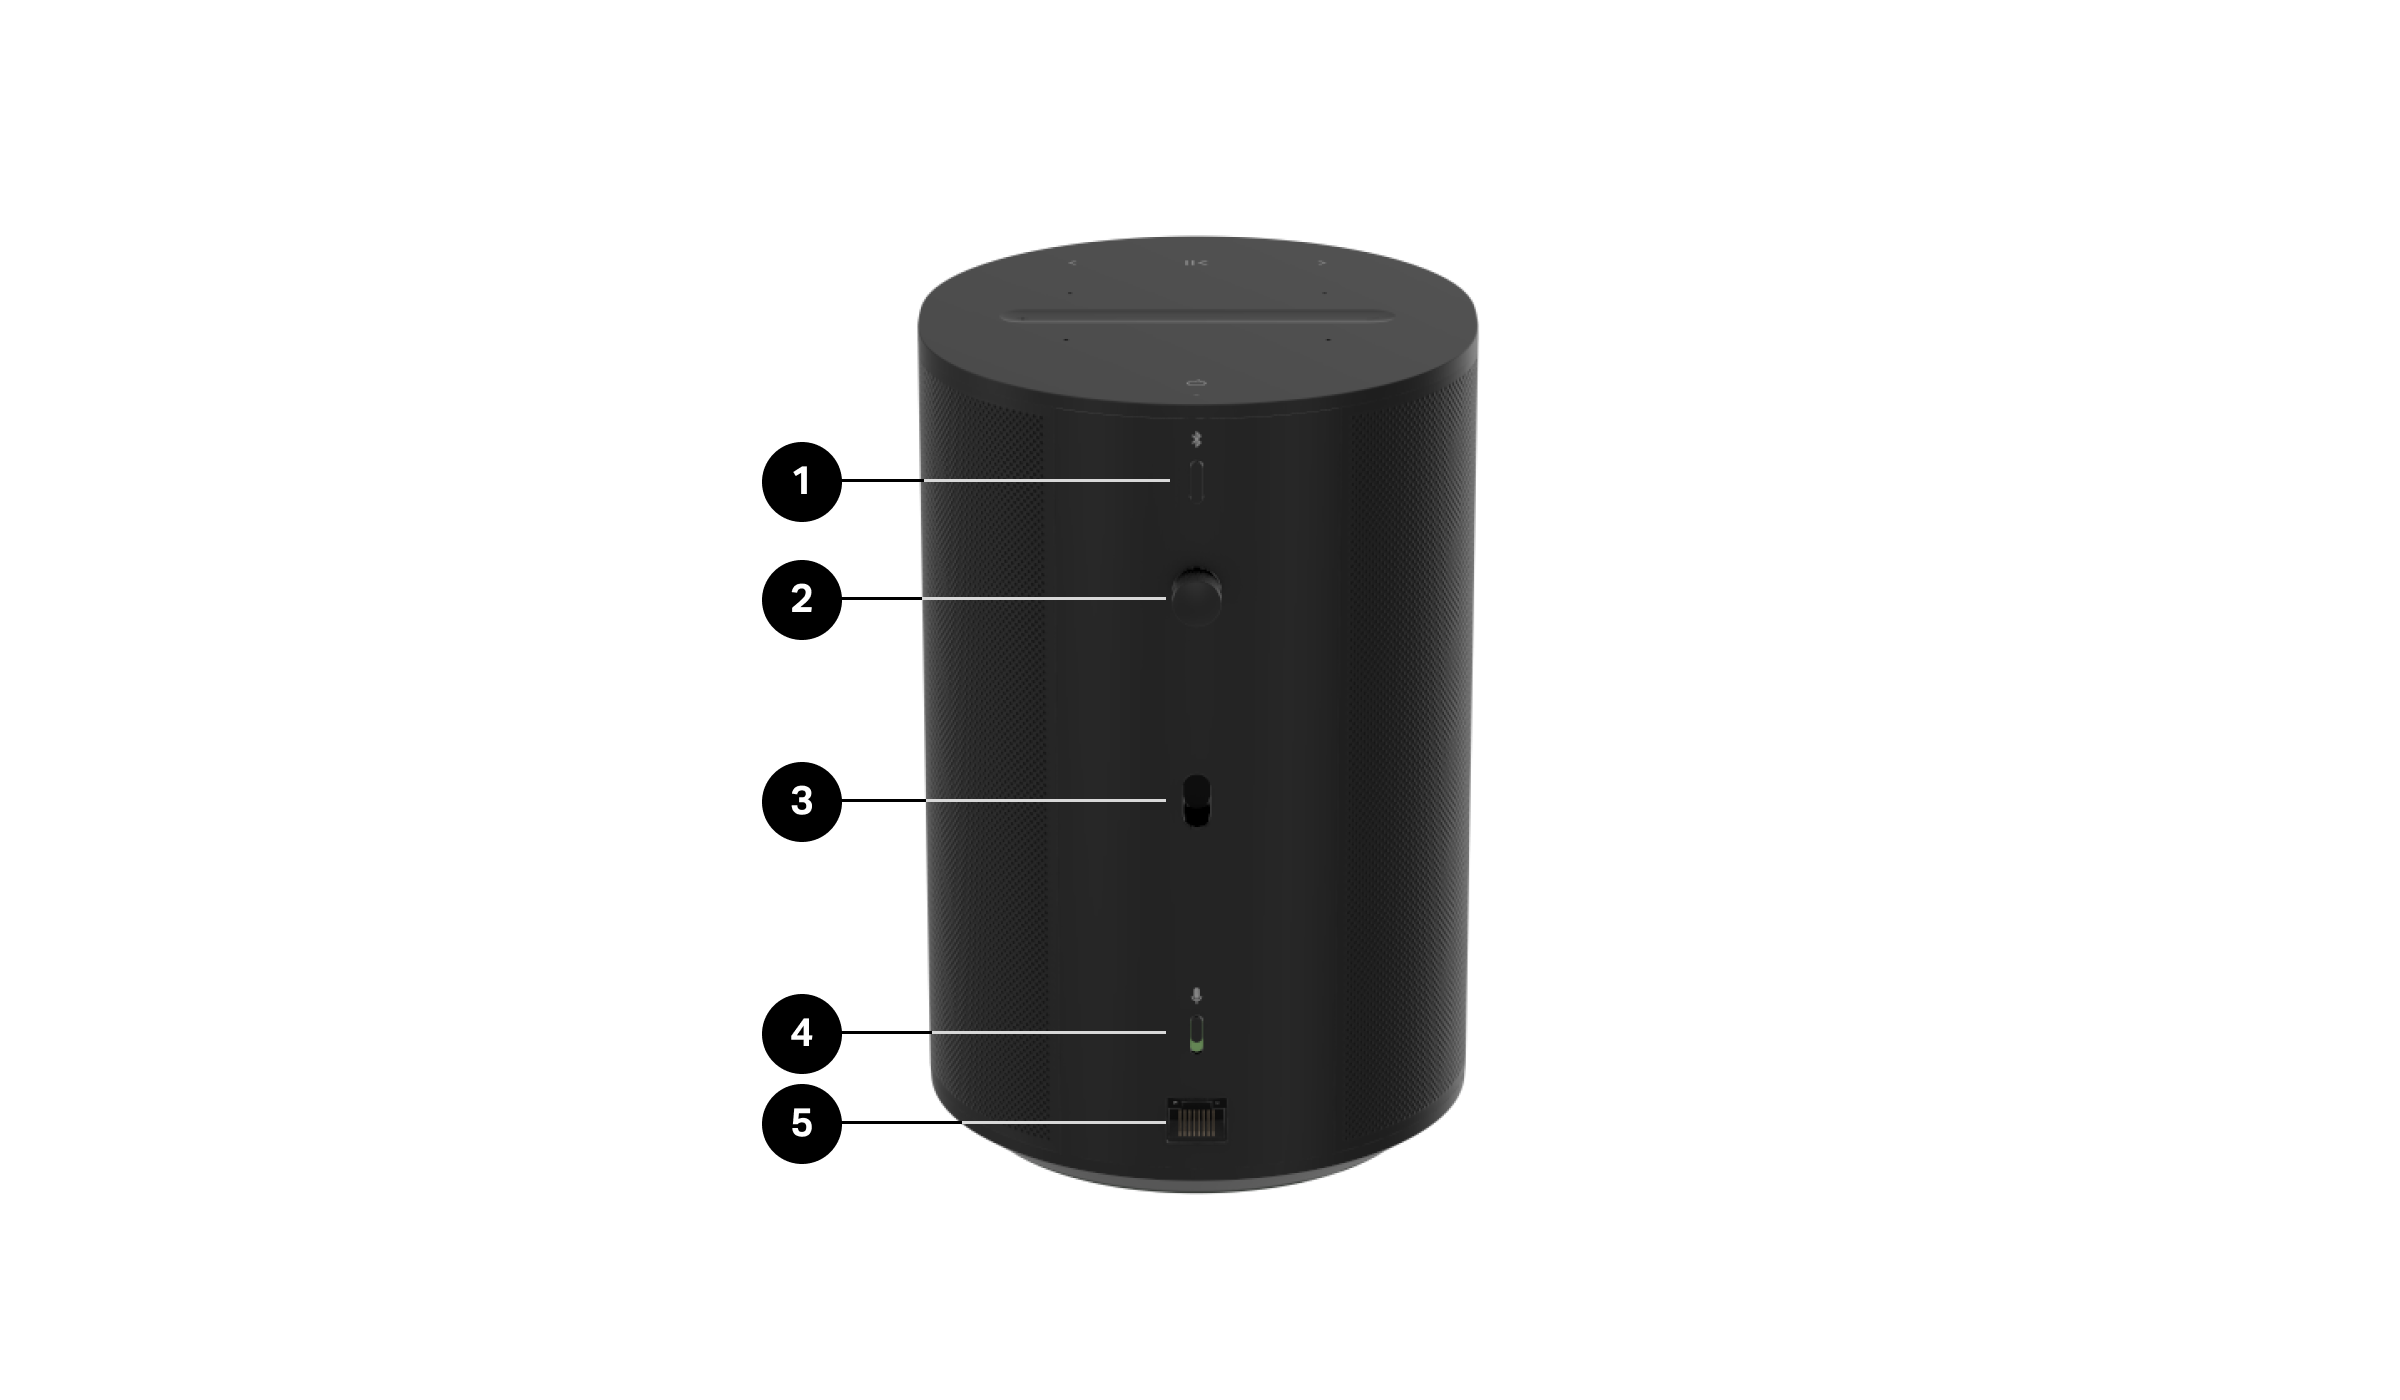
1 | Bluetooth button | Pair a new device
When your Era 100 Pro successfully connects to Bluetooth, the status light will show solid blue. Factory reset
|
2 | Threaded insert and eyebolt | The threaded insert can be used with the optional eyebolt, included with each Era 100 Pro. If building codes on your project require it, insert the eyebolt and use it as a secondary safety attachment point with your preferred safety cable. |
3 | Hook receptacle | Works with Era 100 Pro Surface Mount (sold separately). Provides extra stability in all mounting orientations. Can be removed for compatibility with Era 100. |
4 | Microphone switch | Toggle to turn all product microphones on or off. The switch is in the on position out of the box.
Note: To use voice services, both the microphone switch and the voice services indicator light must be on. |
5 | Network Port | RJ45 ethernet connector with status LEDs. Provides network and power troubleshooting without the Sonos app. Green LED (left)—Indicates network activity. Off = No Network On = Network Active
Off = PoE On = PoE+ |
What's in the box?
- 2 Sonos Era 100 Pro speakers
- 2 eyebolts
- Quickstart Guide and legal/warranty information
Power over Ethernet standards
Era 100 Pro is optimized for PoE+ and compatible with standard (legacy) PoE. Sonos recommends pairing Era 100 Pro with a PoE+ switch or Power Injector for maximum performance.
| PoE Source Type | Era 100 Pro Maximum Consumption |
|---|---|
PoE (802.3af) | 15.4 W |
PoE+ (802.3at) | 30 W |
Important: If connected to a PoE++ power source, Era 100 Pro will negotiate PoE+ class type and consume no more than 30 W.
What do I need?
A Power over Ethernet (PoE or PoE+) switch is the most common way you’ll power your Era 100 Pros. With a PoE switch, you can simply run an Ethernet cable from a PoE+ port on the switch to an Era 100 Pro.
When deciding what switch you’ll use, make sure there are enough PoE ports to power all the speakers in the install. 1 speaker = 1 PoE port.
| Hardware | Description |
|---|---|
Category 5 (CAT5e) cable or better | Any CAT5 or better ethernet cable up to the 328 ft (100 m) maximum distance allowed by the ethernet standards. Sonos recommends CAT6 networking cables for installation. |
Power Sourcing Equipment (PSE) | PoE switchA device that provides power and network connectivity to speakers using Ethernet cables. Era 100 Pro is optimized for PoE+ but can be used with a standard PoE switch. PoE injectorIn limited use cases, a PoE injector can be placed between your standard network switch and the Era 100 Pro that you want to power. It passes through the Ethernet data from the network switch with the addition of power on the speaker. |
PoE budgeting
At a high-level, PoE budgeting is basic math, but it's a crucial part of installing PoE devices. You need to make sure there’s enough power available for all the connected speakers and other PoE devices.
How much power do I need?
The PoE budget is the total amount of power available on the network switch, to power your speakers or other PoE devices.
The PSE you use will have a set amount of power it can provide both overall and per port, depending on the switch you choose.
Important: Switches are often unable to deliver maximum PoE power on all switch ports simultaneously.
To calculate the budget, consider the PoE switch as a whole, the ports available, and the devices you want powered when they connect to your PSE.
Unlike typical PoE devices (cameras, IP phones, control interfaces) that draw a static amount of power at all times, PoE speakers present a dynamic load to the power source and will draw more power at higher volume levels.
For the purposes of your system maximum power consumption, remember that:
- Era 100 Pro max consumption on PoE+ = 30 W
- Era 100 Pro max consumption on PoE = 15.4 W
Multiply the number of Era 100 Pro speakers you have by the power they each need (30 W each for PoE+, 15.4 W each for PoE). Then, multiply the total power needed by the industry standard headroom of 20% (1.2x).
Example:
8 Era 100 Pros x 30 W = 240 W of power needed
240 W total power x 1.2 (headroom) = 288 W total power recommended
Adding the 20% for headroom is an industry best practice and ensures that the switch is not operating at its own maximum capacity. If improper budgeting occurs and the connected products try to draw more power than available, the switch may shut down and disconnect all devices attached, possibly bringing down the network with it.
Important: If you're adding other PoE devices (security cameras, doorbells, intercoms, lighting, etc.) in addition to your Era 100 Pro(s), these also need to be accounted for in your PoE budgeting calculations.
Choosing a switch
Sonos Era 100 Pro is optimized for PoE+ (IEEE 802.3at), compatible with PoE (IEEE 802.3af), and has been tested to standards defined by the Ethernet Alliance.
The power sourcing equipment (PSE) must be compatible with one of those IEEE standards. For a list of equipment that has been verified by the Ethernet Alliance, please visit their certified products list: https://ea-poe-cert.iol.unh.edu/
Before selecting a switch, consider how many networked devices on the system will require PoE power, how much power they draw, as well as the power budget available on the switch(es) you’re considering.
Connecting to a WiFi network
Era 100 Pro can also use WiFi to connect to the network when a wired connection from a PoE switch is not possible (materials, distance, etc).
This can be done with the use of a PoE injector (the injector will provide power, not data).
Using this feature will require the Era 100 Pro to be connected to the SSID of the wireless access point. If there is another wireless Sonos device already on the network, Era 100 Pro will automatically receive the wireless network credentials and password. If there is not already another Sonos device connected to the wireless network, you will need to perform the initial Era 100 Pro setup with a wireless connection to the network.
PoE nuances and settings
| Passive PoE | Power management modes |
|---|---|
Passive PoE is not ratified by the IEEE and therefore it’s not a standard. Passive PoE does not include a digital “handshake” or safety check when devices are connected together, which can cause a passive PoE switch to overload an IEEE PoE device. Passive PoE is normally used in closed systems where the hardware vendor supplies both the PSE and the connected devices, with certainty that nothing else will be used on that network. There are no standards defining the maximum voltage, current, or power that can be delivered by passive PoE equipment, so it’s very easy to damage PoE devices that are not specifically designed for passive PoE. Don’t use a passive PoE switch or power injector with Era 100 Pro. | Some PoE switches allow the user to reserve power for some, or all, network switch ports. Power management modes that might be present on your PSE include:
Era 100 Pro supports all of the above modes. |
Networking
Era 100 Pro requires an internet connection on either its wired or wireless network interfaces for setup, media streaming, and management (like with our Sonos Pro service, currently only available in the US).
Era 100 Pro is the first Sonos product that does not use spanning tree protocol (STP) in either wired or wireless modes.
The Era 100 Pro wireless network interface is disabled whenever a valid network link is detected on the wired ethernet interface. To enable wireless networking, provide power but no network link on the wired ethernet connection. This can be achieved by using the power output of a PoE Injector, without connecting the PoE Injector data source to a network switch.
Placement
Era 100 Pro sounds great no matter where you place it (indoor use only). Here are some guidelines to get you started:
- Era 100 Pro automatically selects an optimized DSP configuration when mounted in portrait, landscape, or ceiling (pointing downward) orientations.
- If you're using Era 100 Pro speakers as surrounds, leave at least 8" (203 mm) clearance around the front of each speaker.
- When using Era 100 Pro as standalone speakers or stereo pairs (not zones), you can further fine-tune the sound with Trueplay tuning in the Sonos app. This technology uses the mics in the speaker or your iOS device to measure acoustic reflections then optimizes the sound.
Era 100 Pro Surface Mount
Era 100 Pro is mountable on virtually any surface including concrete, brick, masonry, or wood.
- Includes an indexed ball joint for secure, fast, and repeatable device articulation.
- Incorporates theft deterrence and cable management to deliver a secure, clean, and premium aesthetic.
- Mounts on virtually any surface, in any direction or orientation.
- Offers easy access to the RJ45 port, buttons, and touch controls.
What's in the box?
Each custom-designed Era 100 Pro Surface Mount package includes:
- 2 surface mounts
- 2 surface brackets
- 2 short speaker mount screws
Note: Era 100 Pro sold separately.
Era 100 Pro is mountable on virtually any surface including concrete, brick, masonry, or wood.
1 | PlacementWhen used in conjunction with the Surface Mount, the Era 100 Pro can be mounted in virtually any orientation, on both walls and ceilings.  | 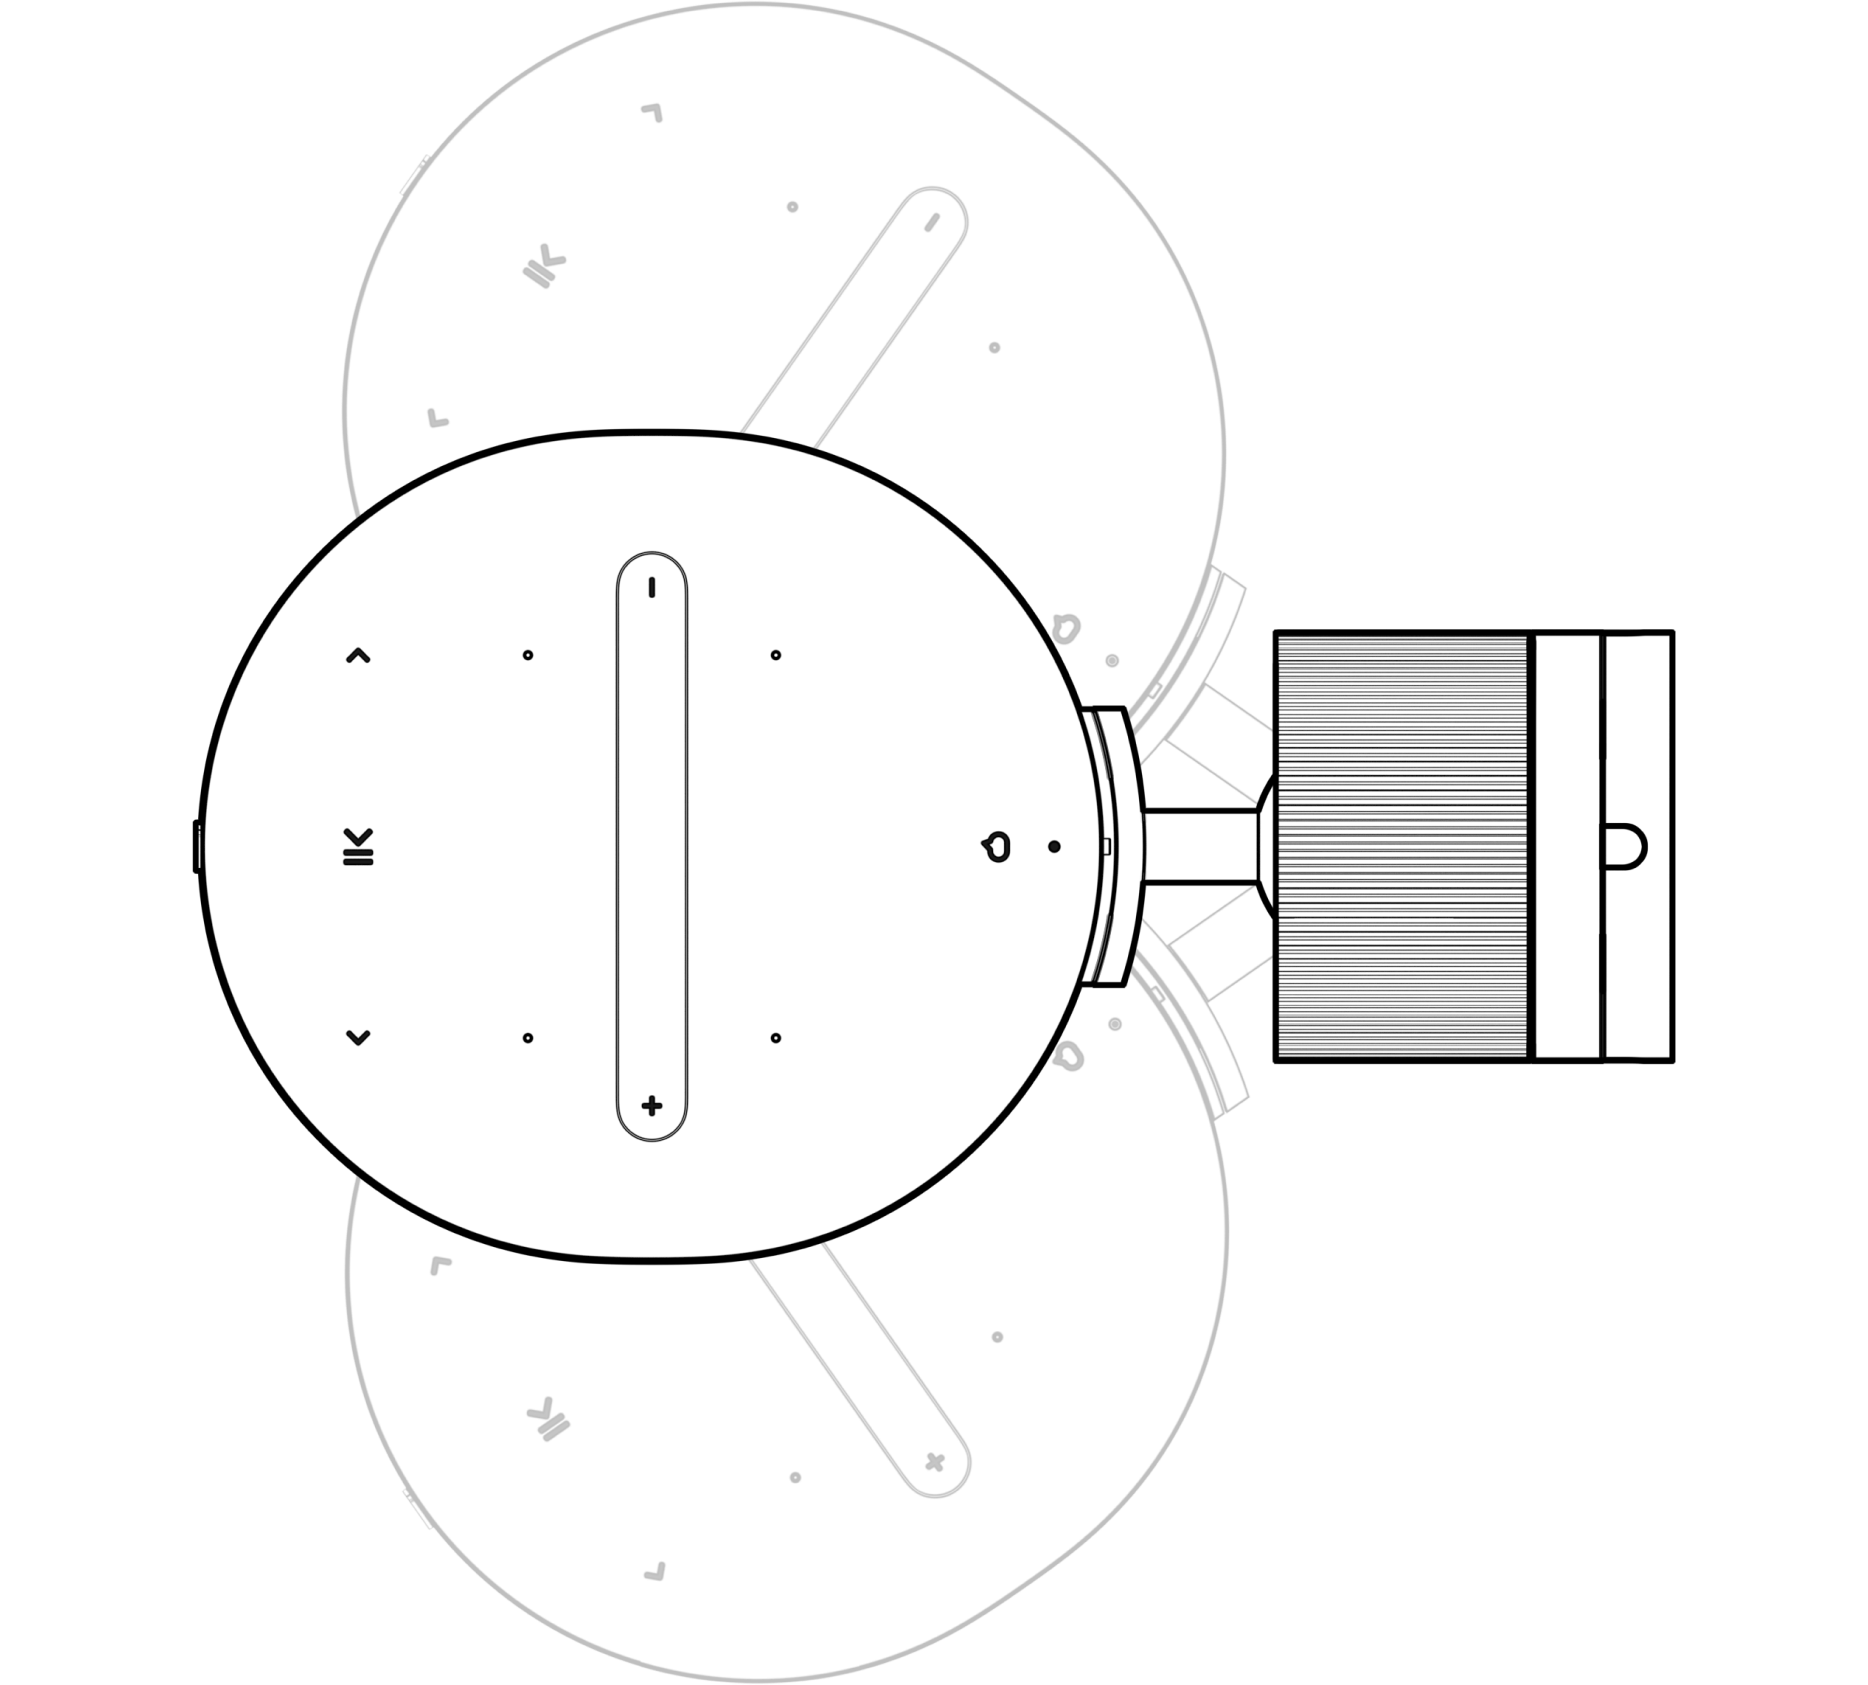 |
2 | Cable routingThe bracket enables cables to come through a surface and into the center of the bracket, or pass through the bracket along the surface if you are not able to drill holes. Through bracket cable management |  Through wall cable management |
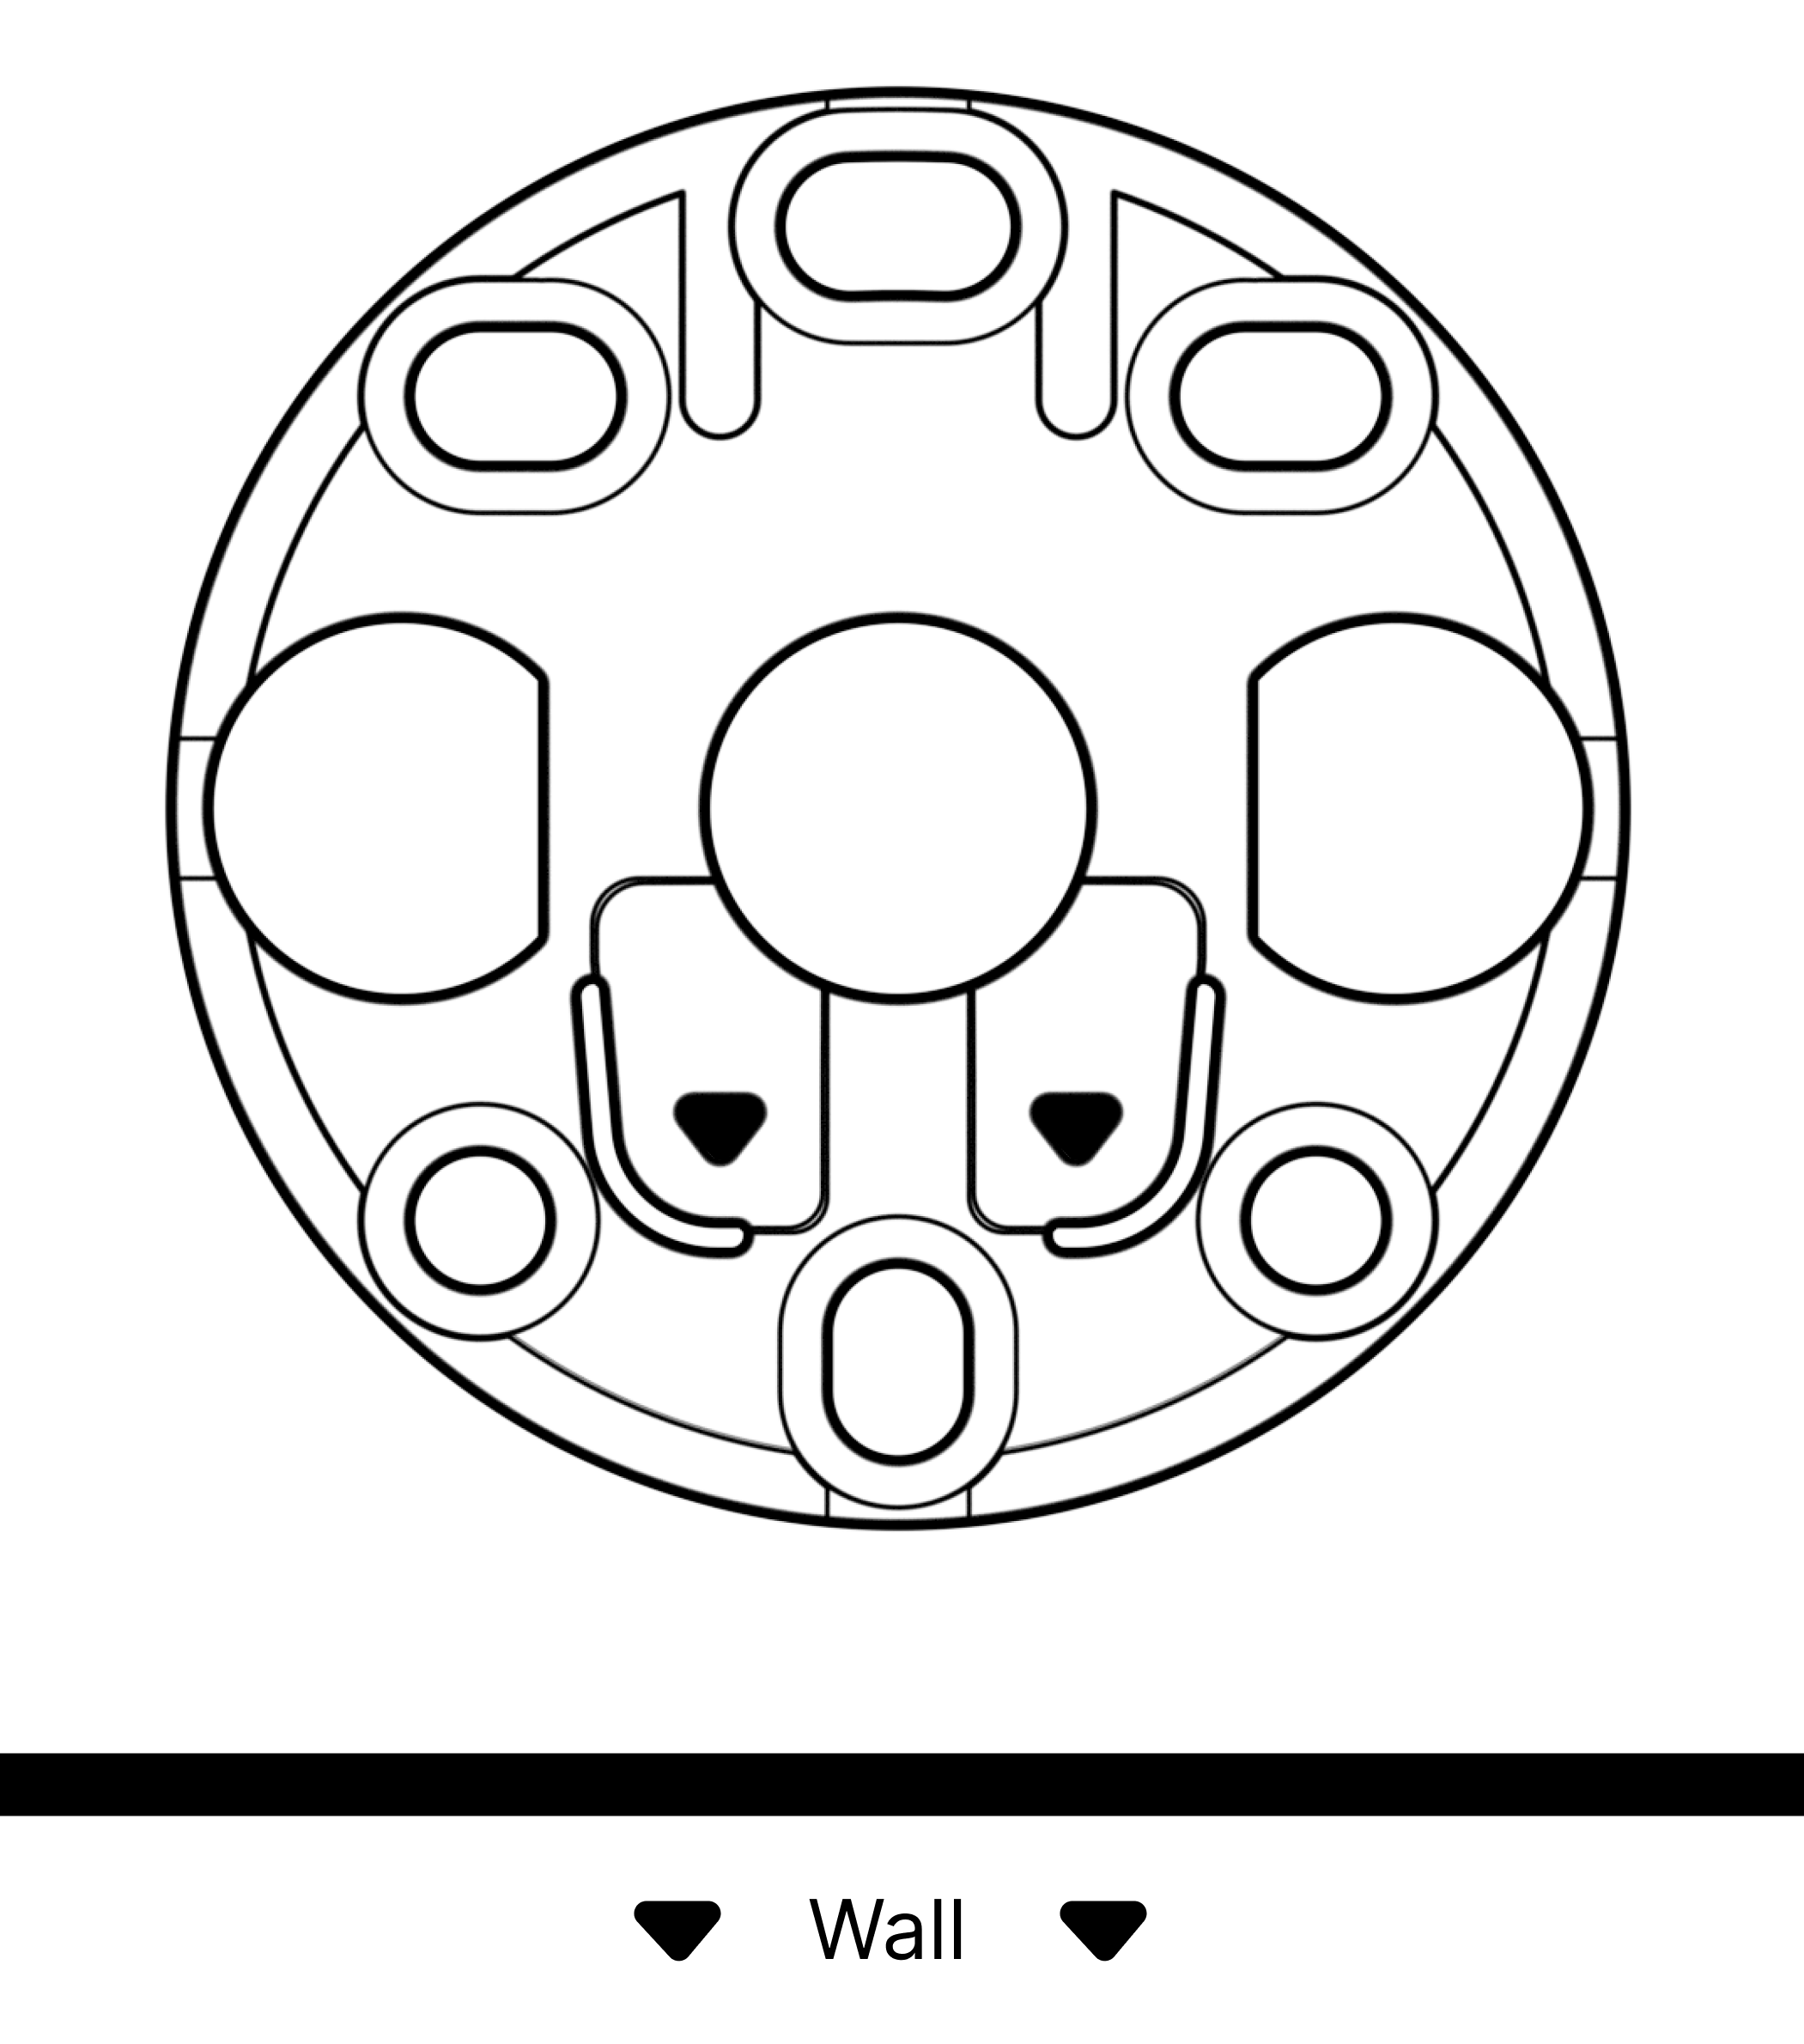
3 | BracketThe bracket allows for multiple hardware and hole configurations, depending on the surface you are mounting into. We recommend a minimum of 2 mounting points. Recommended hardware: Screw head: Countersunk / Flathead Max Ø = 9.5 mm Min Ø = 7 mm Screw diameter: Max Ø = 5 mm | 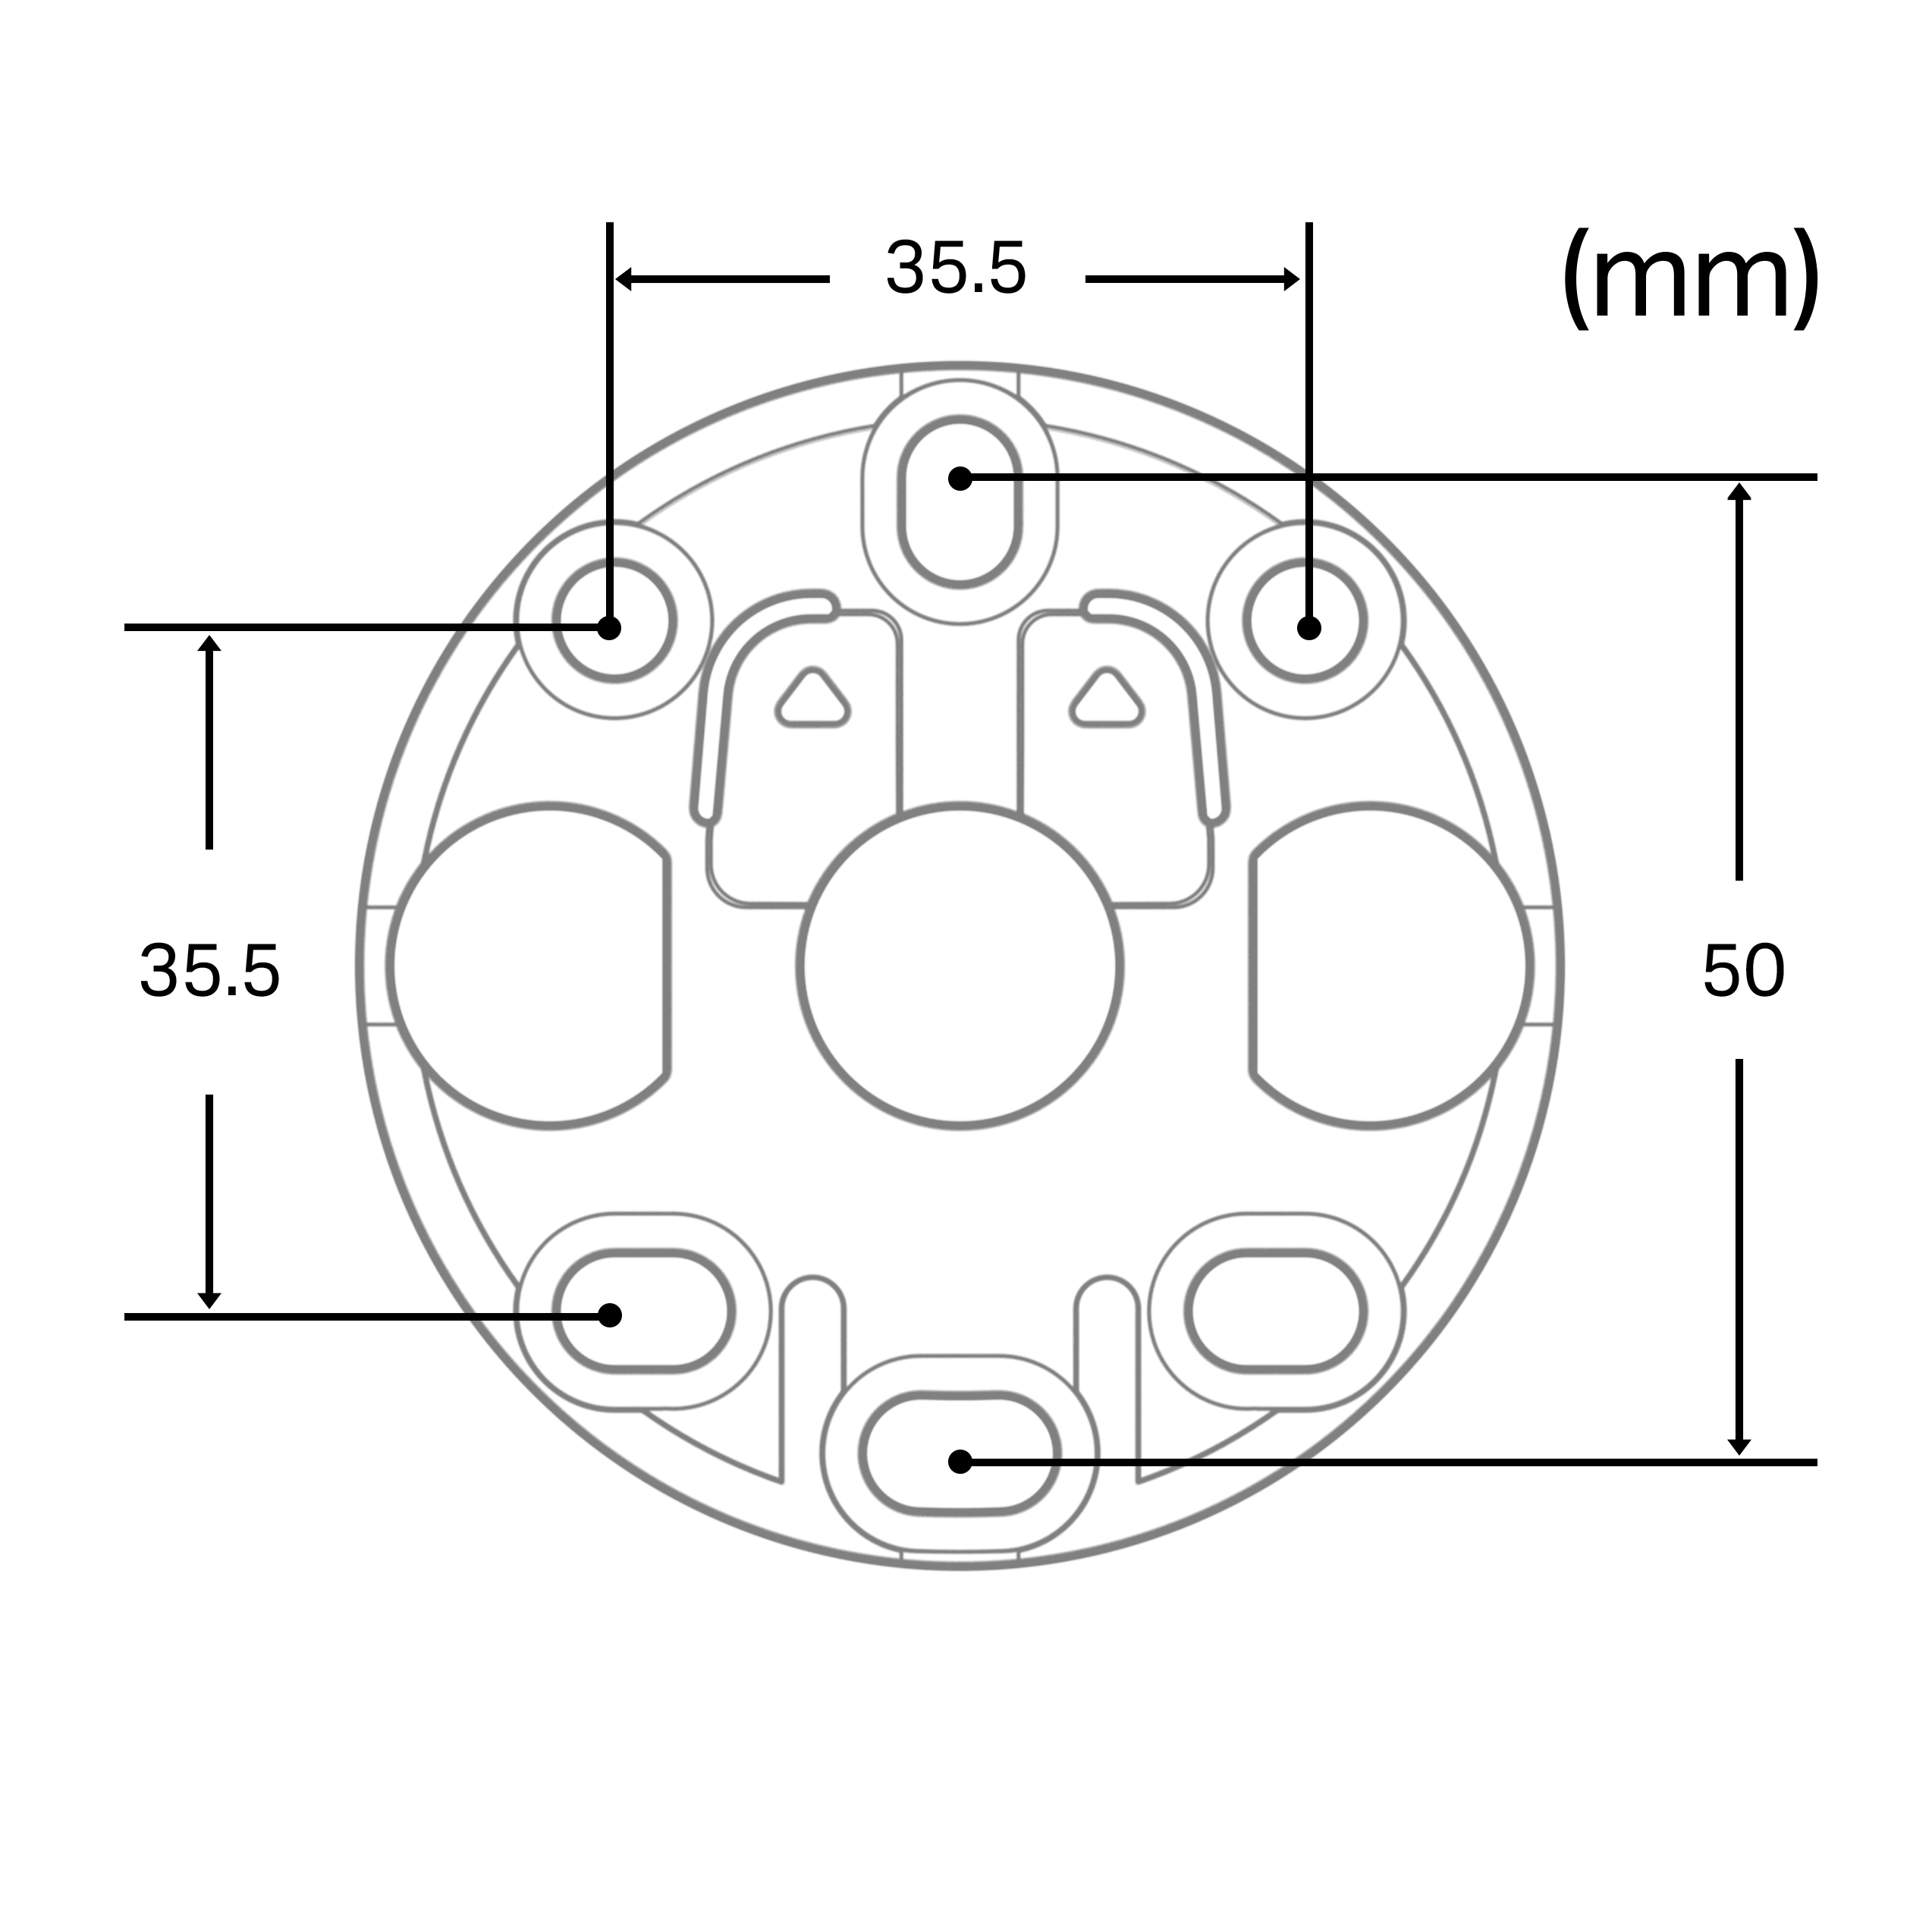 |
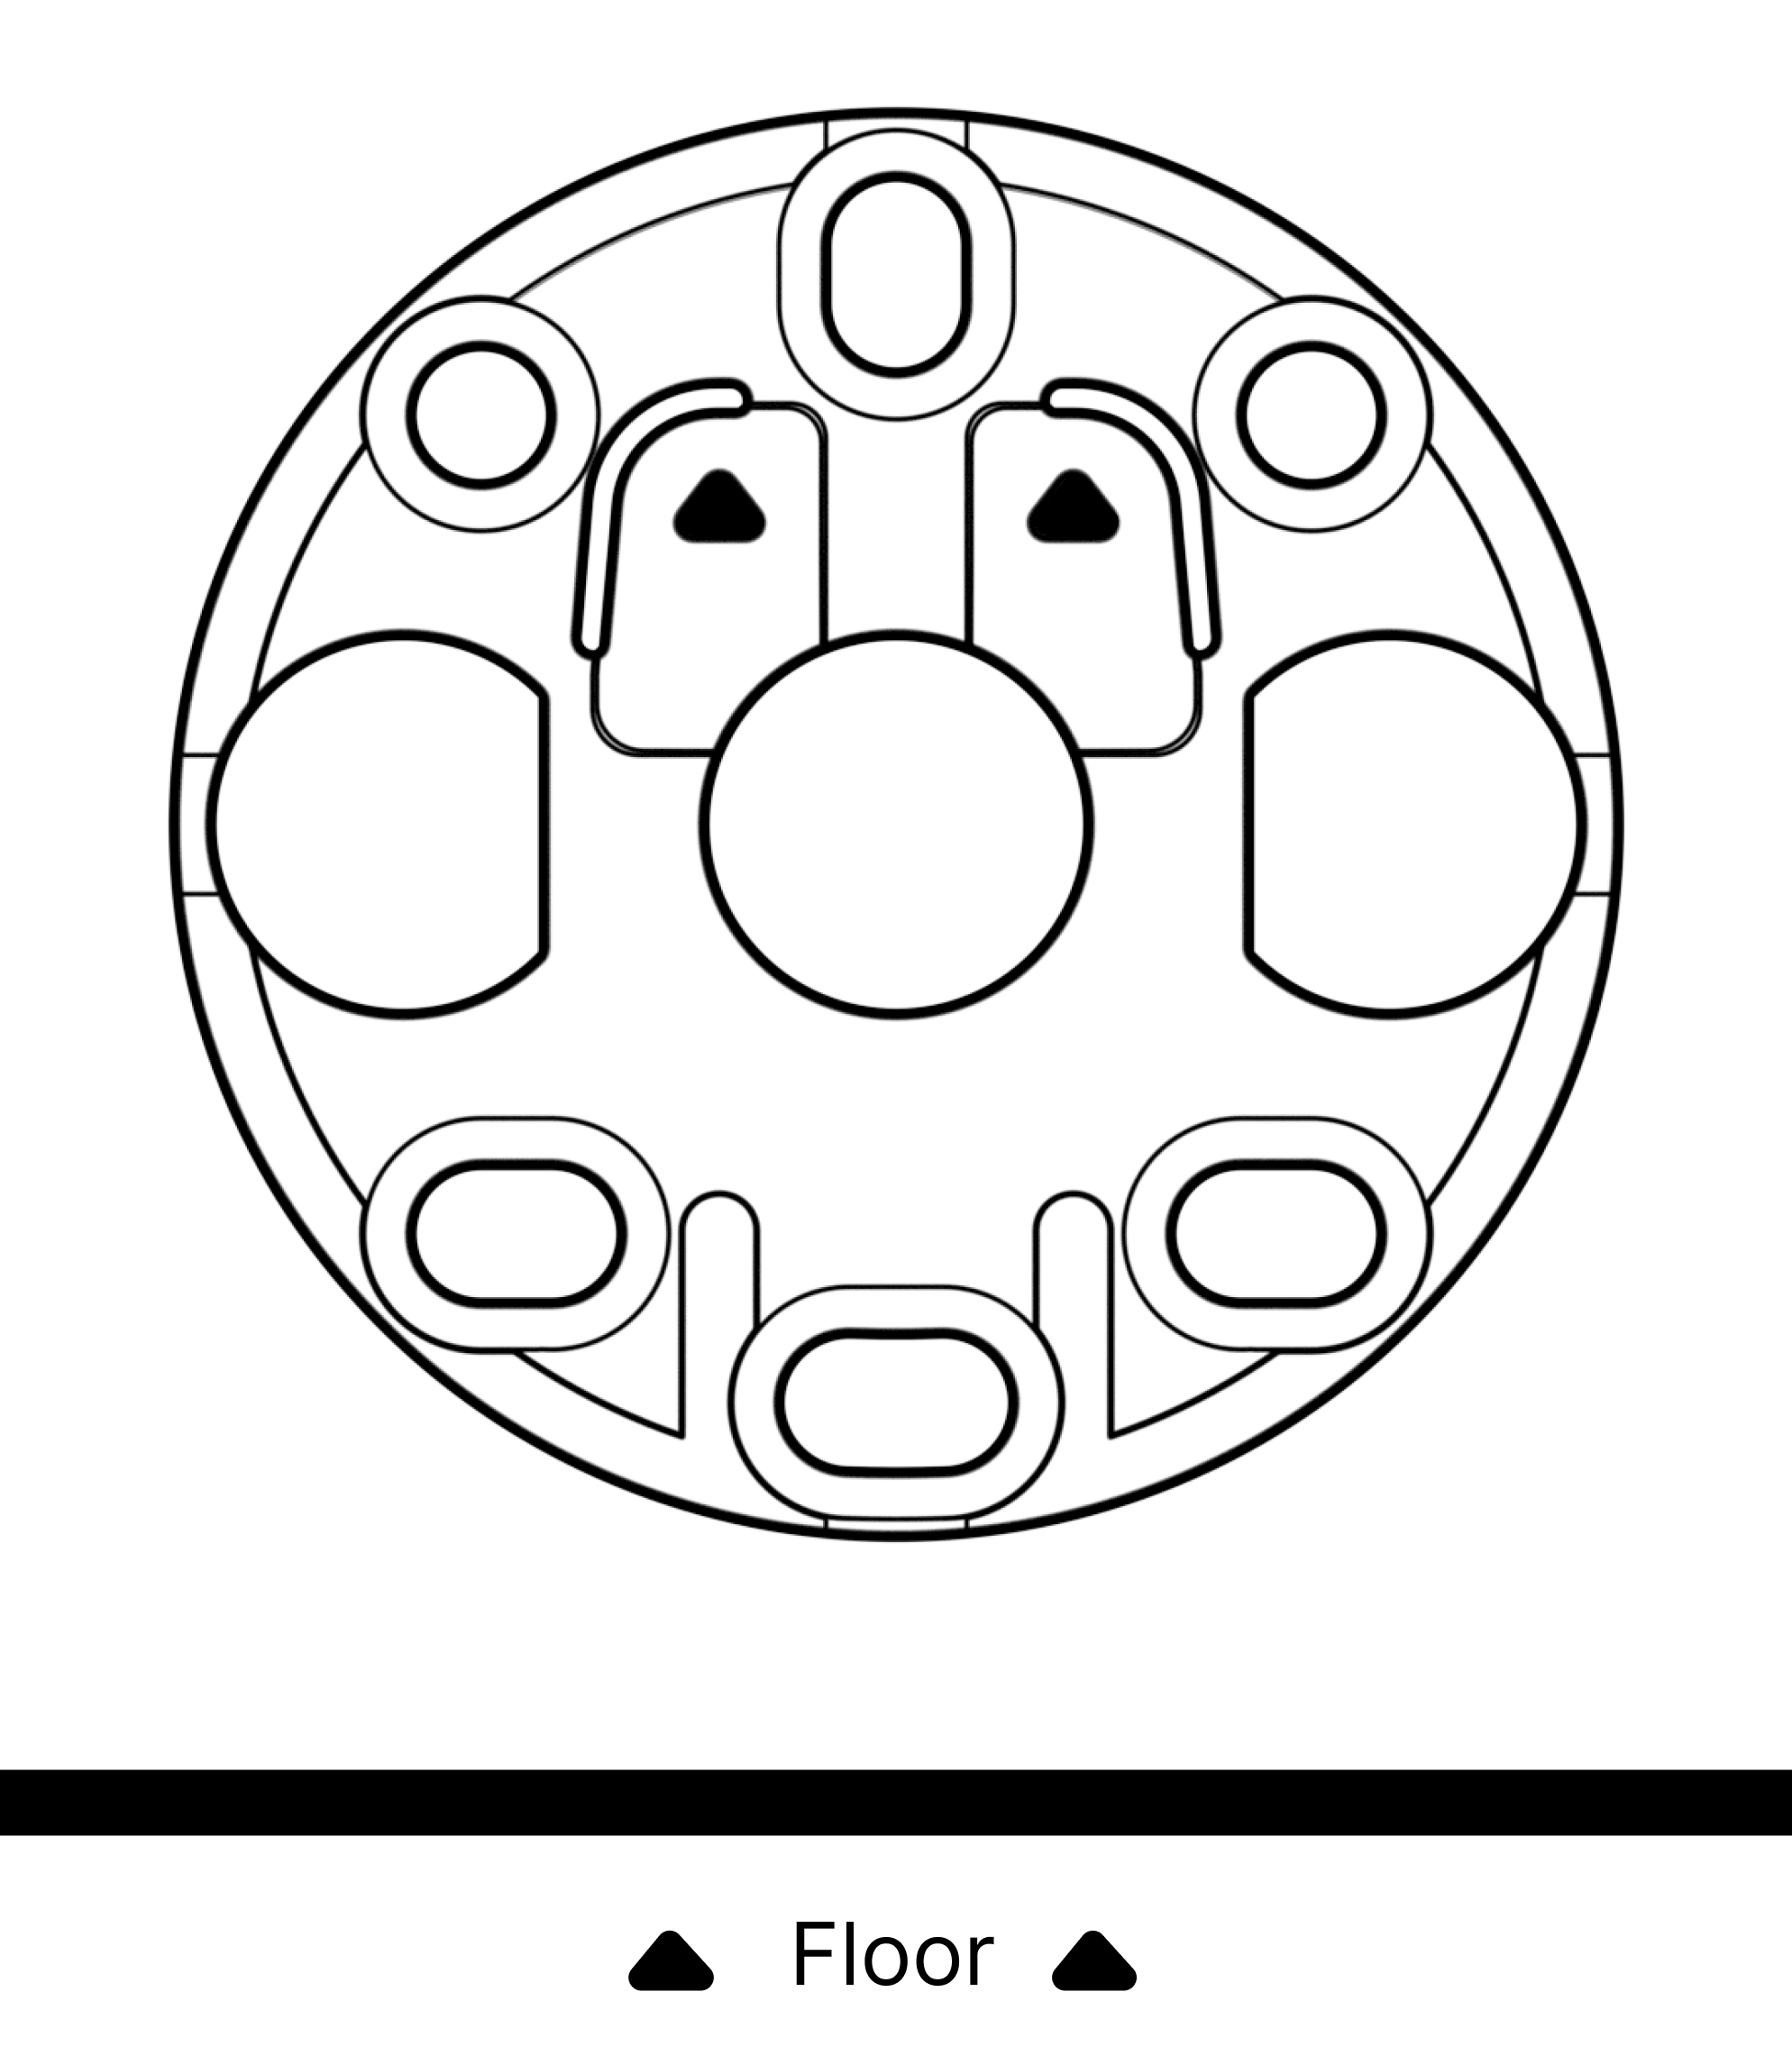
4 | Mounting on wallsWhen mounting on a wall, make sure the bracket is oriented with the arrows pointing up. Double-check the spacing to ensure the speaker will fit in your desired orientation.
|  |
5 | Mounting on ceilingsWhen mounting on a ceiling, make sure the bracket is oriented with the arrows pointing towards the closest wall. Double check the spacing to ensure the speaker will fit in your desired orientation.
|  |
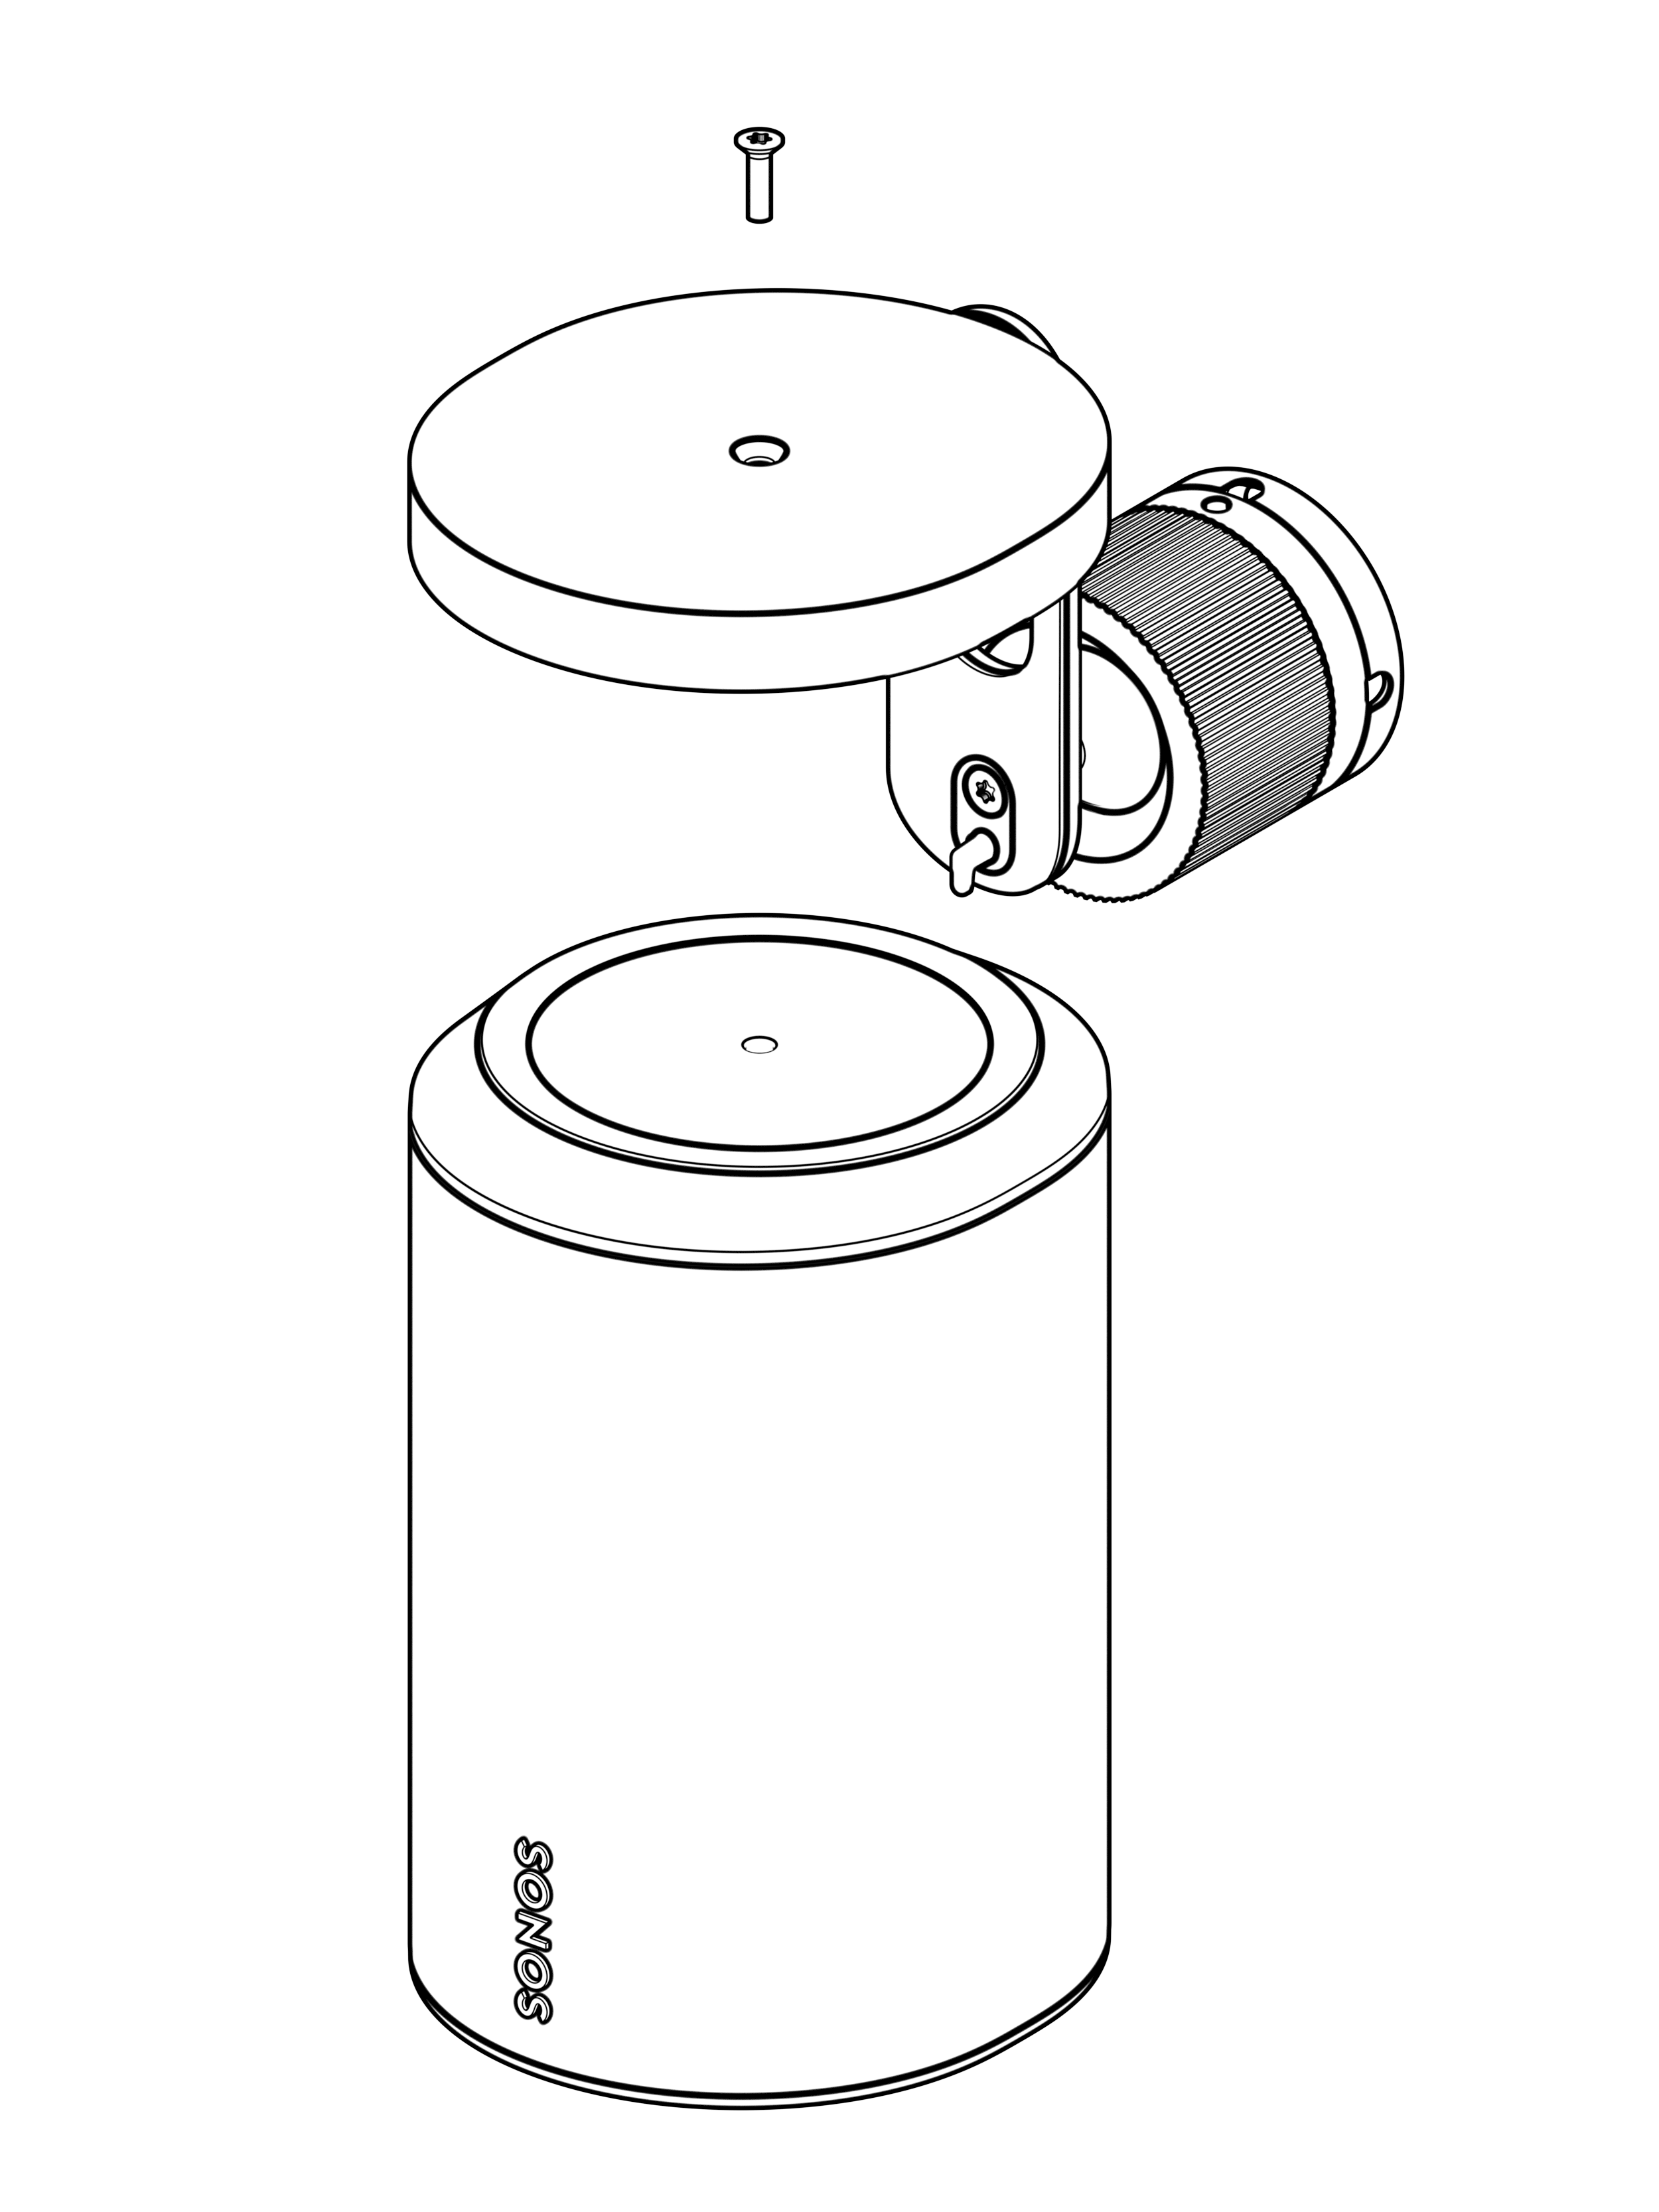
6 | Attaching the speakerRotate the speaker so the screw hole is facing up. Attach the speaker to the mount using 1 short speaker mount screw (included). We recommend attaching Era 100 Pro to the mount first, before attaching the mount to the bracket. For two reasons:
|  |
7 | Attaching the surface mountAlign the mount with the bracket keyhole slot, then slide the mount down to lock it into place. When correctly mounted, you will hear a click. This click is the theft prevention lock. Make sure the mount and speaker are securely seated and the theft prevention lock is engaged. | 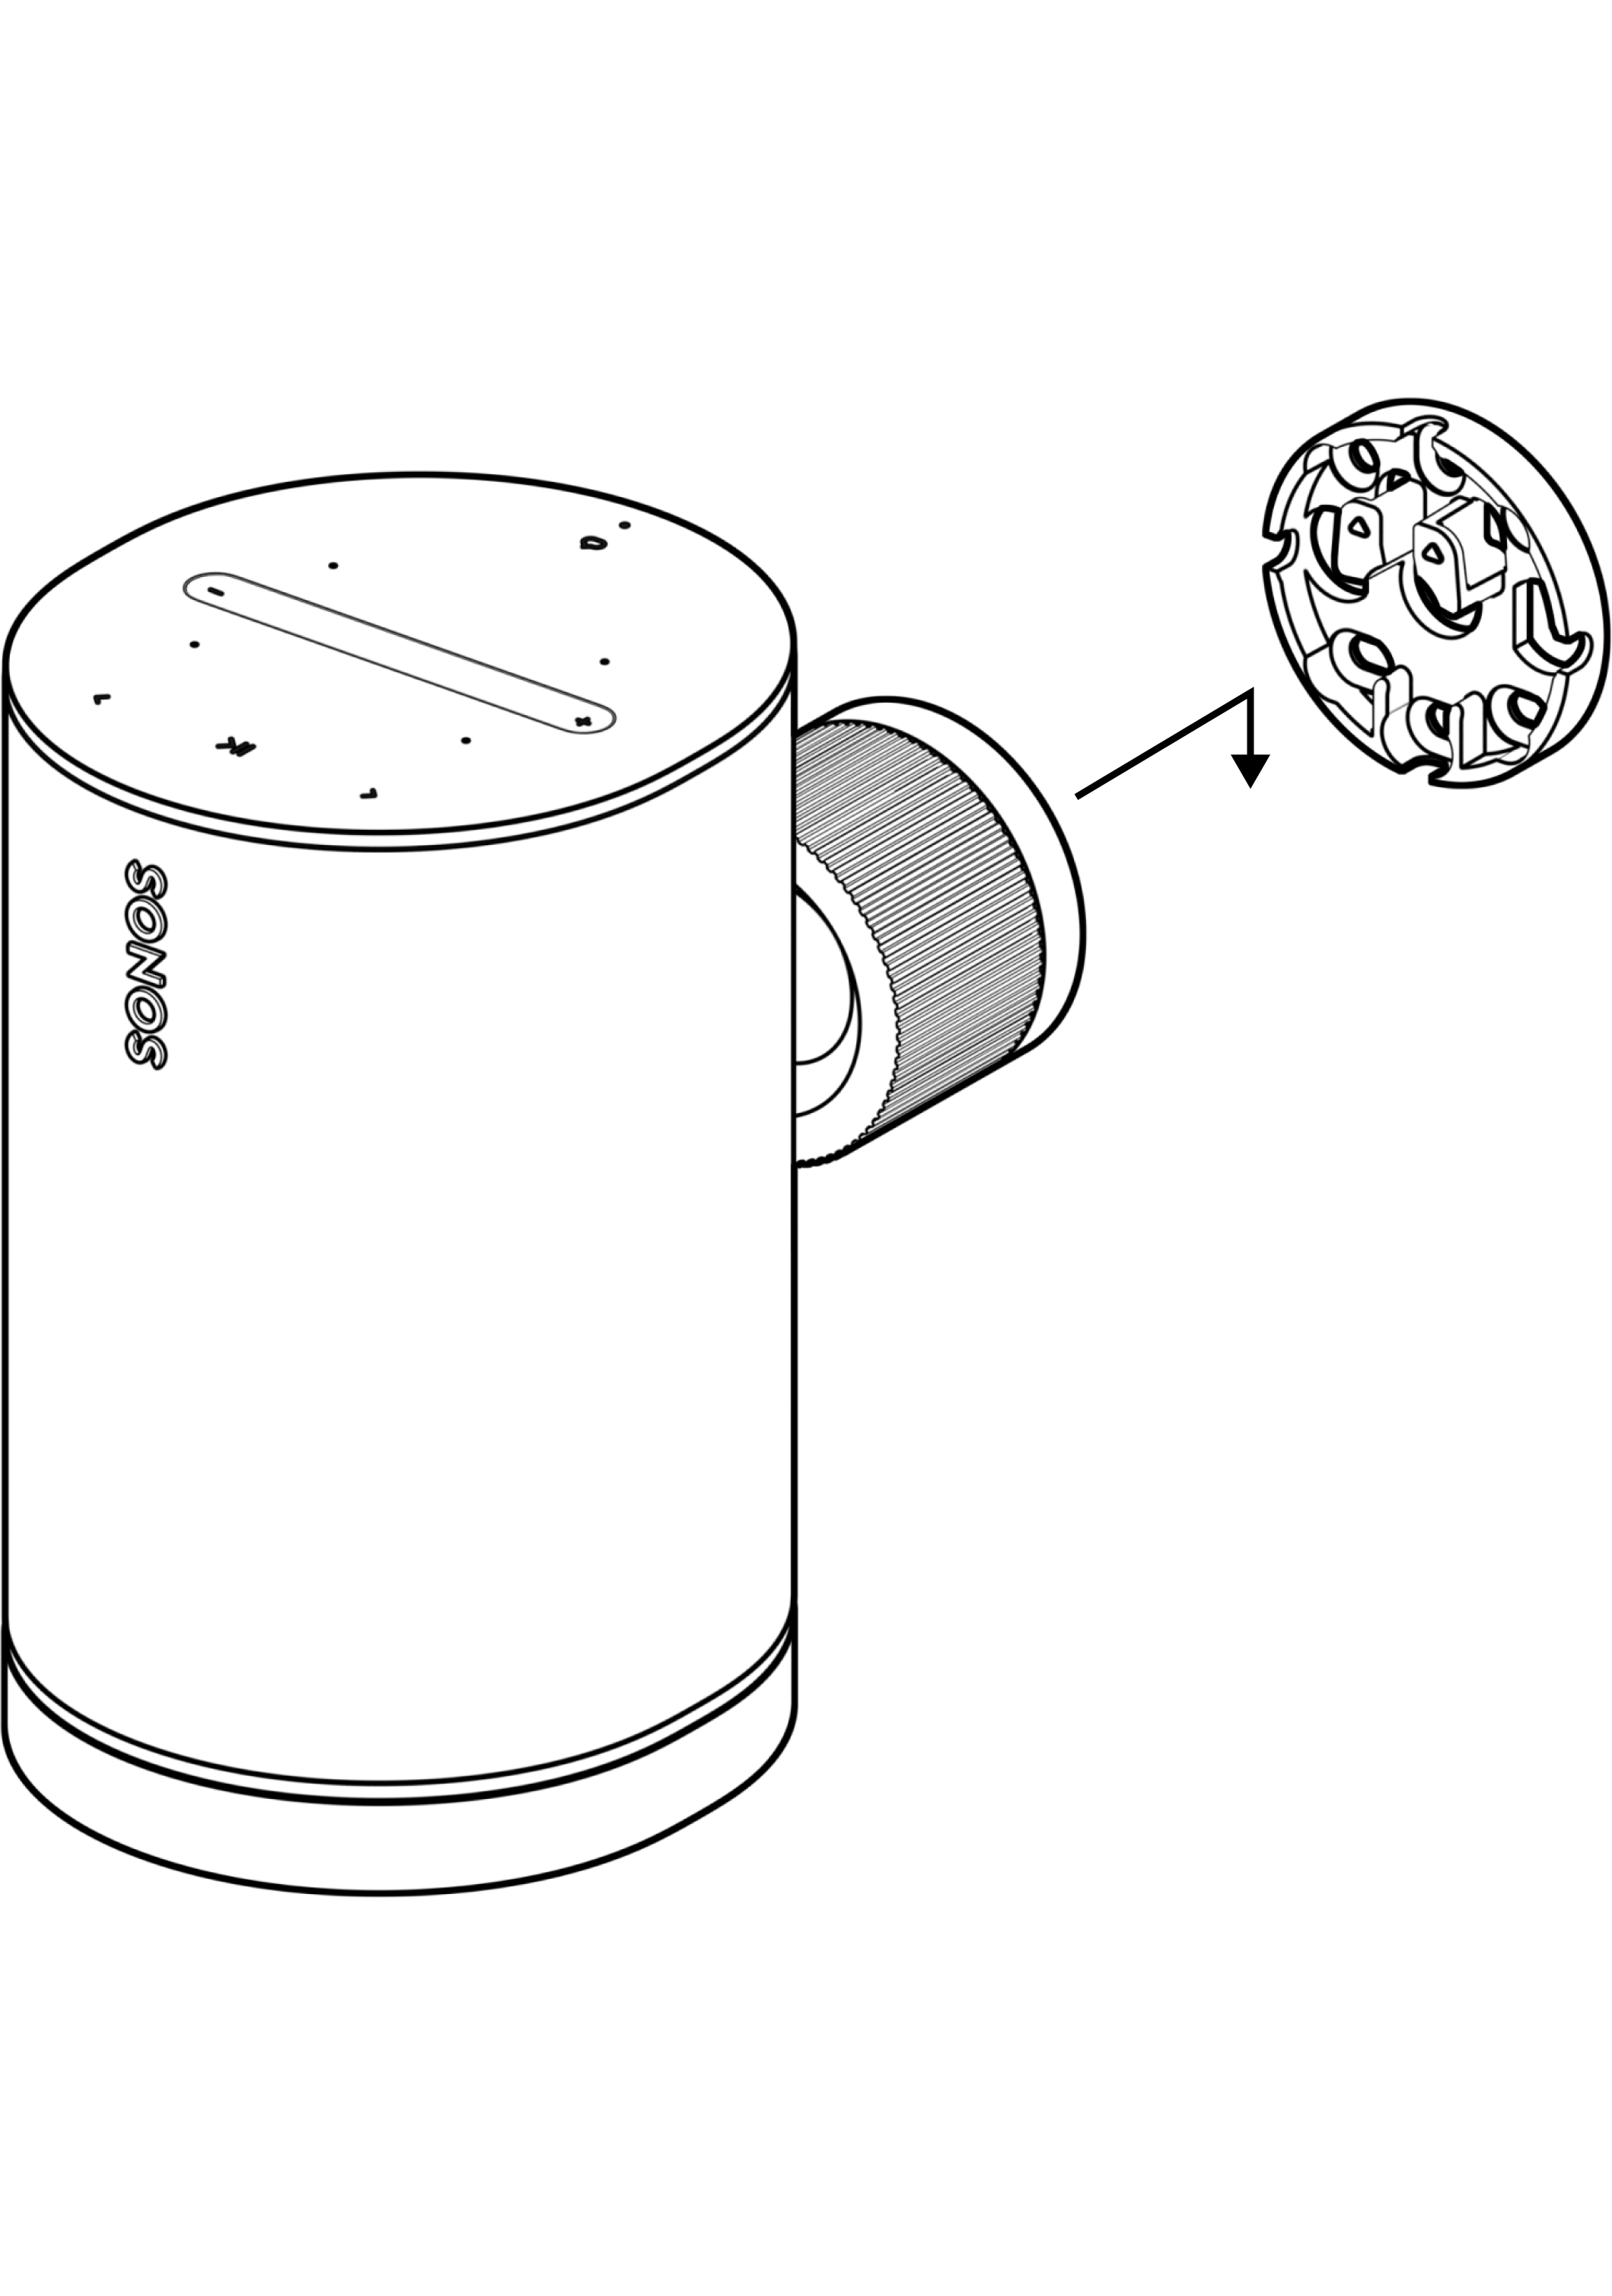 |
8 | ArticulationTo adjust its articulation, unlock the mount by rotating the collar counterclockwise. Reposition the speaker, then rotate the collar clockwise, and tighten by hand. 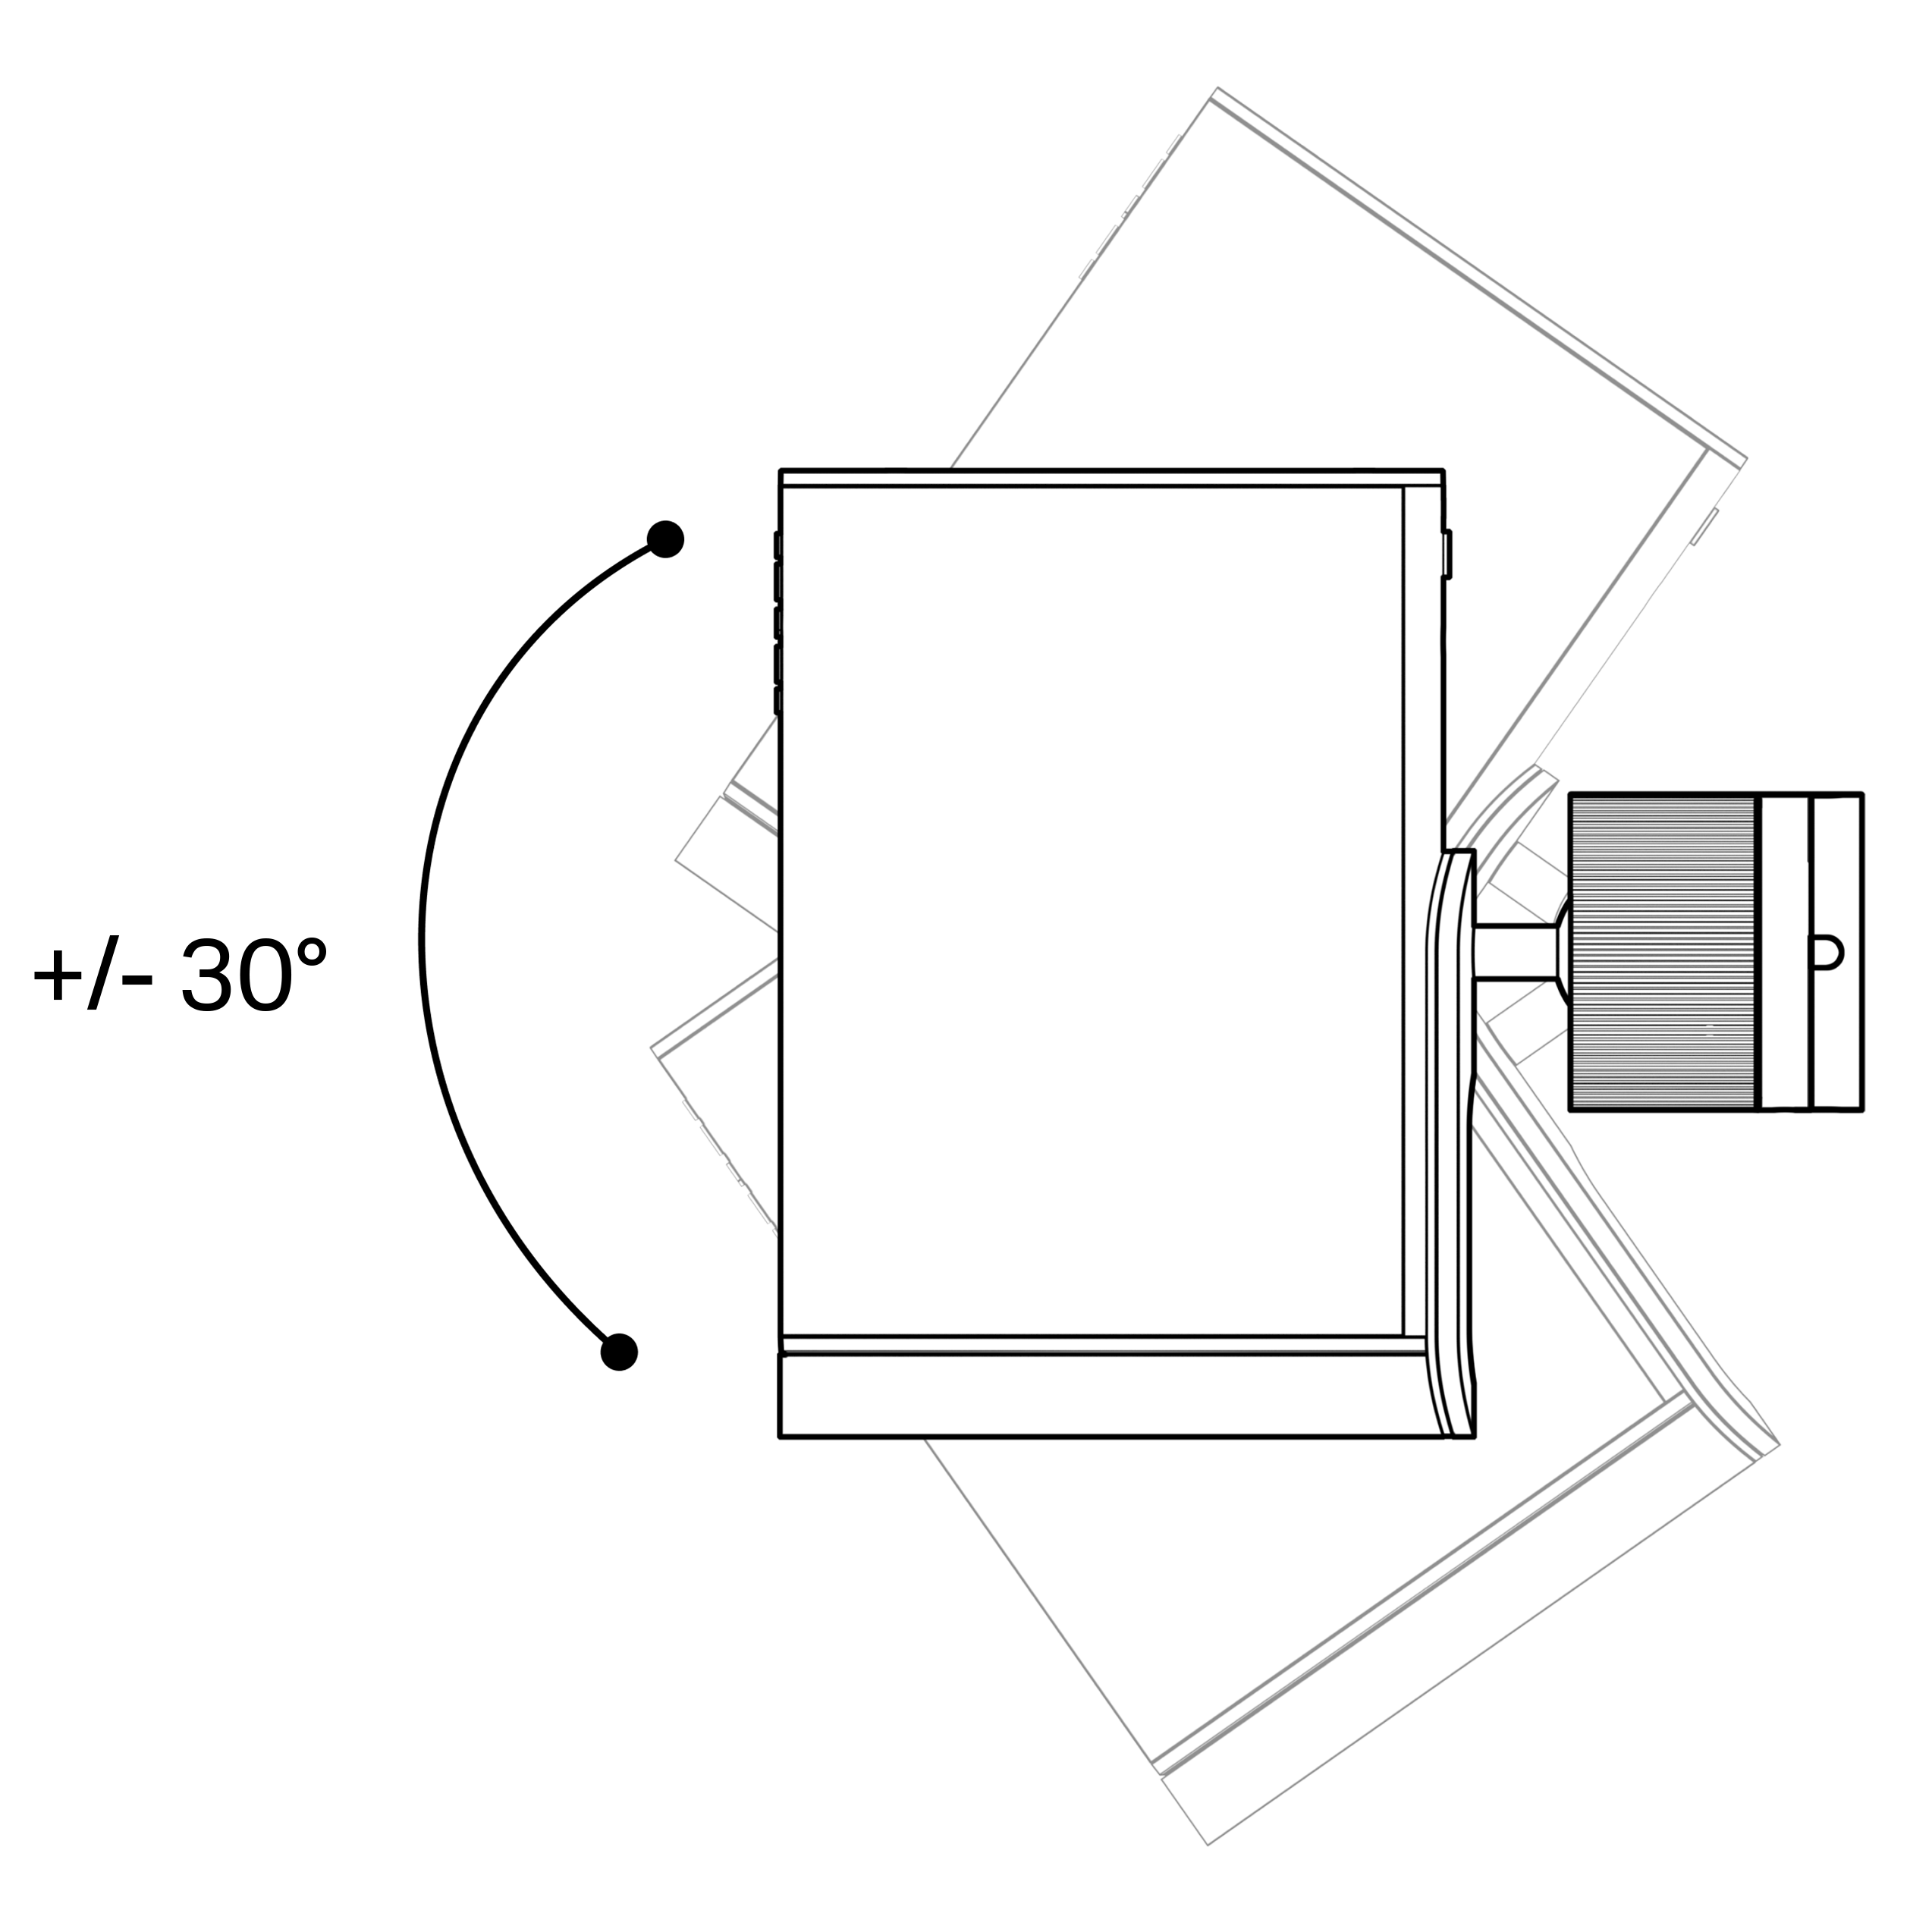 | 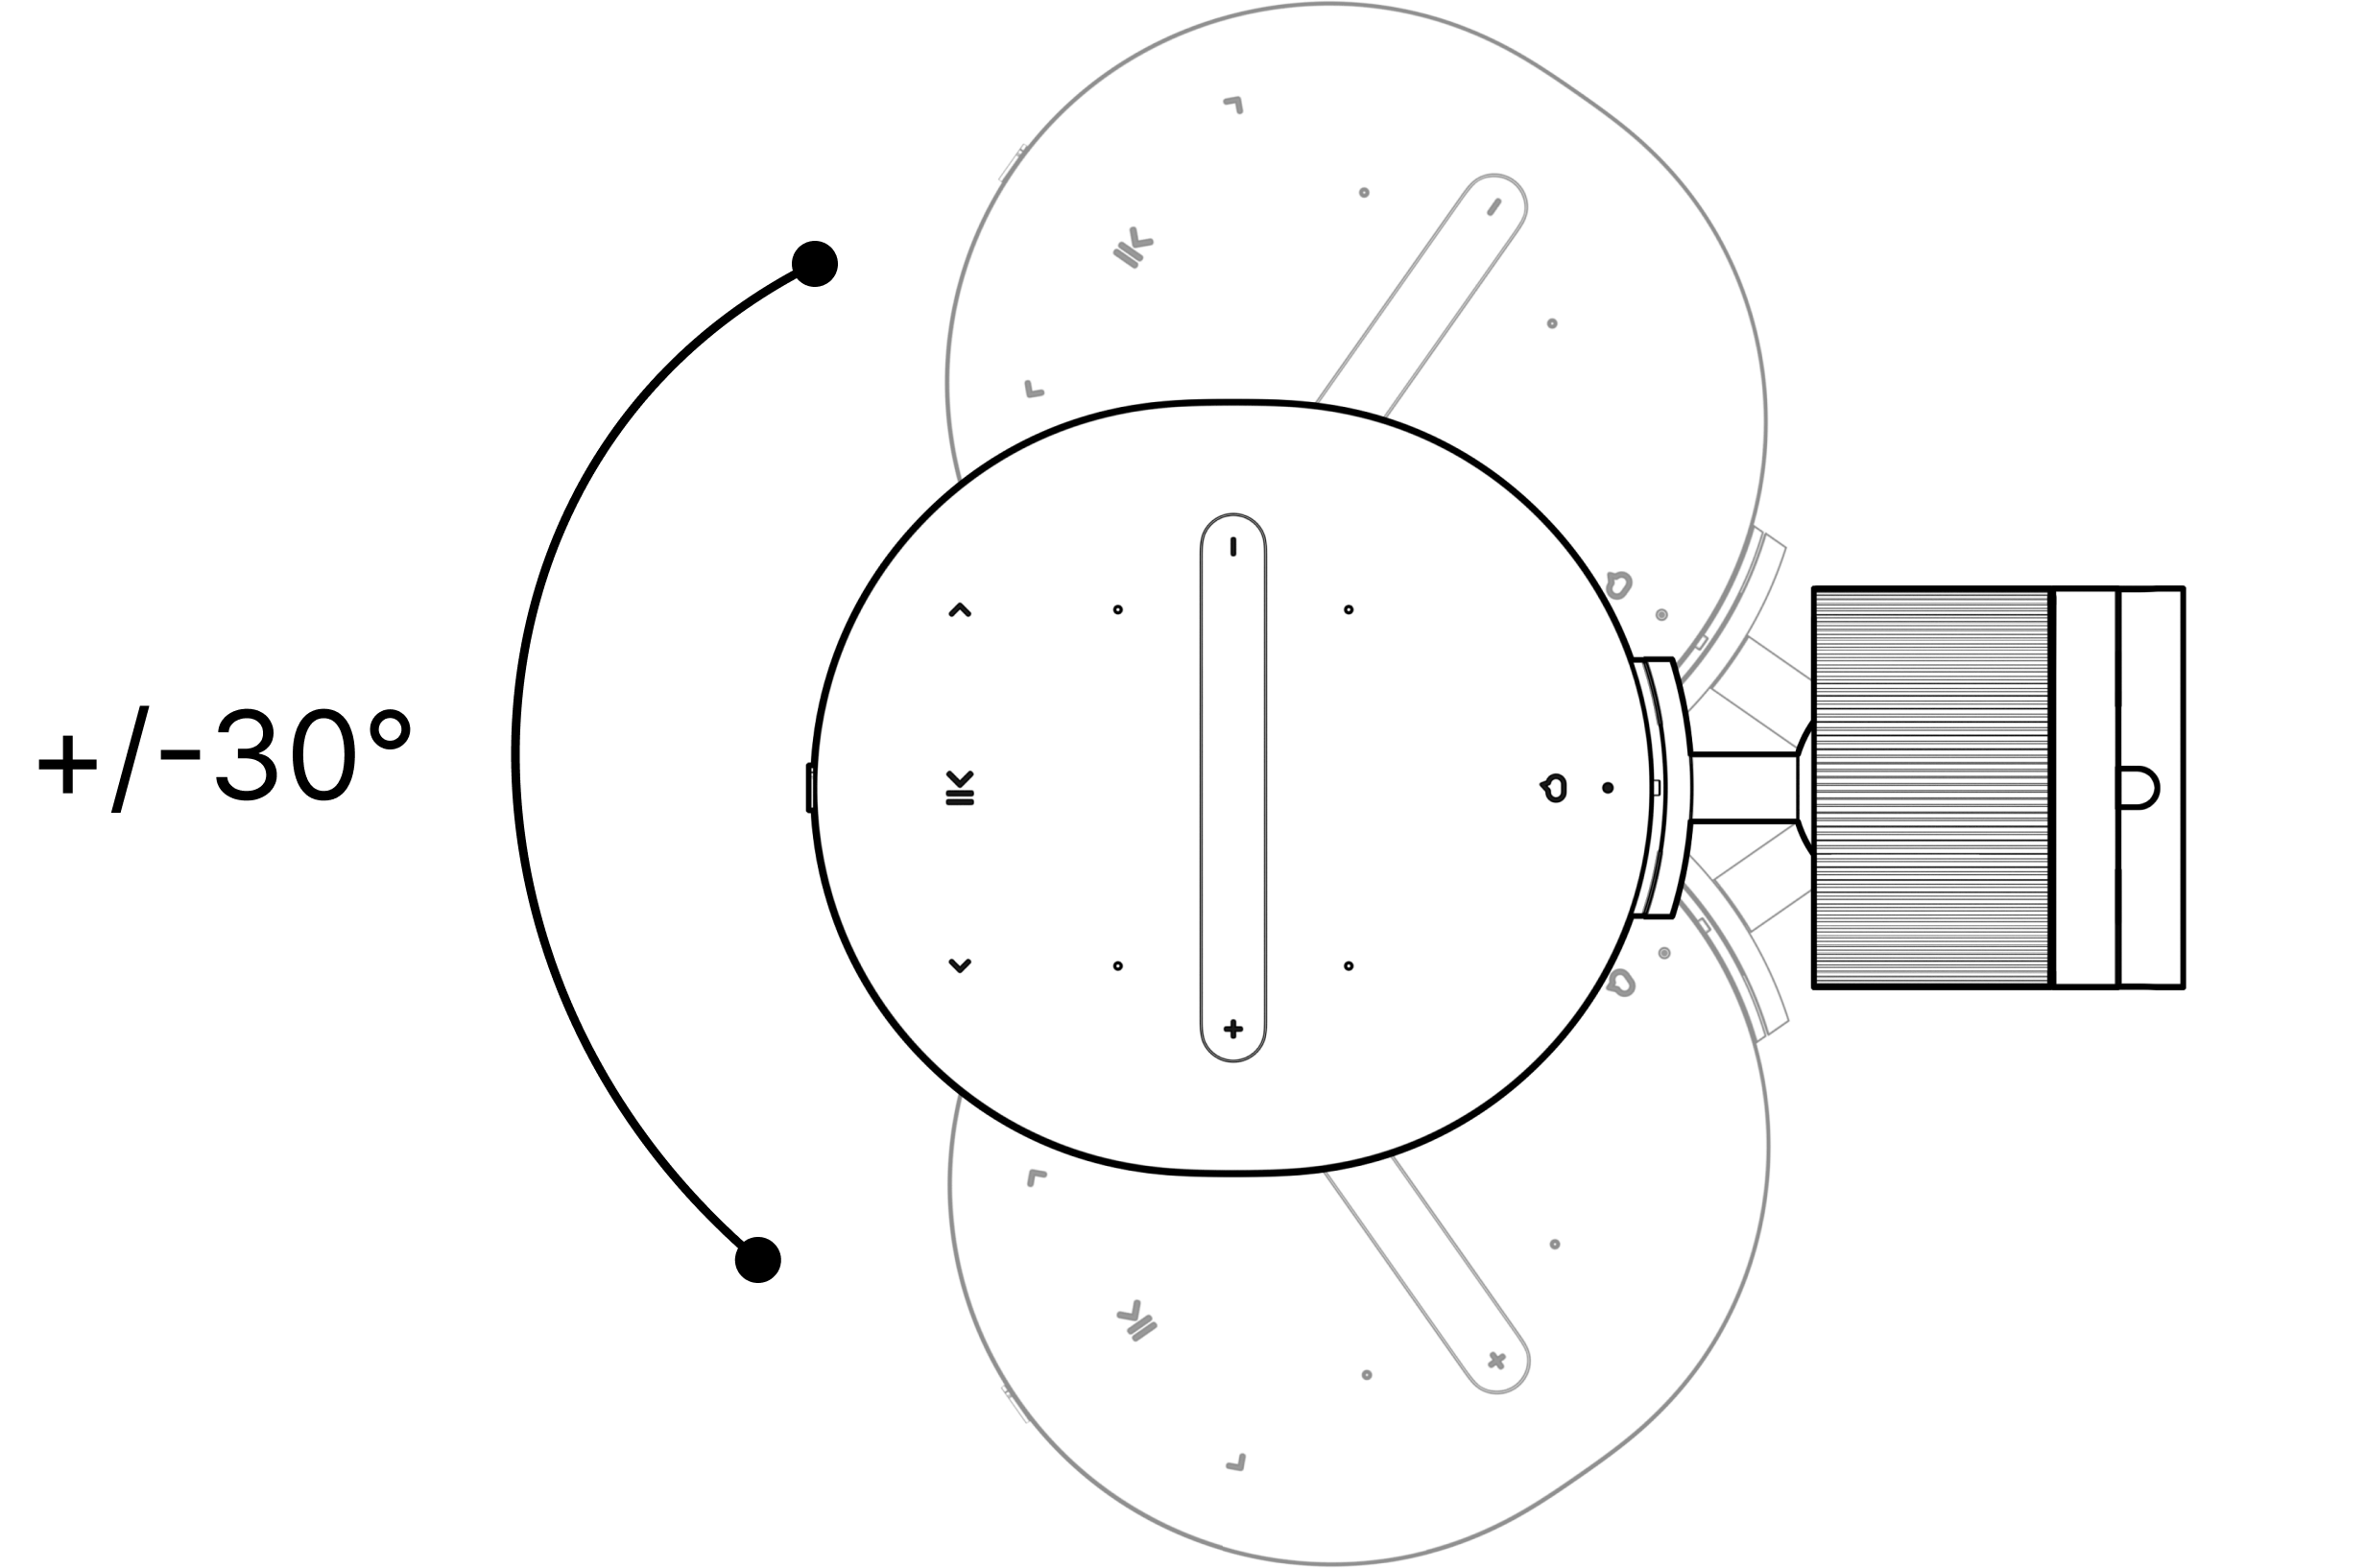 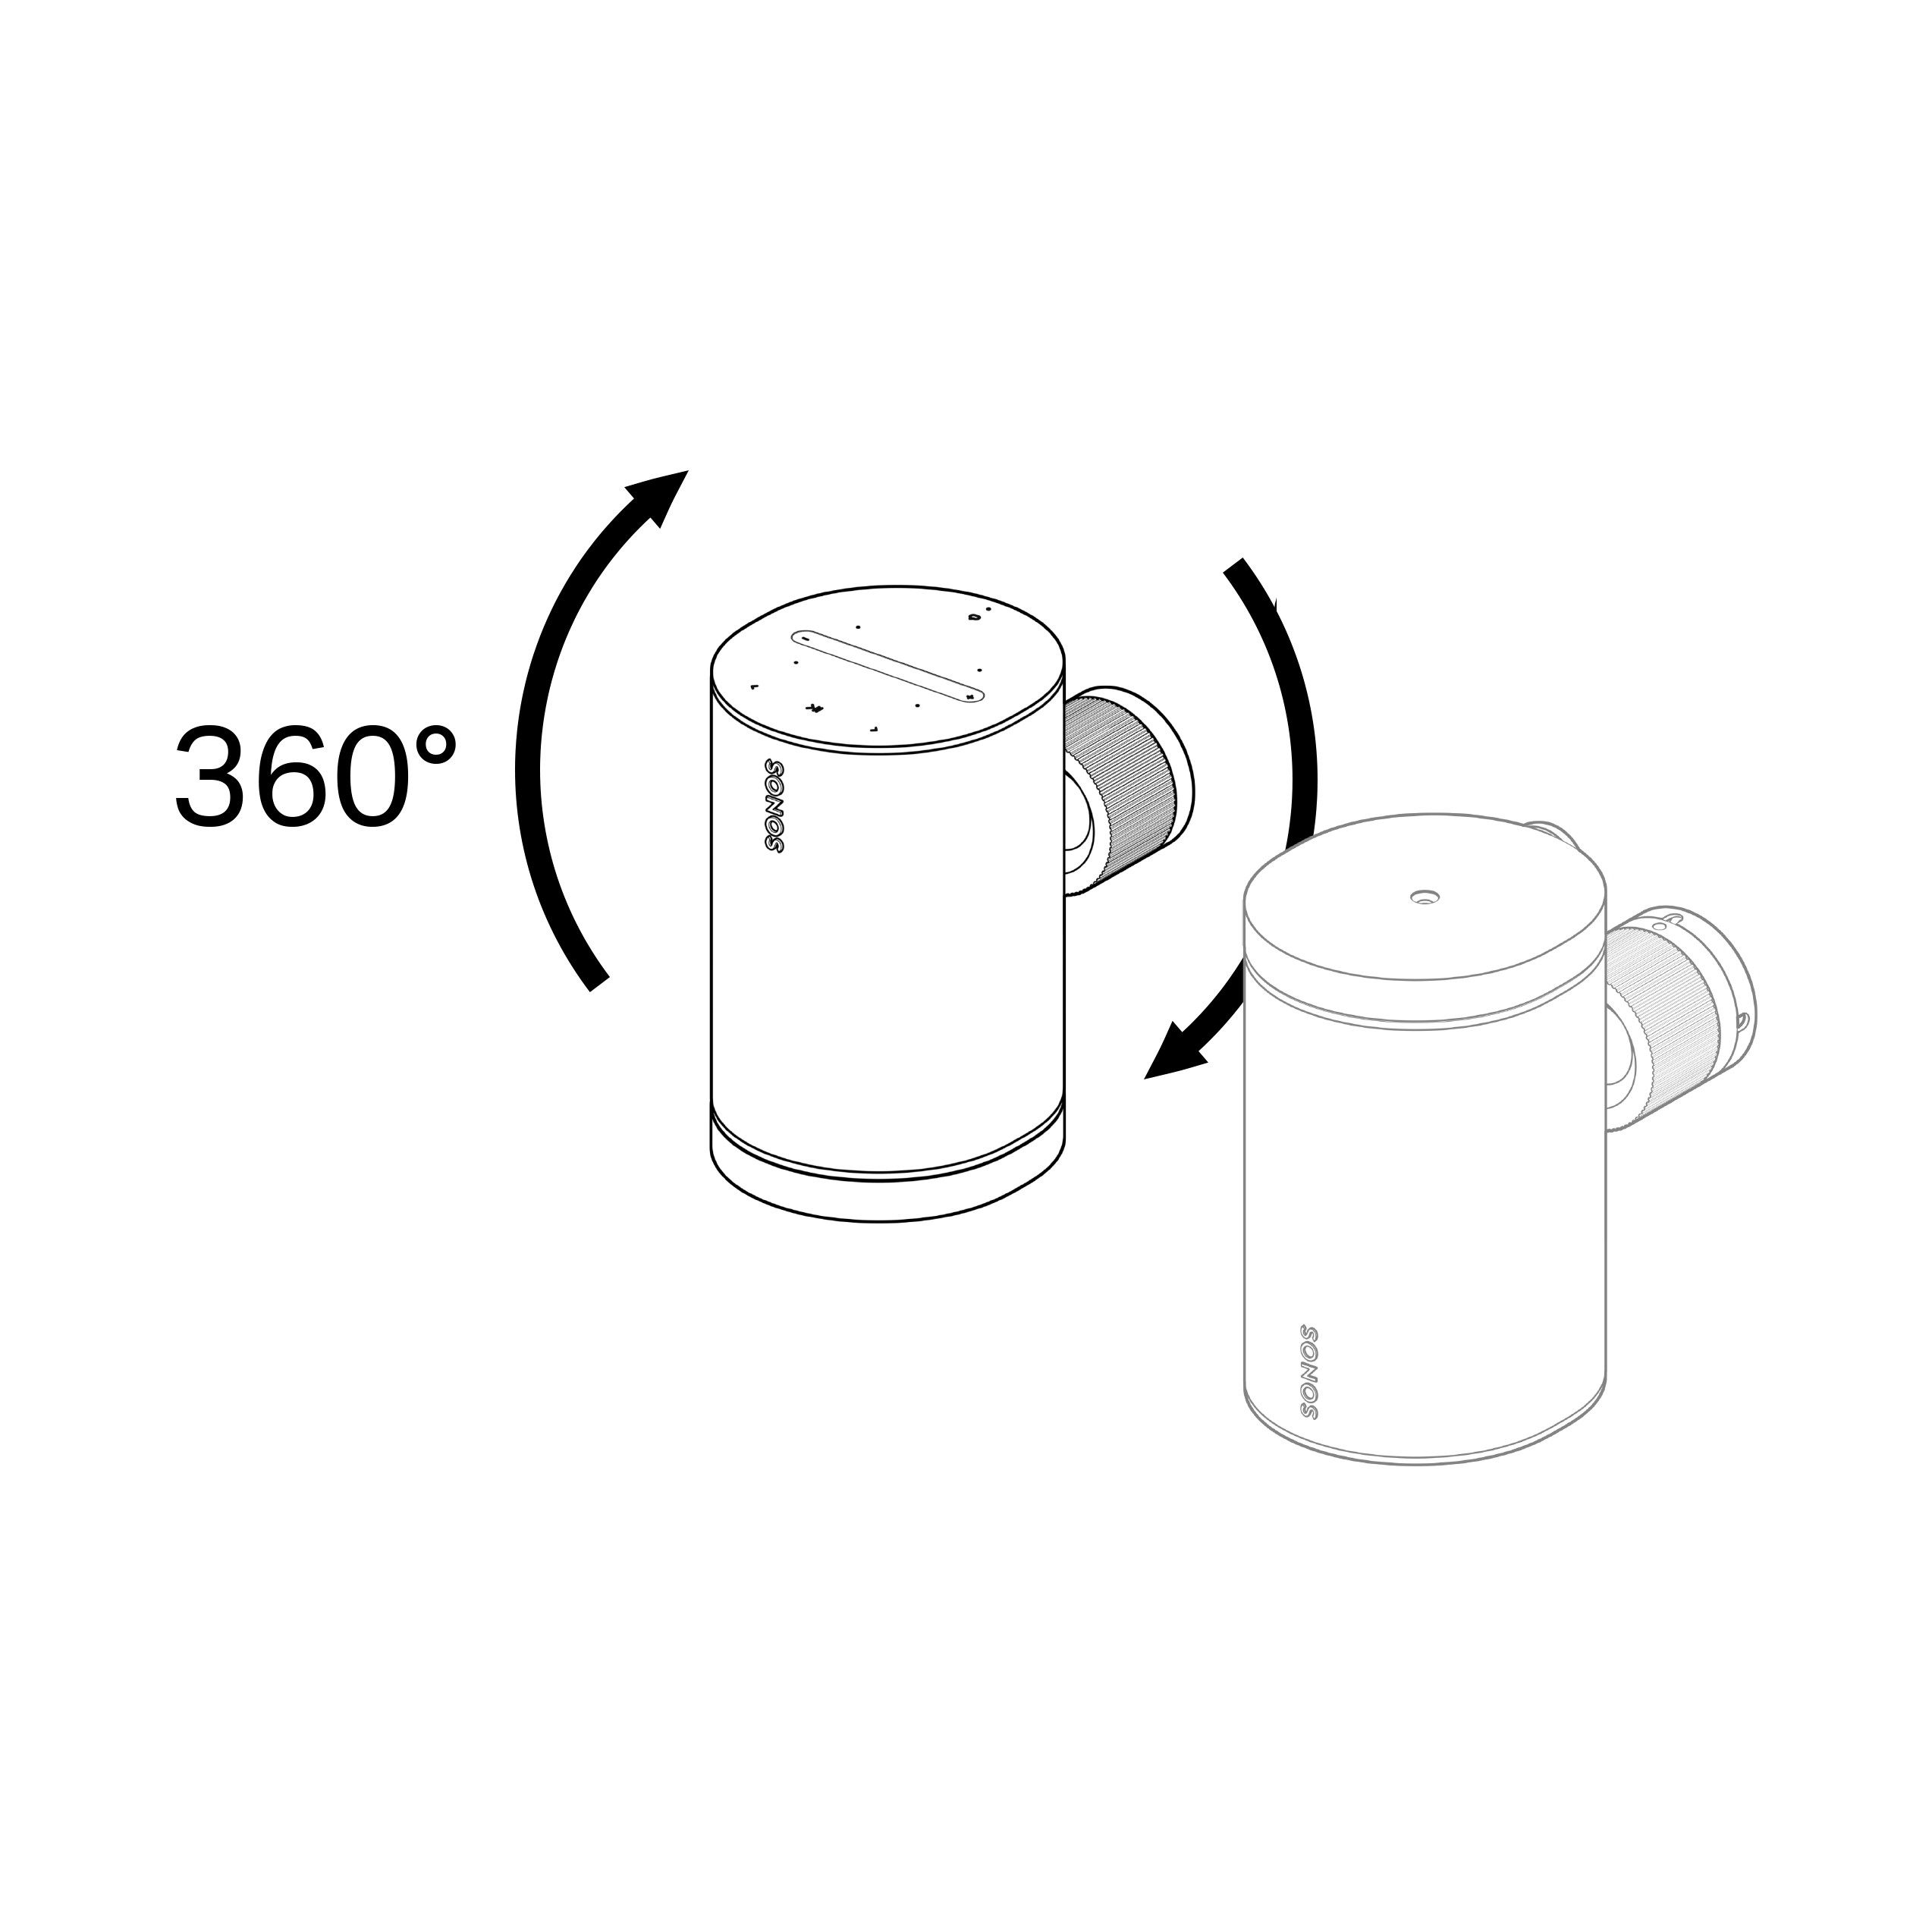 |
9 | Theft deterrenceTo unlock the theft prevention mechanism, push a small tool (e.g. a thin screwdriver or pick) into the hole located behind and underneath the twist lock. Tool ax Ø = 4.5 mm Tool Min Length = 30 mm | 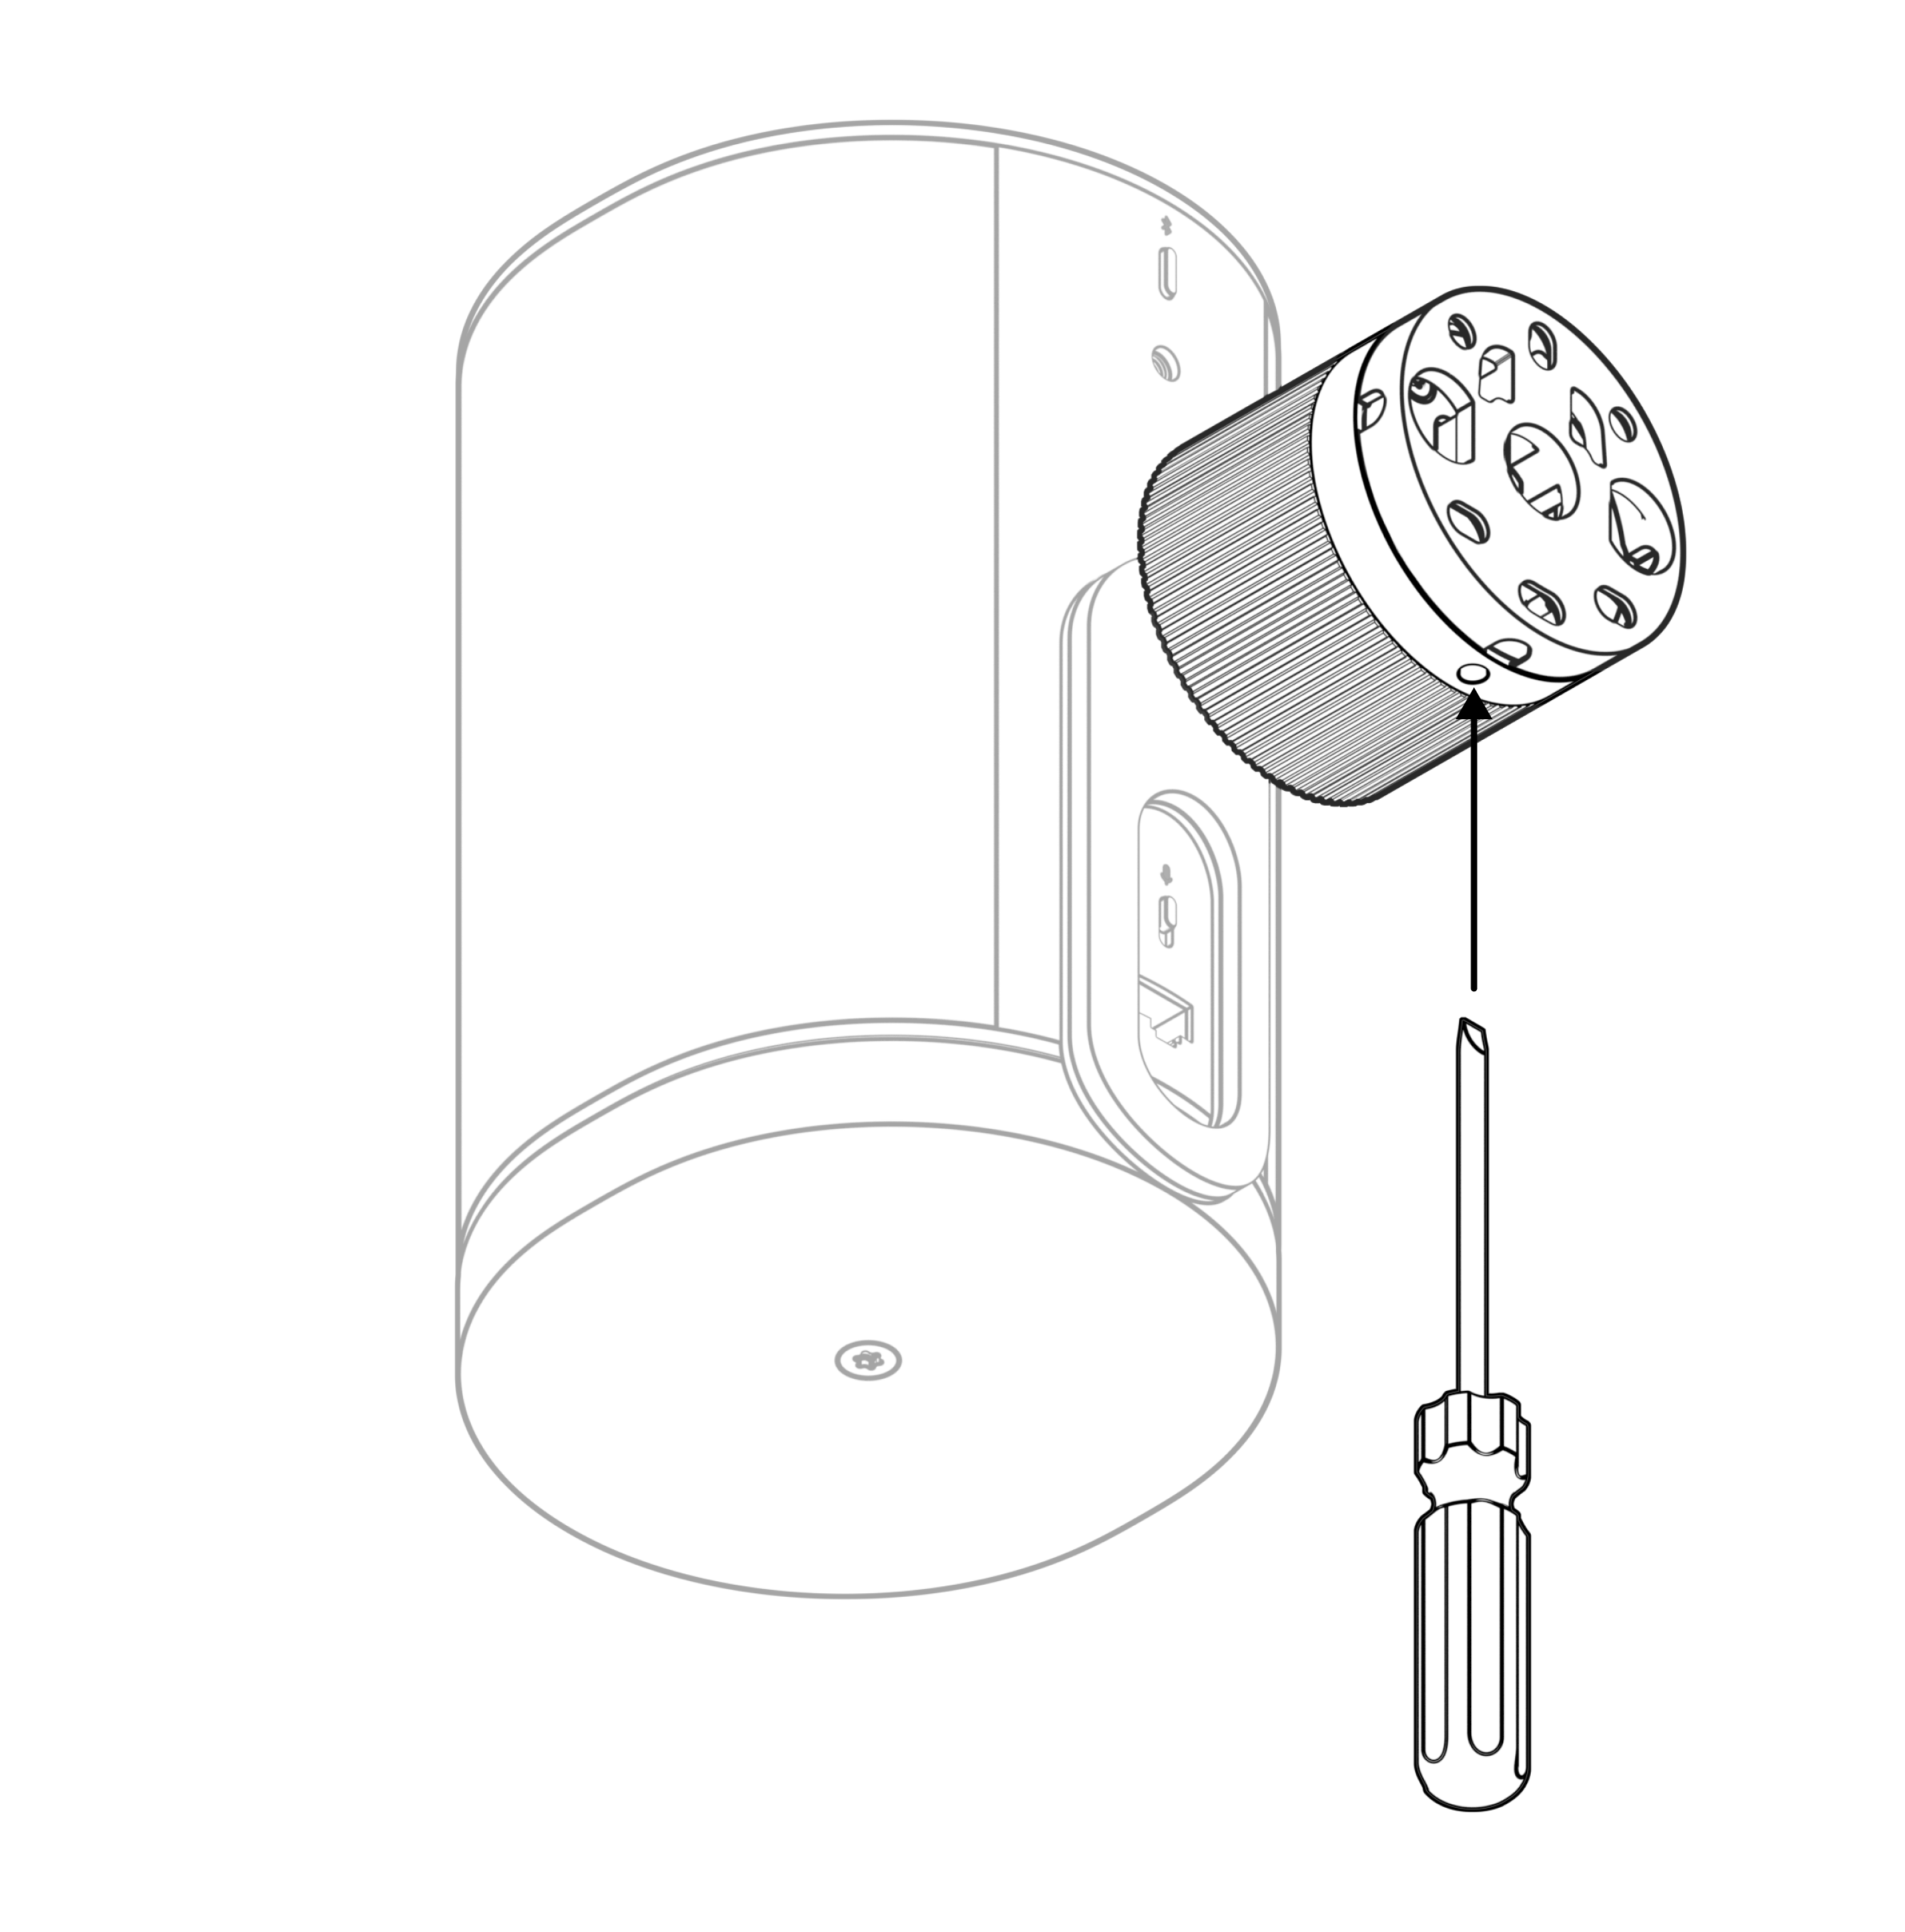 |
10 | Safety tetherIf a safety tether is required, attach it to the speaker using the included eyebolt attachment. |  |
Era 100 compatibility
The Era Pro Surface Mount is compatible with Era 100 with some limitations. The Era 100 does not have a hook receptacle, so you will need to remove the hook from the Surface Mount using the instructions below. Sonos recommends to only use Era 100 in a vertical orientation (not landscape or ceiling mounted) since it does not have the added stability from the hook.
It's also not possible to attach a safety tether to Era 100.
1 | Unscrew the hook from the mount. | 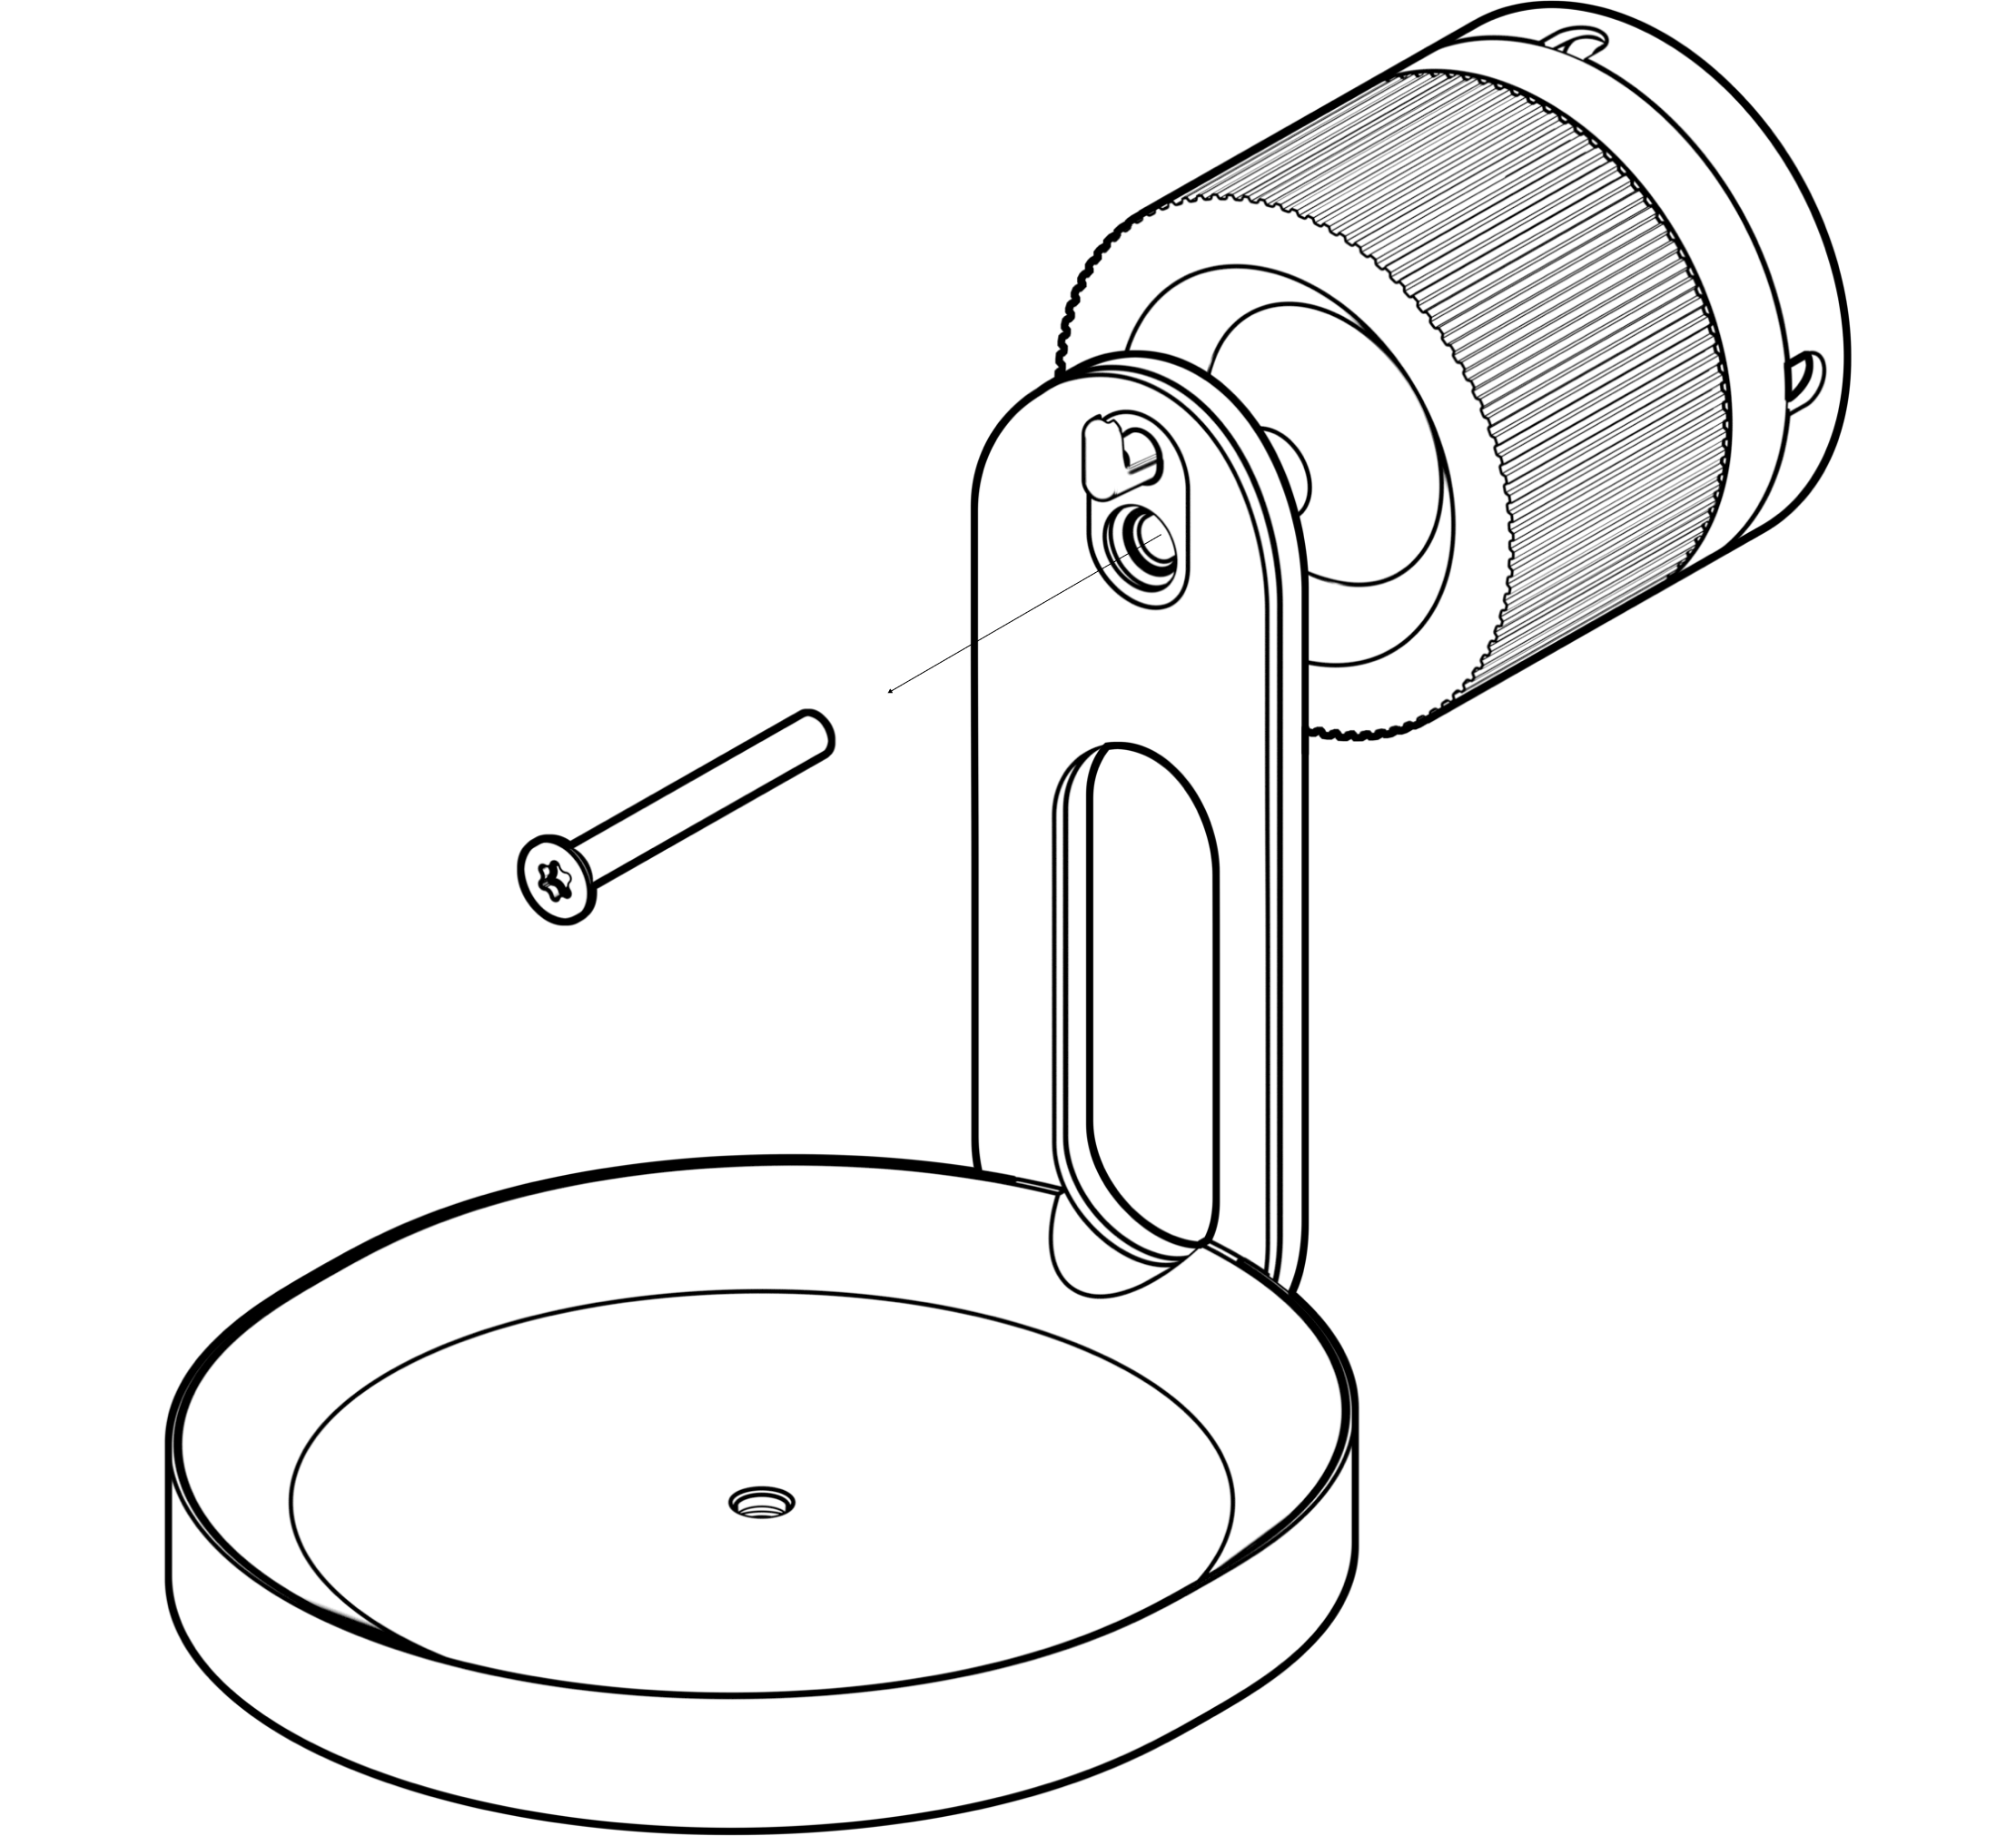 |
2 | Remove the hook and re-attach the screw with 4-5 Nm torque. | 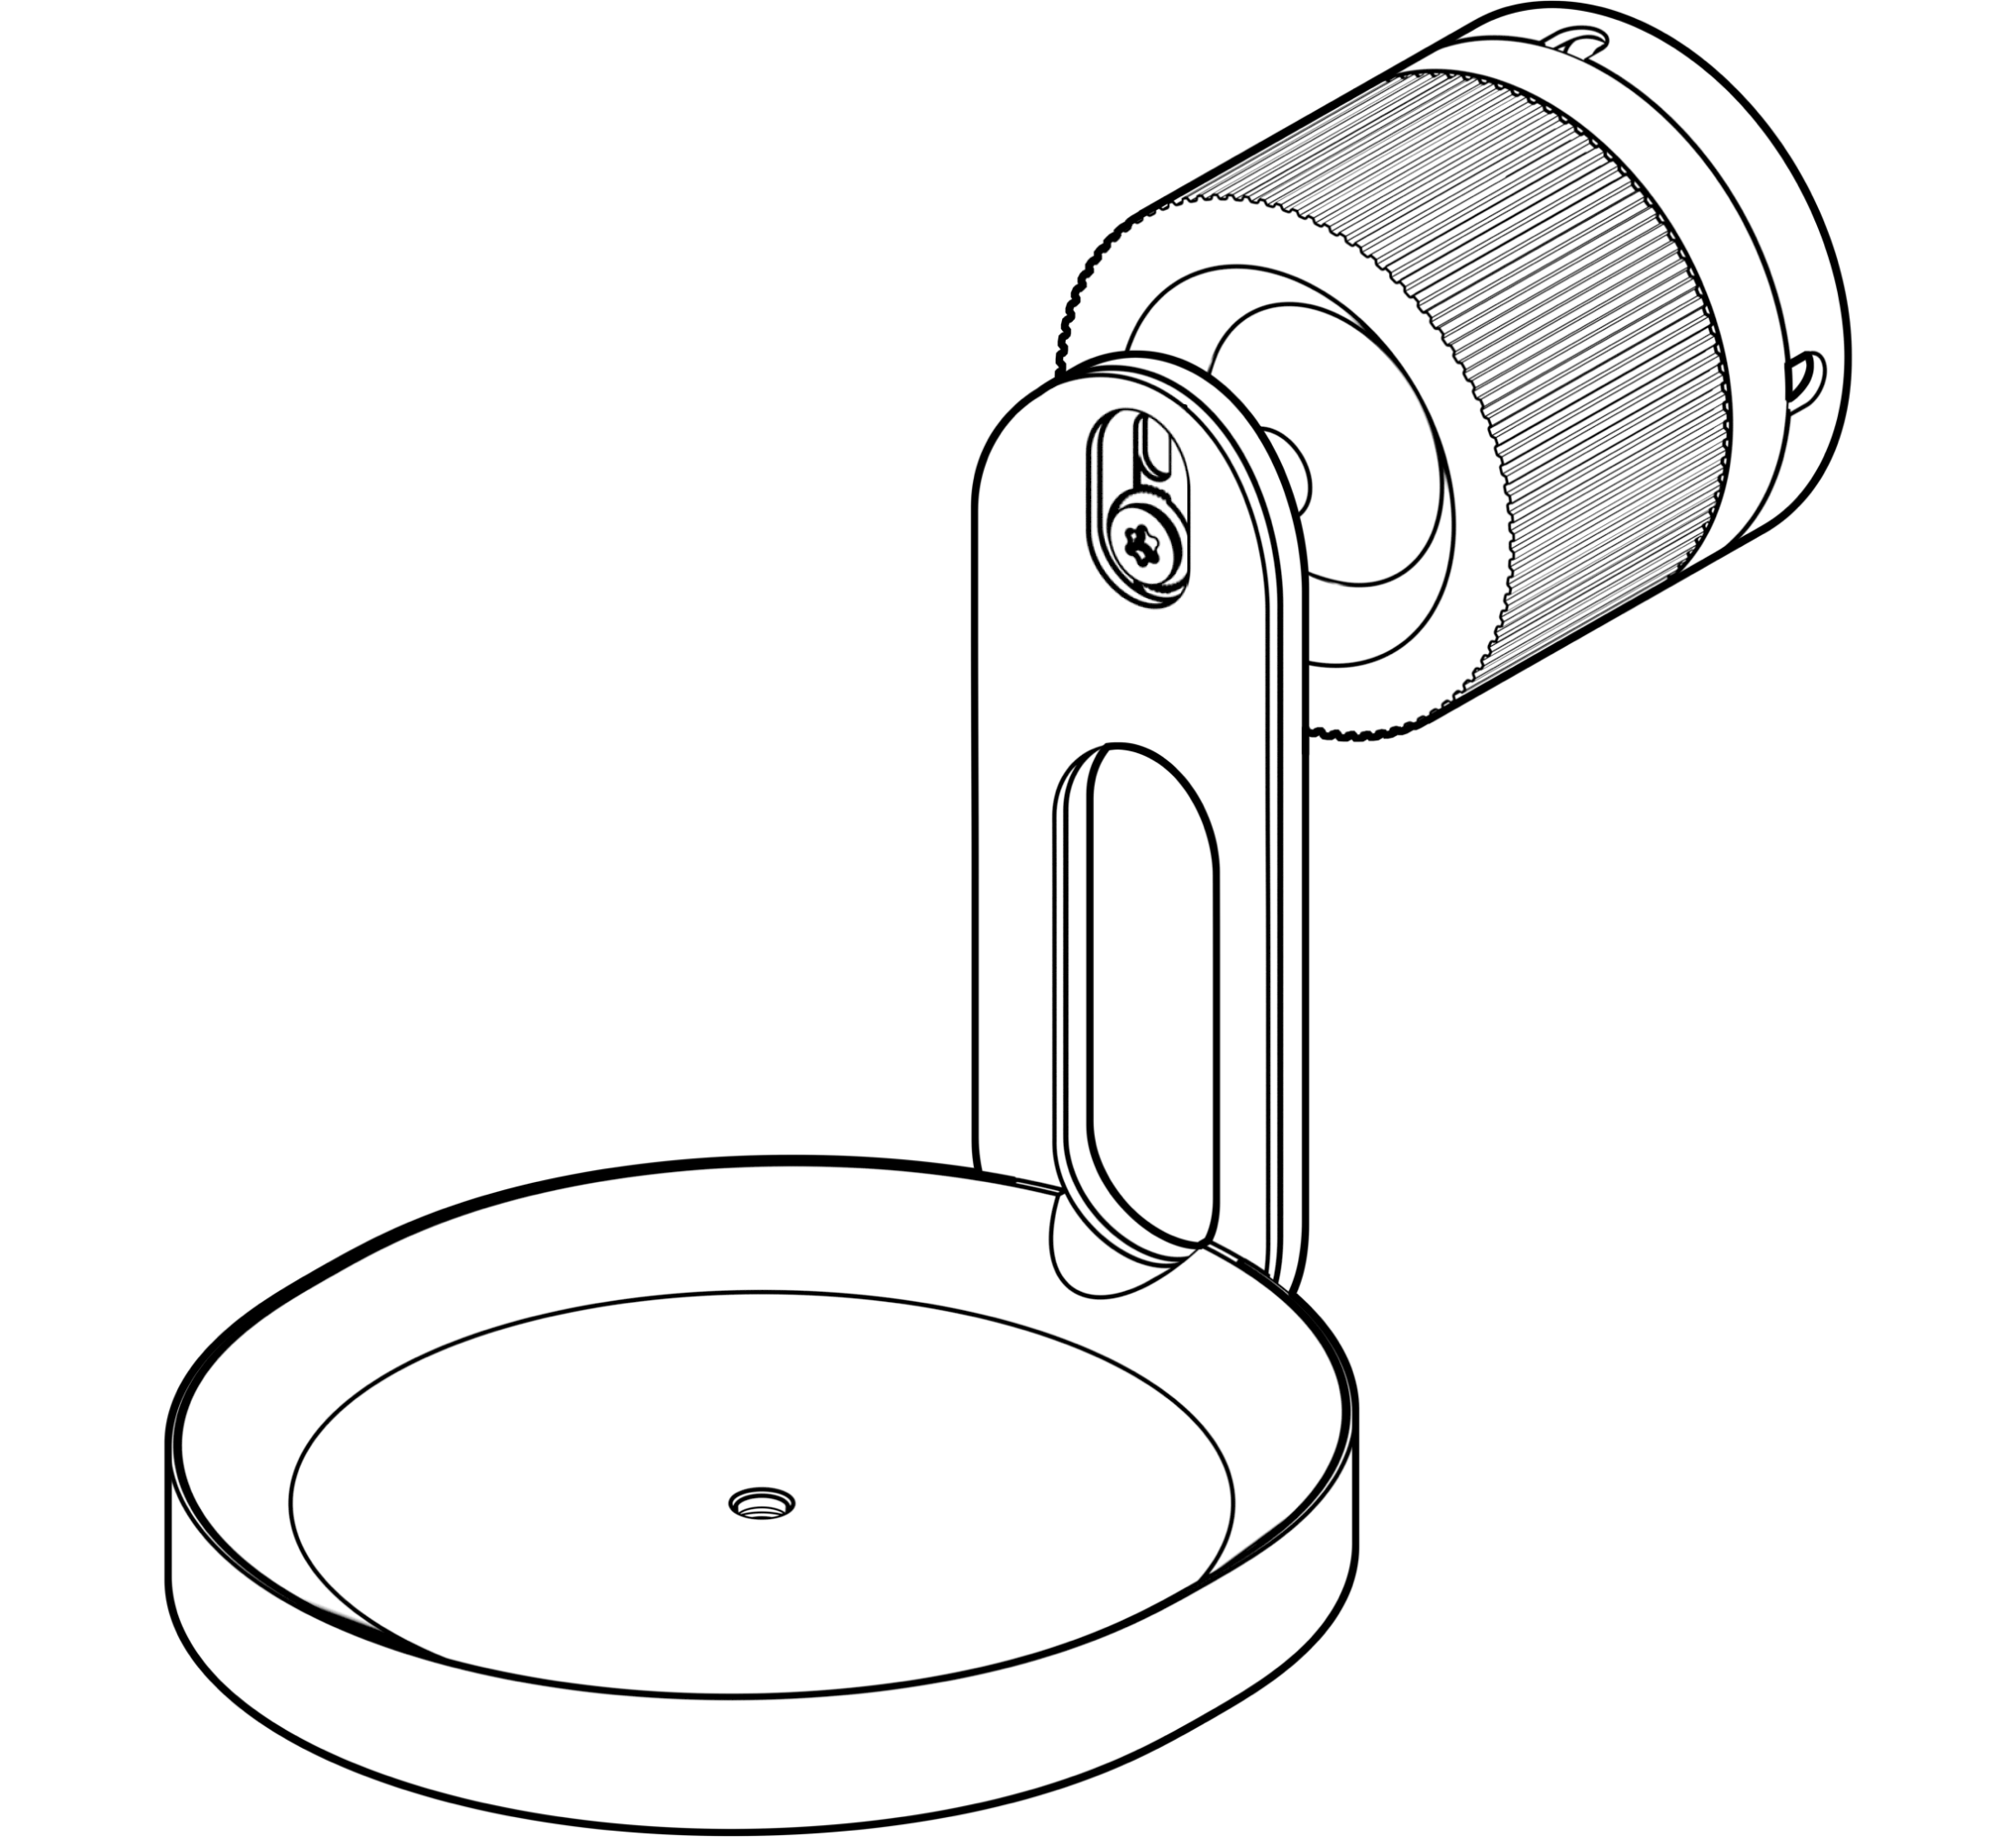 |
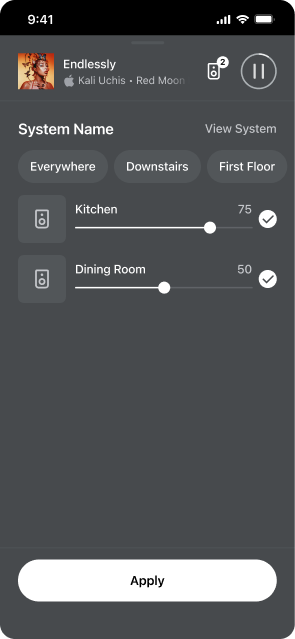
Zones
Set up zones in the Sonos app to better fill large spaces with sound. A zone is a new semi-permanent configuration for multiple speakers throughout a system. Zones can be a single room, half of a room, or even multiple rooms.
Once a zone is created, it keeps the speakers configured as one unit until the user removes the zone in System Settings  . You can place a maximum of 16 devices into a zone. To ensure the best experience, we recommend a wired internet connection into each speaker. If a wireless connection is needed, we recommend not exceeding six (6) WiFi connected devices per zone. The maximum number of Sonos devices per system is 32.
- Go to System Settings and select an Era 100 Pro.
- Scroll down to Products, then select + Set Up Zone to get started.
Once you create a zone, all products in it are accessed together. Swipe up on the Now Playing bar, or navigate to the output selector  to control all products in a zone at once.
Zones user interface
An established zone appears as a single connected set of speakers in the app interface. Instead of having to give multiple products a common name in the same space (e.g. Kitchen, Kitchen 2, Kitchen 3, etc.) they look like one, single player in the output selector and system view.
| A group containing multiple speakers | A zone containing multiple speakers |
|---|---|
 |  |
Set up a zone
- Go to System Settings and select a speaker.
- Under Products, select + Set Up Zone to get started with zone configuration.
1 | After selecting + Set Up Zone, the app will take you through setup. | 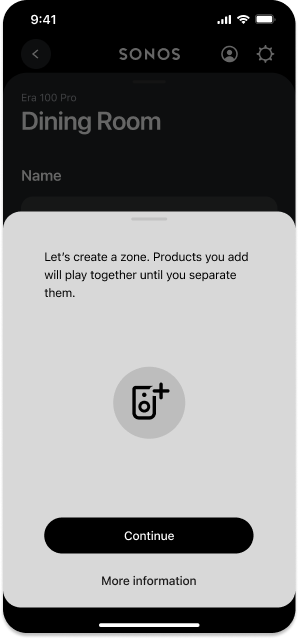 |
2 | Select the products you want to add to the zone. | 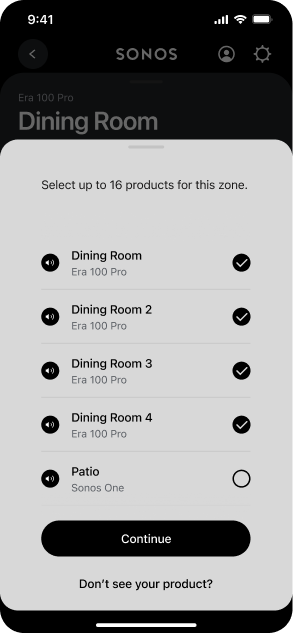 |
Manage a zone
1 | Go to System Settings | 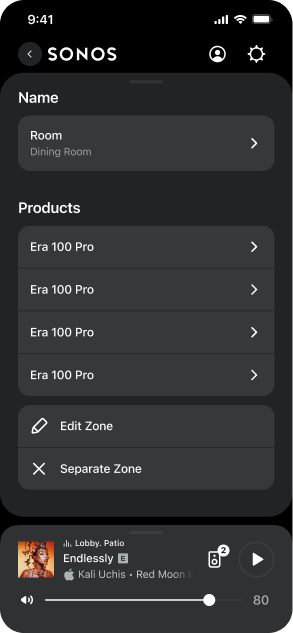 |
2 | Under Products, select either Edit Zone to reconfigure a zone or Separate Zone to disband all speakers in the zone. | 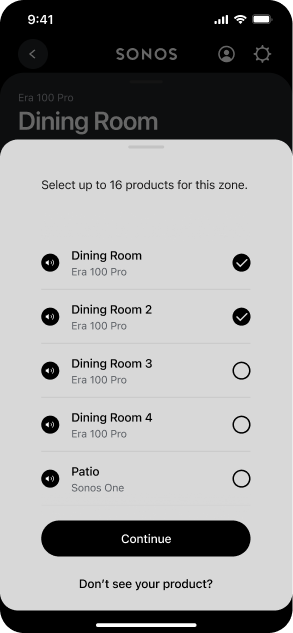 |
Volume and EQ
| Volume trim settings | EQ settings |
|---|---|
In System Settings 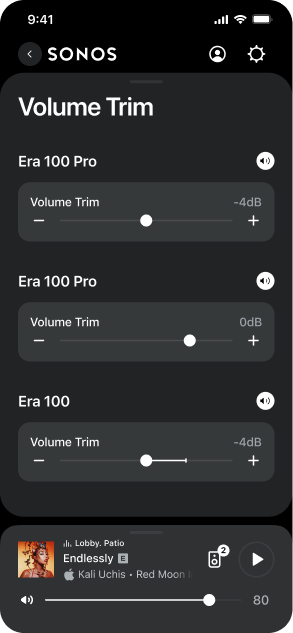 | In System Settings 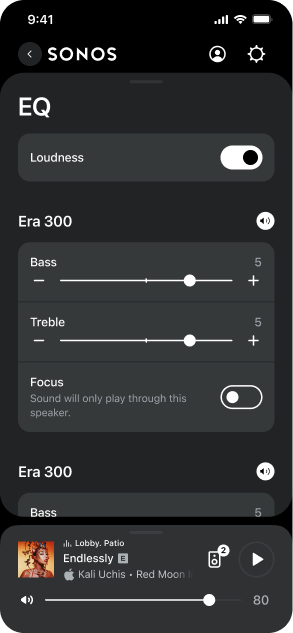 |
Identify speakers in a zone
Select the speaker icon  in the app to identify individual speakers in a zone when adjusting sound settings. The speaker you selected will play a tone and flash its LEDs for audible and visual feedback.
Trueplay™
Trueplay tuning measures how sound reflects off walls, furnishings, and other surfaces in a room, then fine tunes your Sonos speaker to make sure it sounds great no matter where you place it.
- Go to System Settings .
- Select your Era 100 Pro from the list of products.
- Navigate to Sound and select Trueplay to get started.
Note: You can't perform Trueplay tuning on a zone.
Advanced tuning
Advanced tuning takes about 45 seconds and uses the microphone on an iOS device (running iOS 8 or later) so you'll move around the room while the sound is fine tuned for your space.
Note: Advanced tuning is the best choice for large rooms (open concept spaces may experience less precise tuning).
Quick tuning
Quick tuning takes about 10 seconds and uses the microphone on your Sonos product to detect the environment so there's no need to move around the room during tuning.
Note: Quick tuning is available for both iOS and Android, and is a good choice for smaller rooms, or spaces where it's difficult to move easily.
Microphone and voice
There are 2 ways to enable or disable the microphone and voice services on Era 100 Pro:
- The microphone switch on the back electrically disconnects all microphones. This switch is in the ON position when you take the product out of the box.
- The voice services button on top turns voice services on and off without affecting the microphones needed for TrueplayTM and other microphone-enabled features.
- When both are on, voice control and all microphone-enabled features are available.
- When both are off, voice control and all microphone-enabled features are unavailable.
When the microphone switch is on and the voice services light is off, TrueplayTM and other microphone-enabled features are available but voice control is off.
You can add Sonos Voice Control, or a voice assistant you use often, for hands-free control of your Sonos system. Voice control is off by default.
Note: If you're adding a voice assistant, download the voice assistant's app before adding it to your Sonos system.
To add voice control in the Sonos app:
- Go to System Settings and select Manage.
- Scroll down and select Voice Assistants.
- Select + Add a voice assistant, then run through setup.
Specifications
Audio | |
Amplifiers | 3 class-D digital amplifiers precision-tuned for the speaker's unique acoustic architecture. |
Low-frequency driver | One 3.5 x 4.4 in (90.8 x 111.9 mm) carbon filled-polypropylene |
High-frequency drivers | Two 0.63 in (16 mm) silk dome |
Frequency Range1 | 45 Hz-20 kHz ±3 dB 40 Hz-20 kHz -10 dB |
Maximum Long-Term SPL2 | 90 dB @ 1 m with PoE+ |
Maxium Short-Term SPL3 | 98 dB @ 1 m with PoE+ |
Nominal Coverage Angle4 | 240° horizontal x 140° vertical |
Directivity Q5 | 1.8 |
Directivity Index5 | 2.5 dB |
Microphones | The far-field microphone array uses advanced beamforming and multichannel echo cancellation for quick and accurate voice control and Trueplay tuning. Toggle off the mic switch to electrically disconnect the onboard microphones. |
Adjustable EQ | Use the Sonos app to control bass, treble, and loudness. |
TrueplayTM | This software measures the acoustics of the room then fine-tunes the EQ. Compatible with iOS and Android devices. |
Integrated Content Streaming | Amazon Music, Apple Music, Cloud Cover Music, Mood Media, Sonos Radio, Soundtrack Your Brand, Spotify, and many more. For a complete list, please visit: support.sonos.com/services |
Details & Dimensions | |
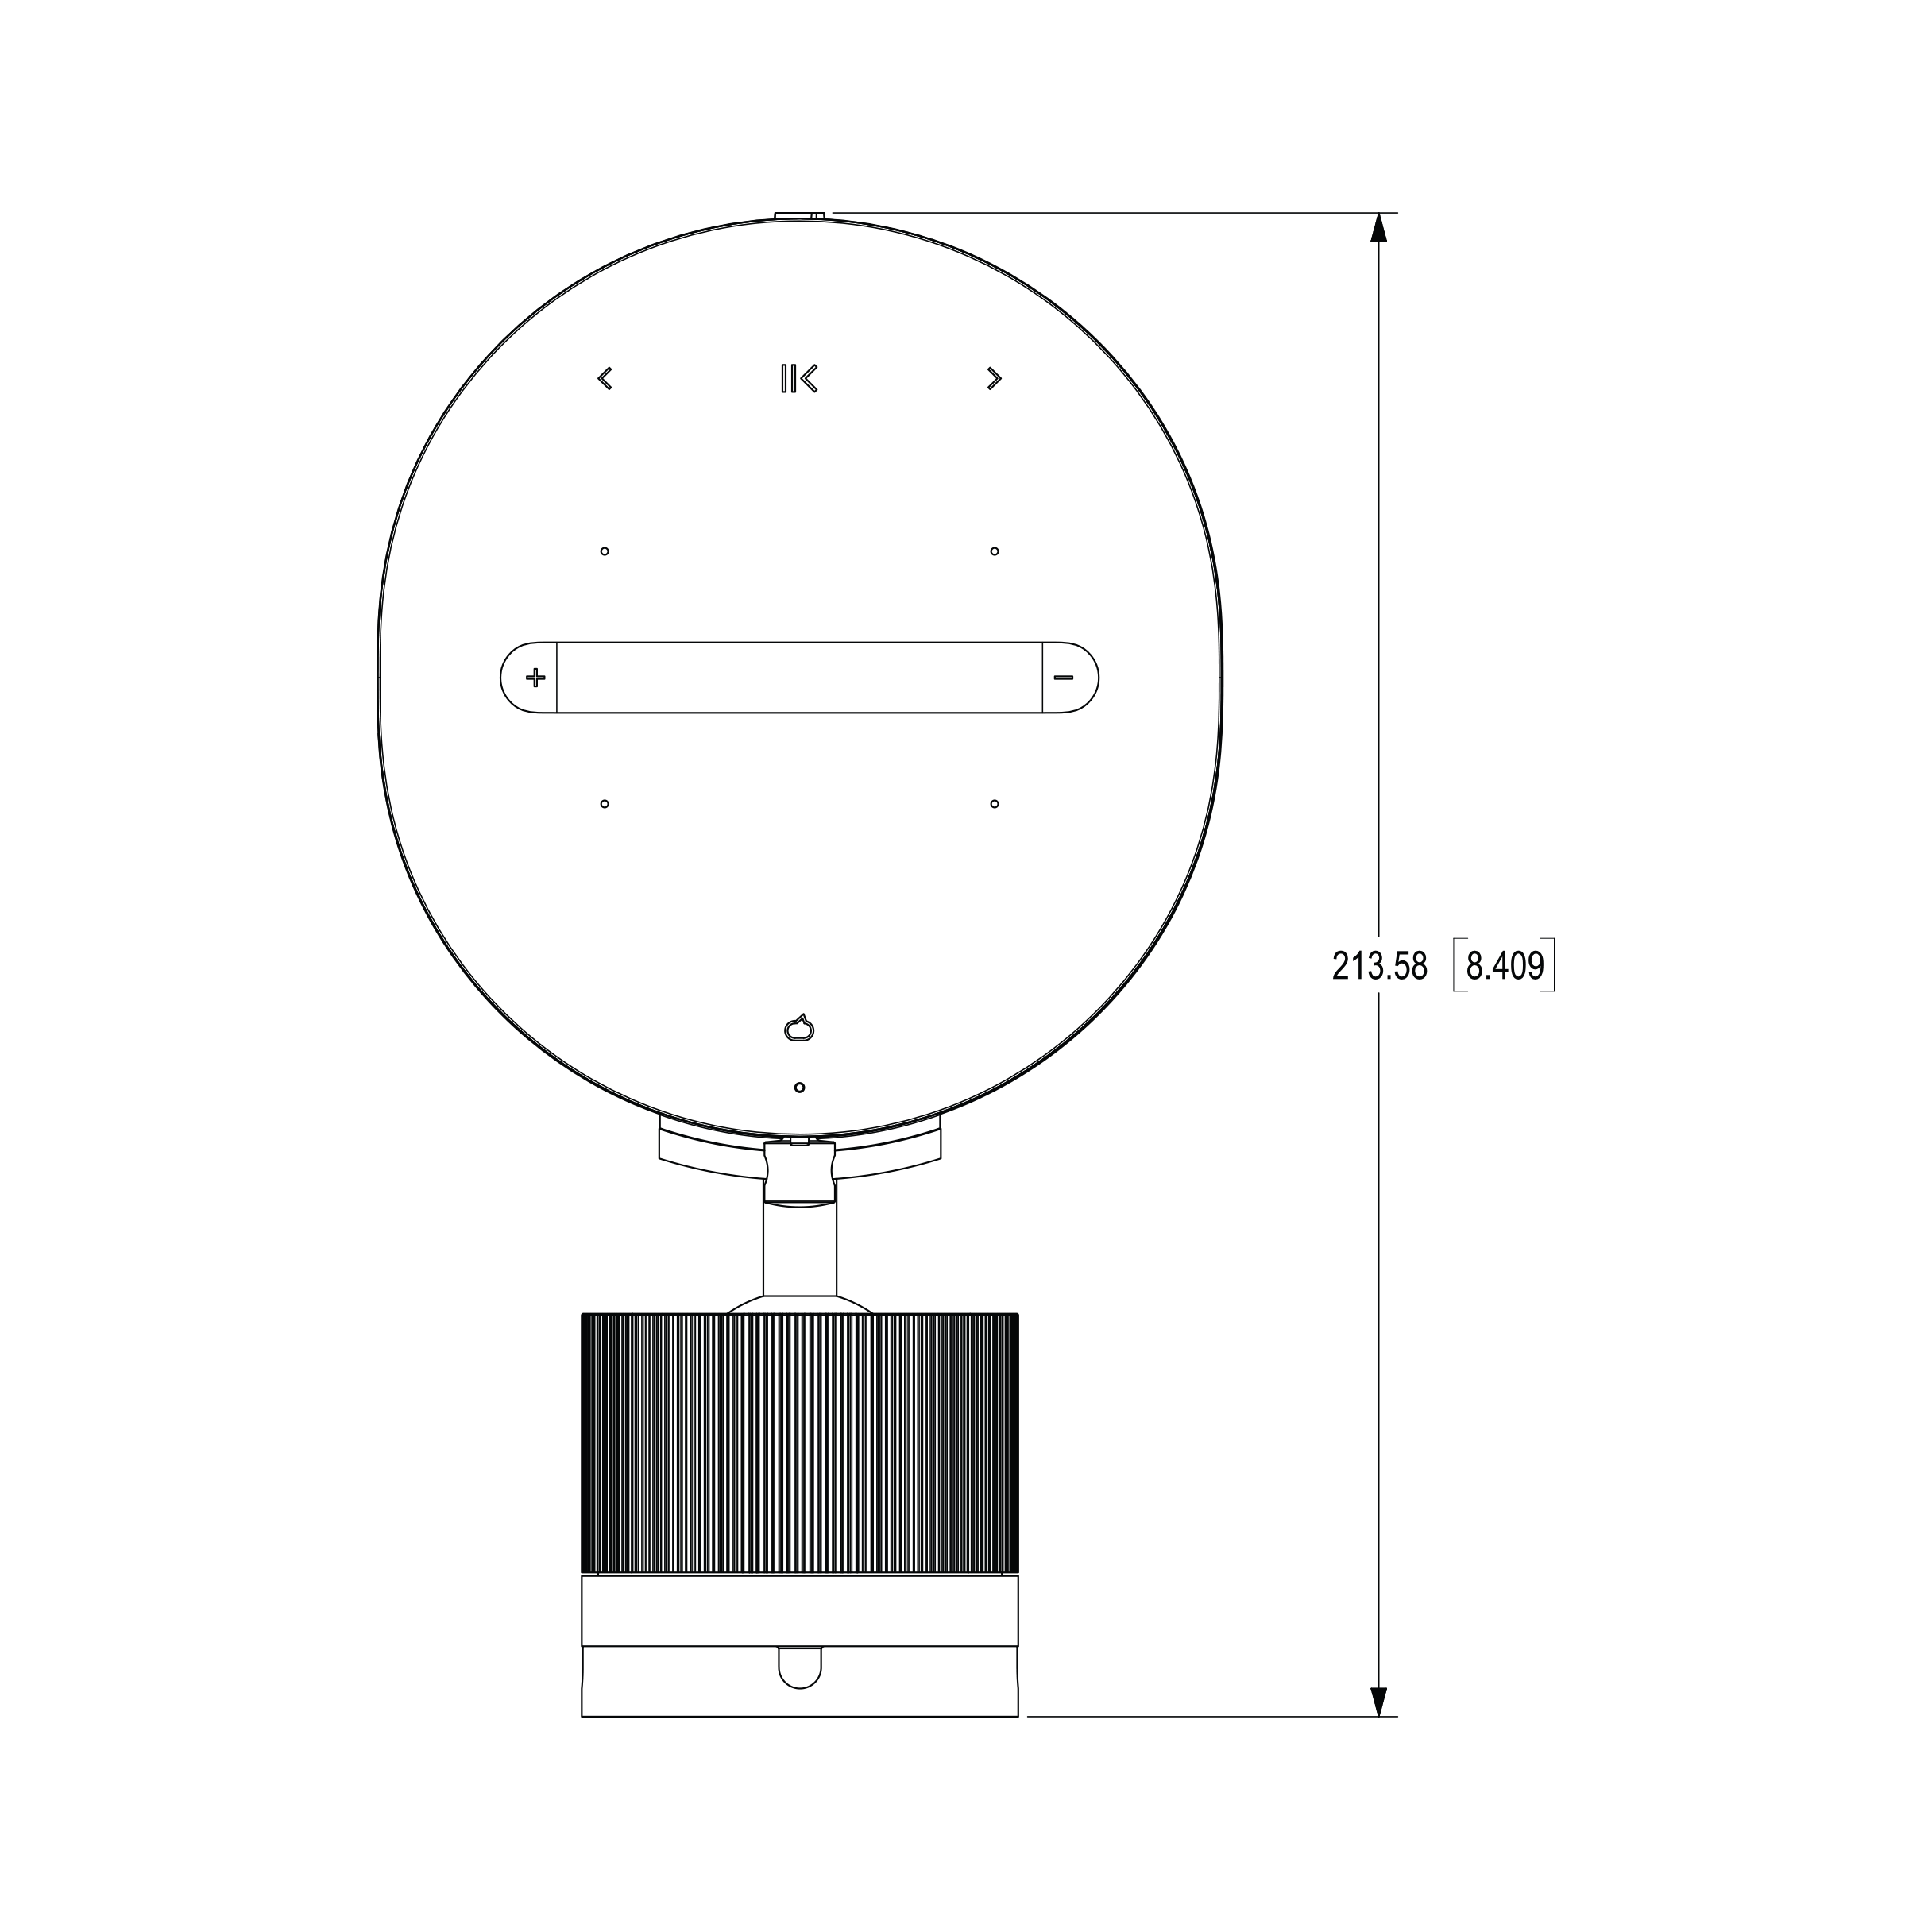
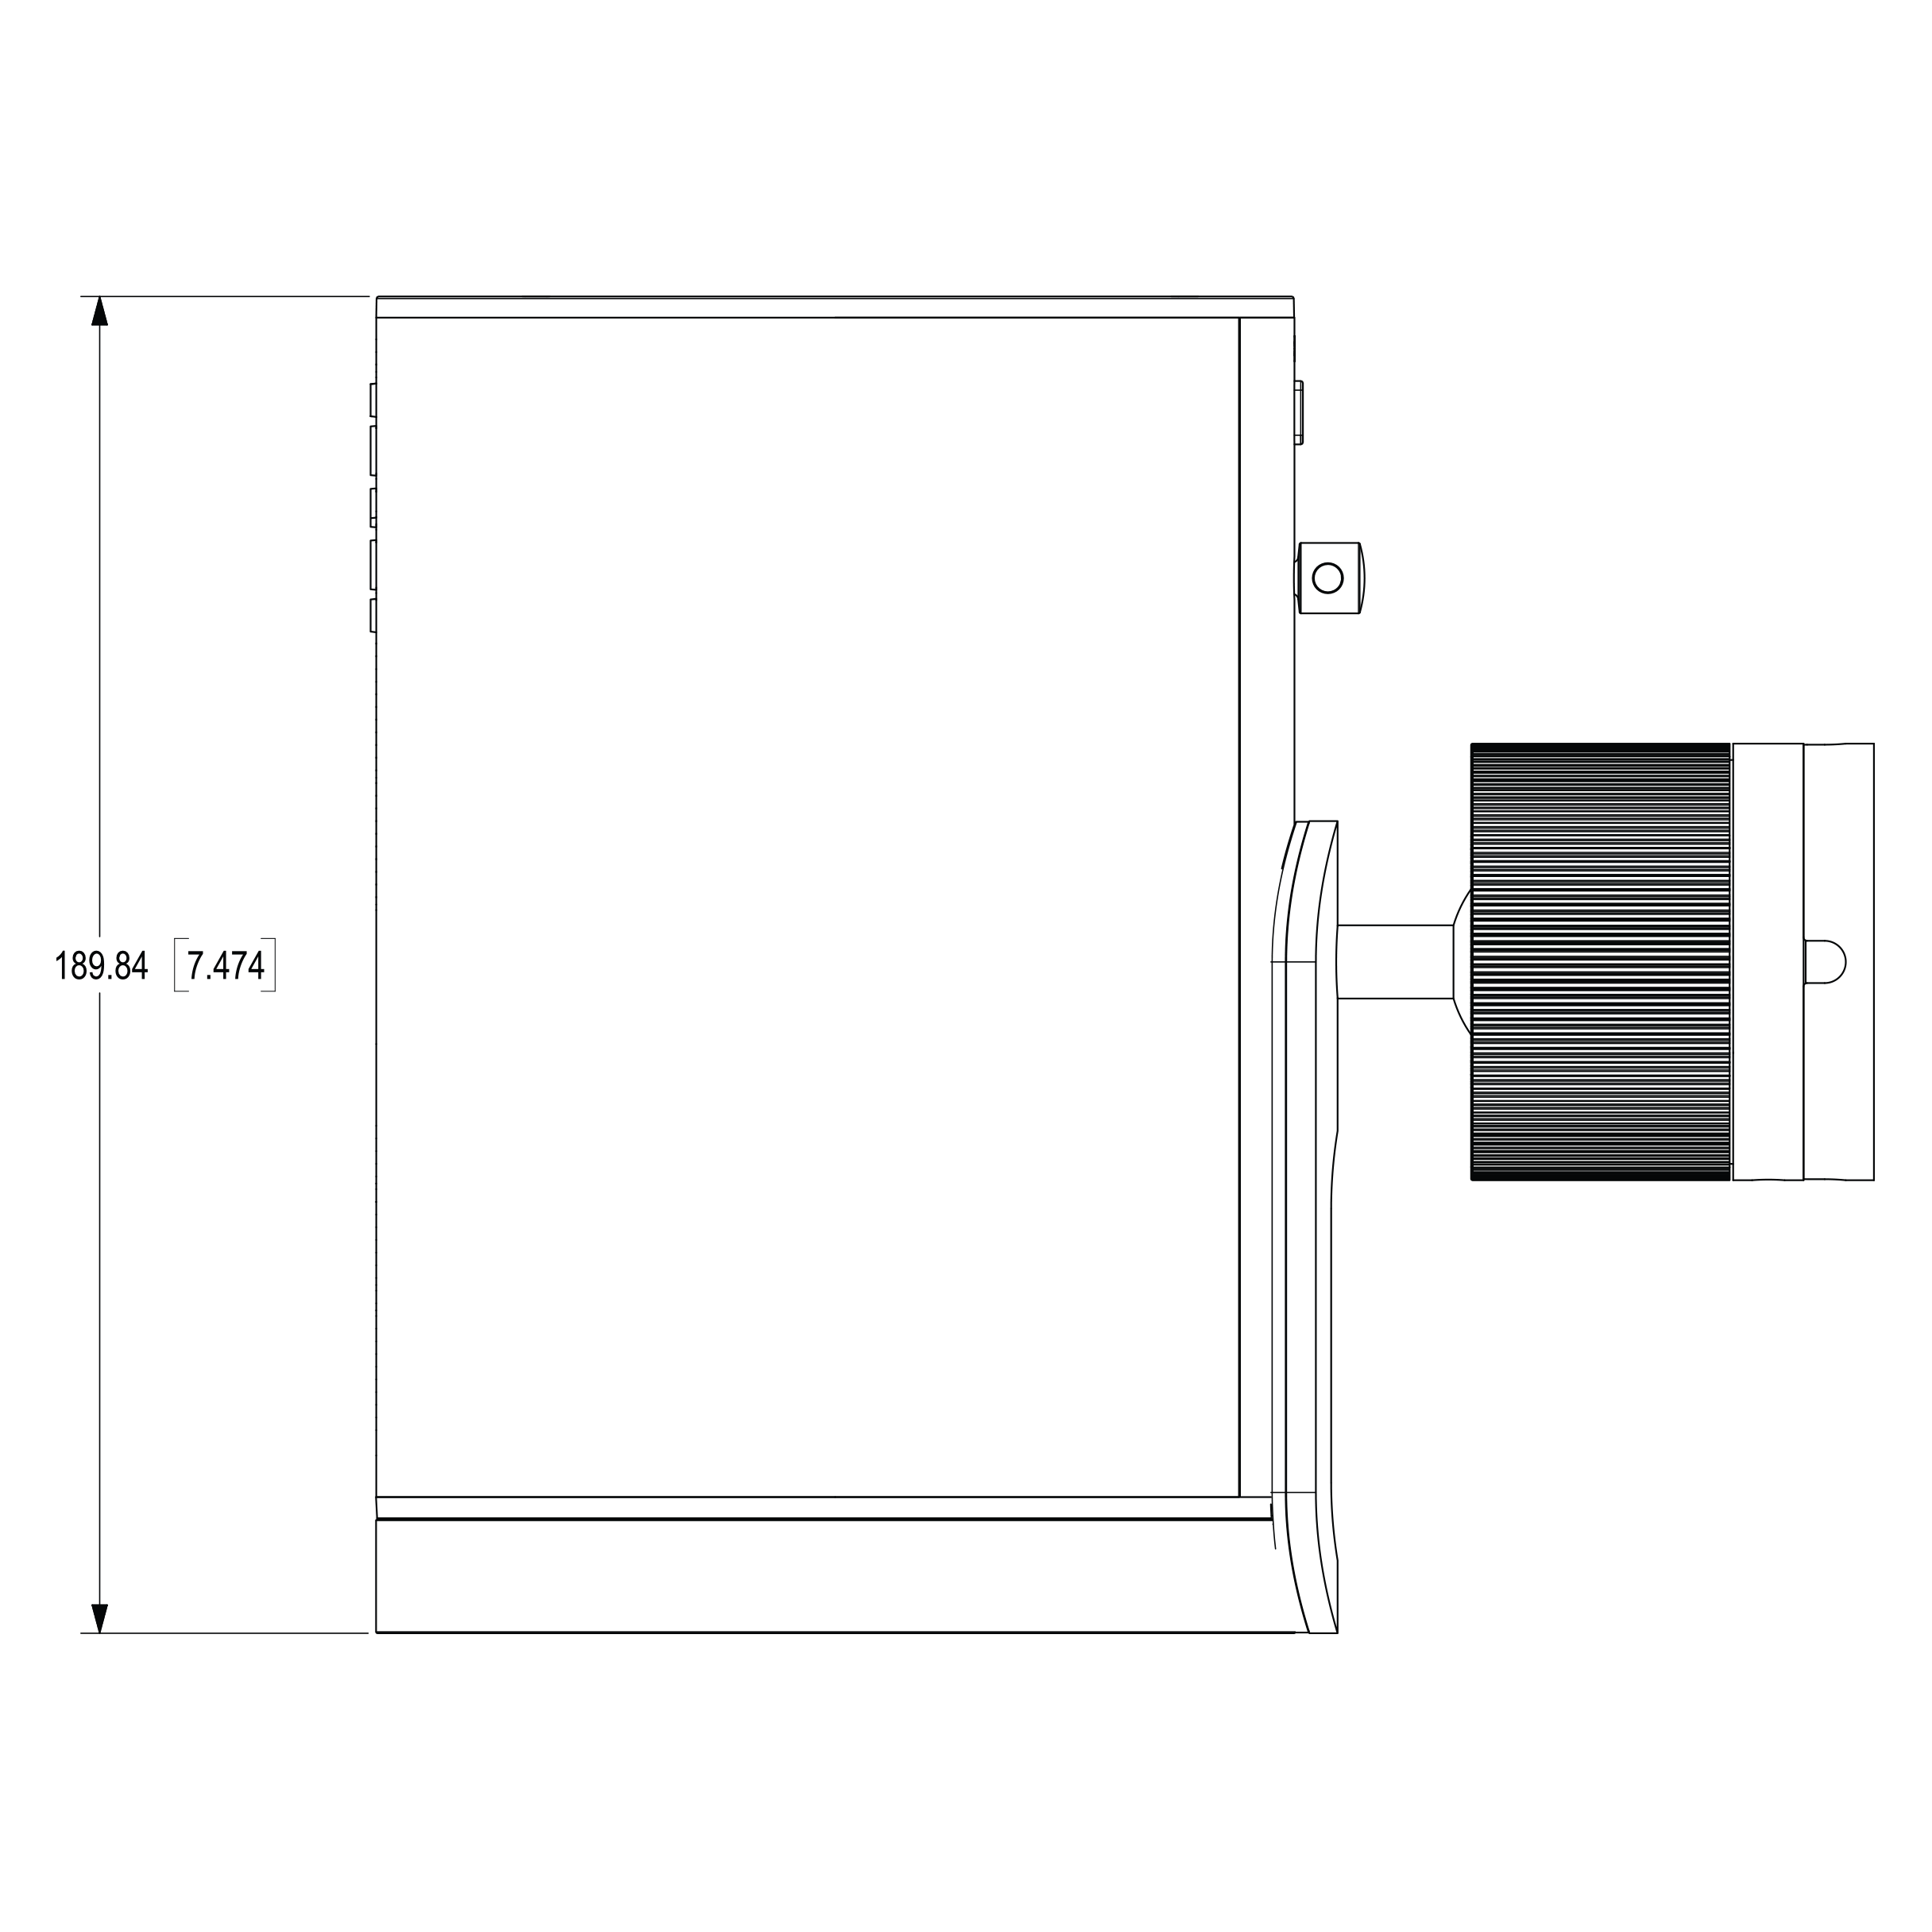
Product Dimensions (W x H x D) | 4.72 x 7.18 x 5.14 in (120 x 182.5 x 130.5 mm) |
Net Weight (Each) | 4.48 lb (2.03 kg) |
Shipping Weight (Pair) | 12.35 lb (5.6 kg) |
Colors | Black, White |
Finish | Matte |
Threaded insert | Included optional eyebolt can be used to provide a secondary safety attachment point to the speaker. |
Hook receptacle | Increases stability when the speaker is paired with the Surface Mount and positioned in a non-portrait orientation. |
Controls | Use the touch controls to play, pause, skip, replay, adjust the volume, mute your voice assistant, and group or ungroup Sonos products. |
Bluetooth button | Press to pair with a Bluetooth device. |
Microphone switch | Toggle off to electrically disconnect the onboard microphones. |
LEDs | An LED on the front of the product indicates power and mute status. White LED on top of the product indicates voice assistant status. A pair of LEDs on the network port indicate power status (yellow) and network activity (green). |
Operating Temperature | 32º to 104º F (0º to 40º C) |
Humidity Range | 5—95% |
Power & Connectivity | |
Power Method | PoE+ (802.3 at), PoE (802.3 af) |
Power Consumption (Max PoE+, Max PoE, idle) | 30 W, 15.4 W, 2.4 W |
Connector Type | 1 x RJ45 |
Ethernet port | 100Base-T network connection and power |
Wired Networking Interface | 100BaseTX, Ethernet RJ45 |
Wireless Networking Interface6 | Compatible with WiFi 6. Connect to WiFi with any 802.11a/b/g/n/ac/ax 2.4 GHz/5 GHz broadcast-capable router |
Bluetooth | Bluetooth 5.0 supports audio streaming from any Bluetooth-enabled device. |
CPU | Quad Core 4xA55 1.4 GHz |
Memory | 2 GB DDR4 8 GB eMMC |
Apple AirPlay 2 | Works with AirPlay 2 on Apple devices iOS 11.4 and higher. |
Direct Streaming Formats | Bluetooth, Apple Airplay 2, Spotify Direct Control |
What's in the box? | |
2 Sonos Era 100 Pro speakers | Product(s) |
2 eyebolts | Eyebolts |
Documentation | Quickstart Guide and legal/warranty information |
Requirements | |
Internet connection | Access to the internet |
Power sourcing equipment (PSE) | Third-party device, such as a PoE network switch or injector. See FAQ for more information |
Ethernet cable | Category 5 (CAT5) or higher |
Sonos app | The latest generation of the Sonos app running on a compatible device |
Safety and Compliance |
1 Measured in 4Pi anechoic space, on axis, 2 Noise filtered to meet IEC60268-5, 6 dB crest factor (RMS), Z-weighted in 4Pi anechoic space, 3 Sine wave output on axis in 4Pi anechoic space, 4 Mounted in portrait orientation, 5 Measured in 4Pi anechoic space average 1 kHz to 16 kHz
Power Response (⅓ octave smoothing)
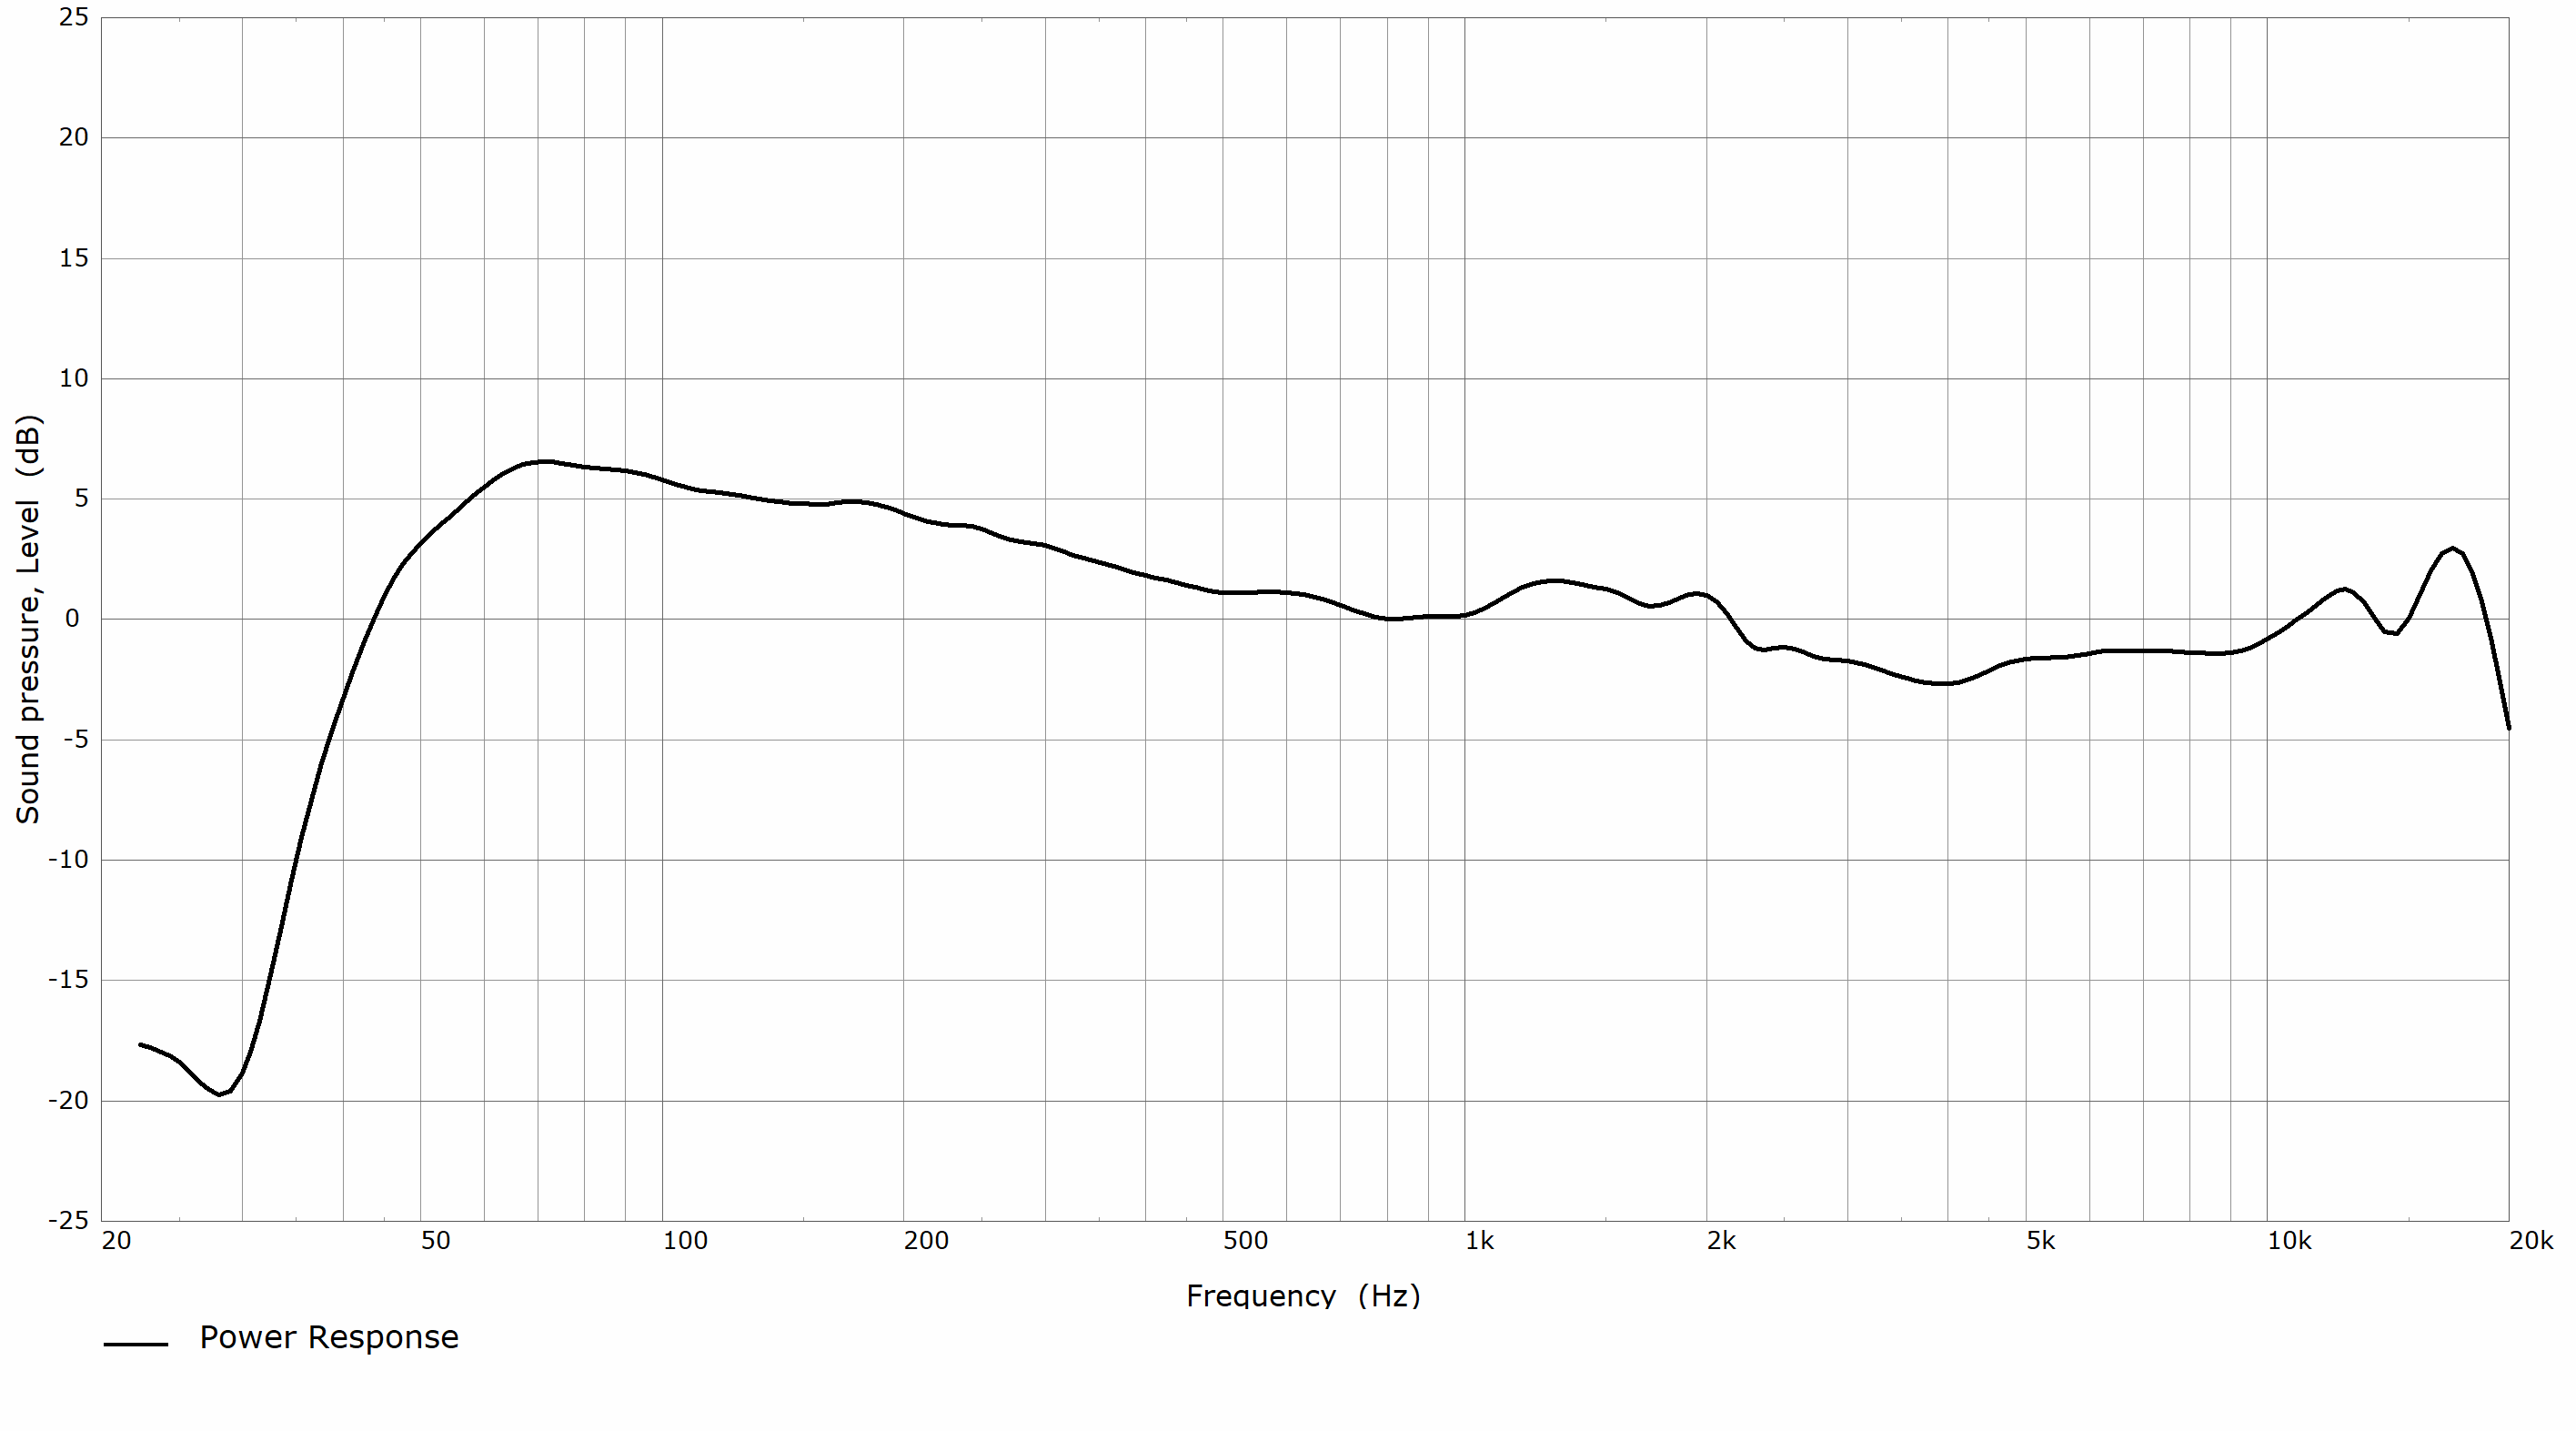
Portrait orientation

Landscape and ceiling-mounted orientation
Directivity Plot (⅓ octave smoothing)
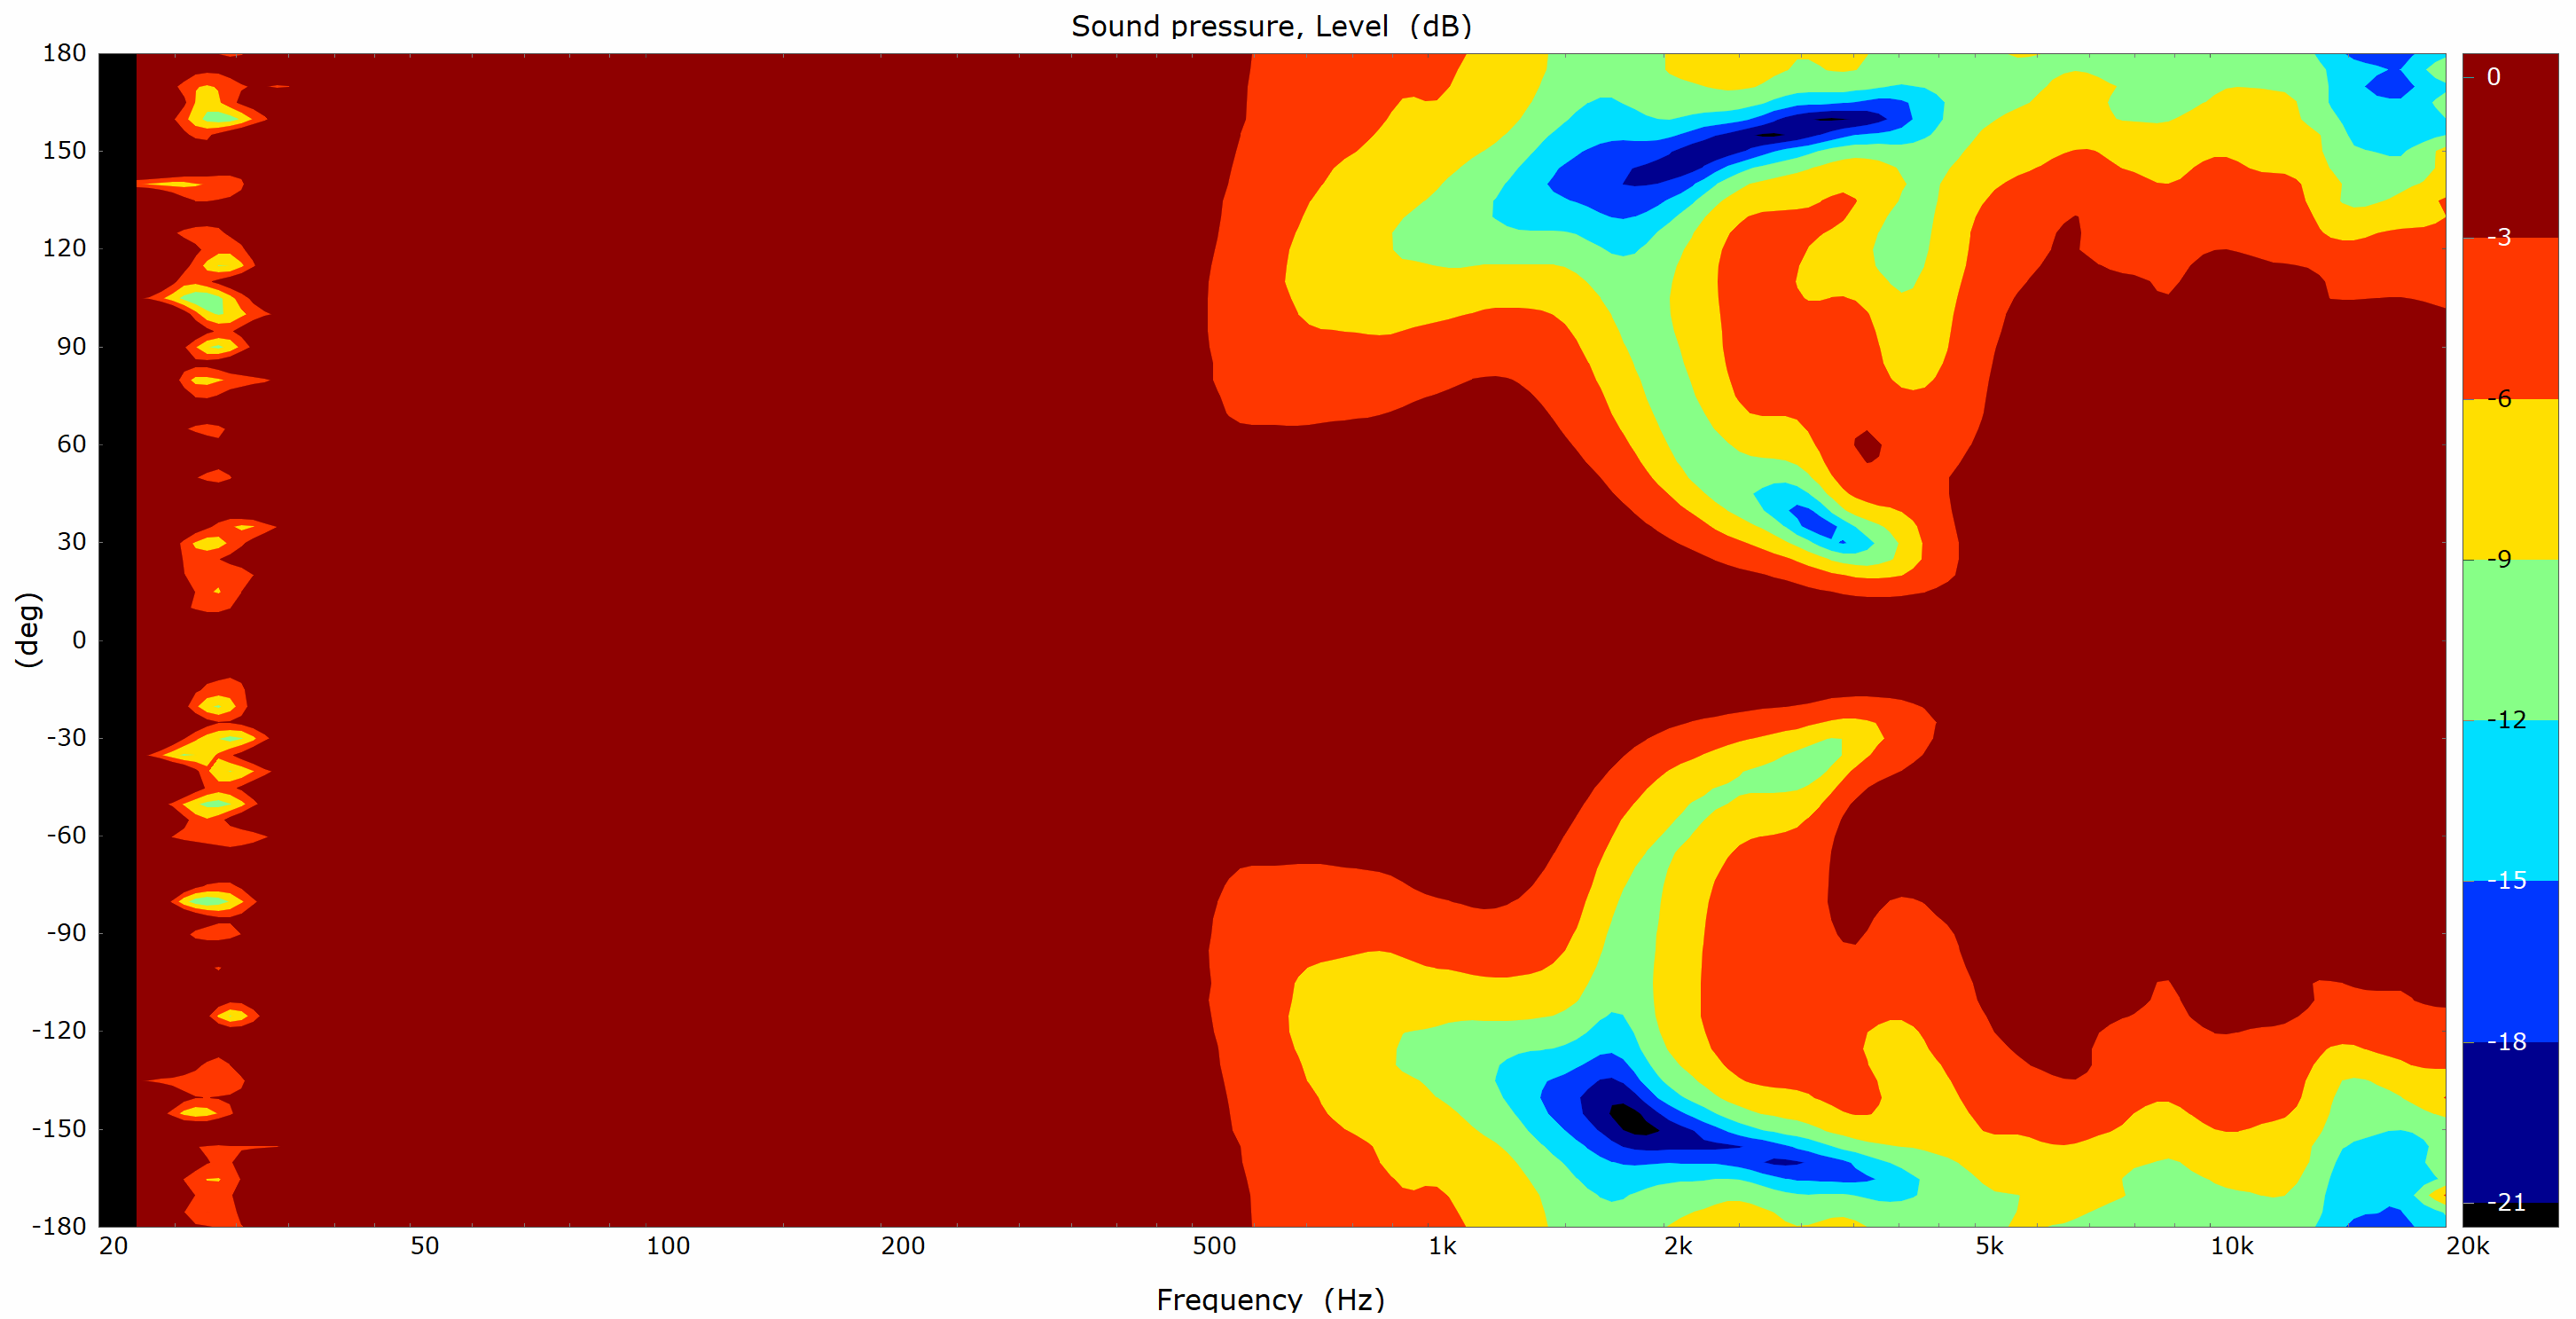
Portrait orientation
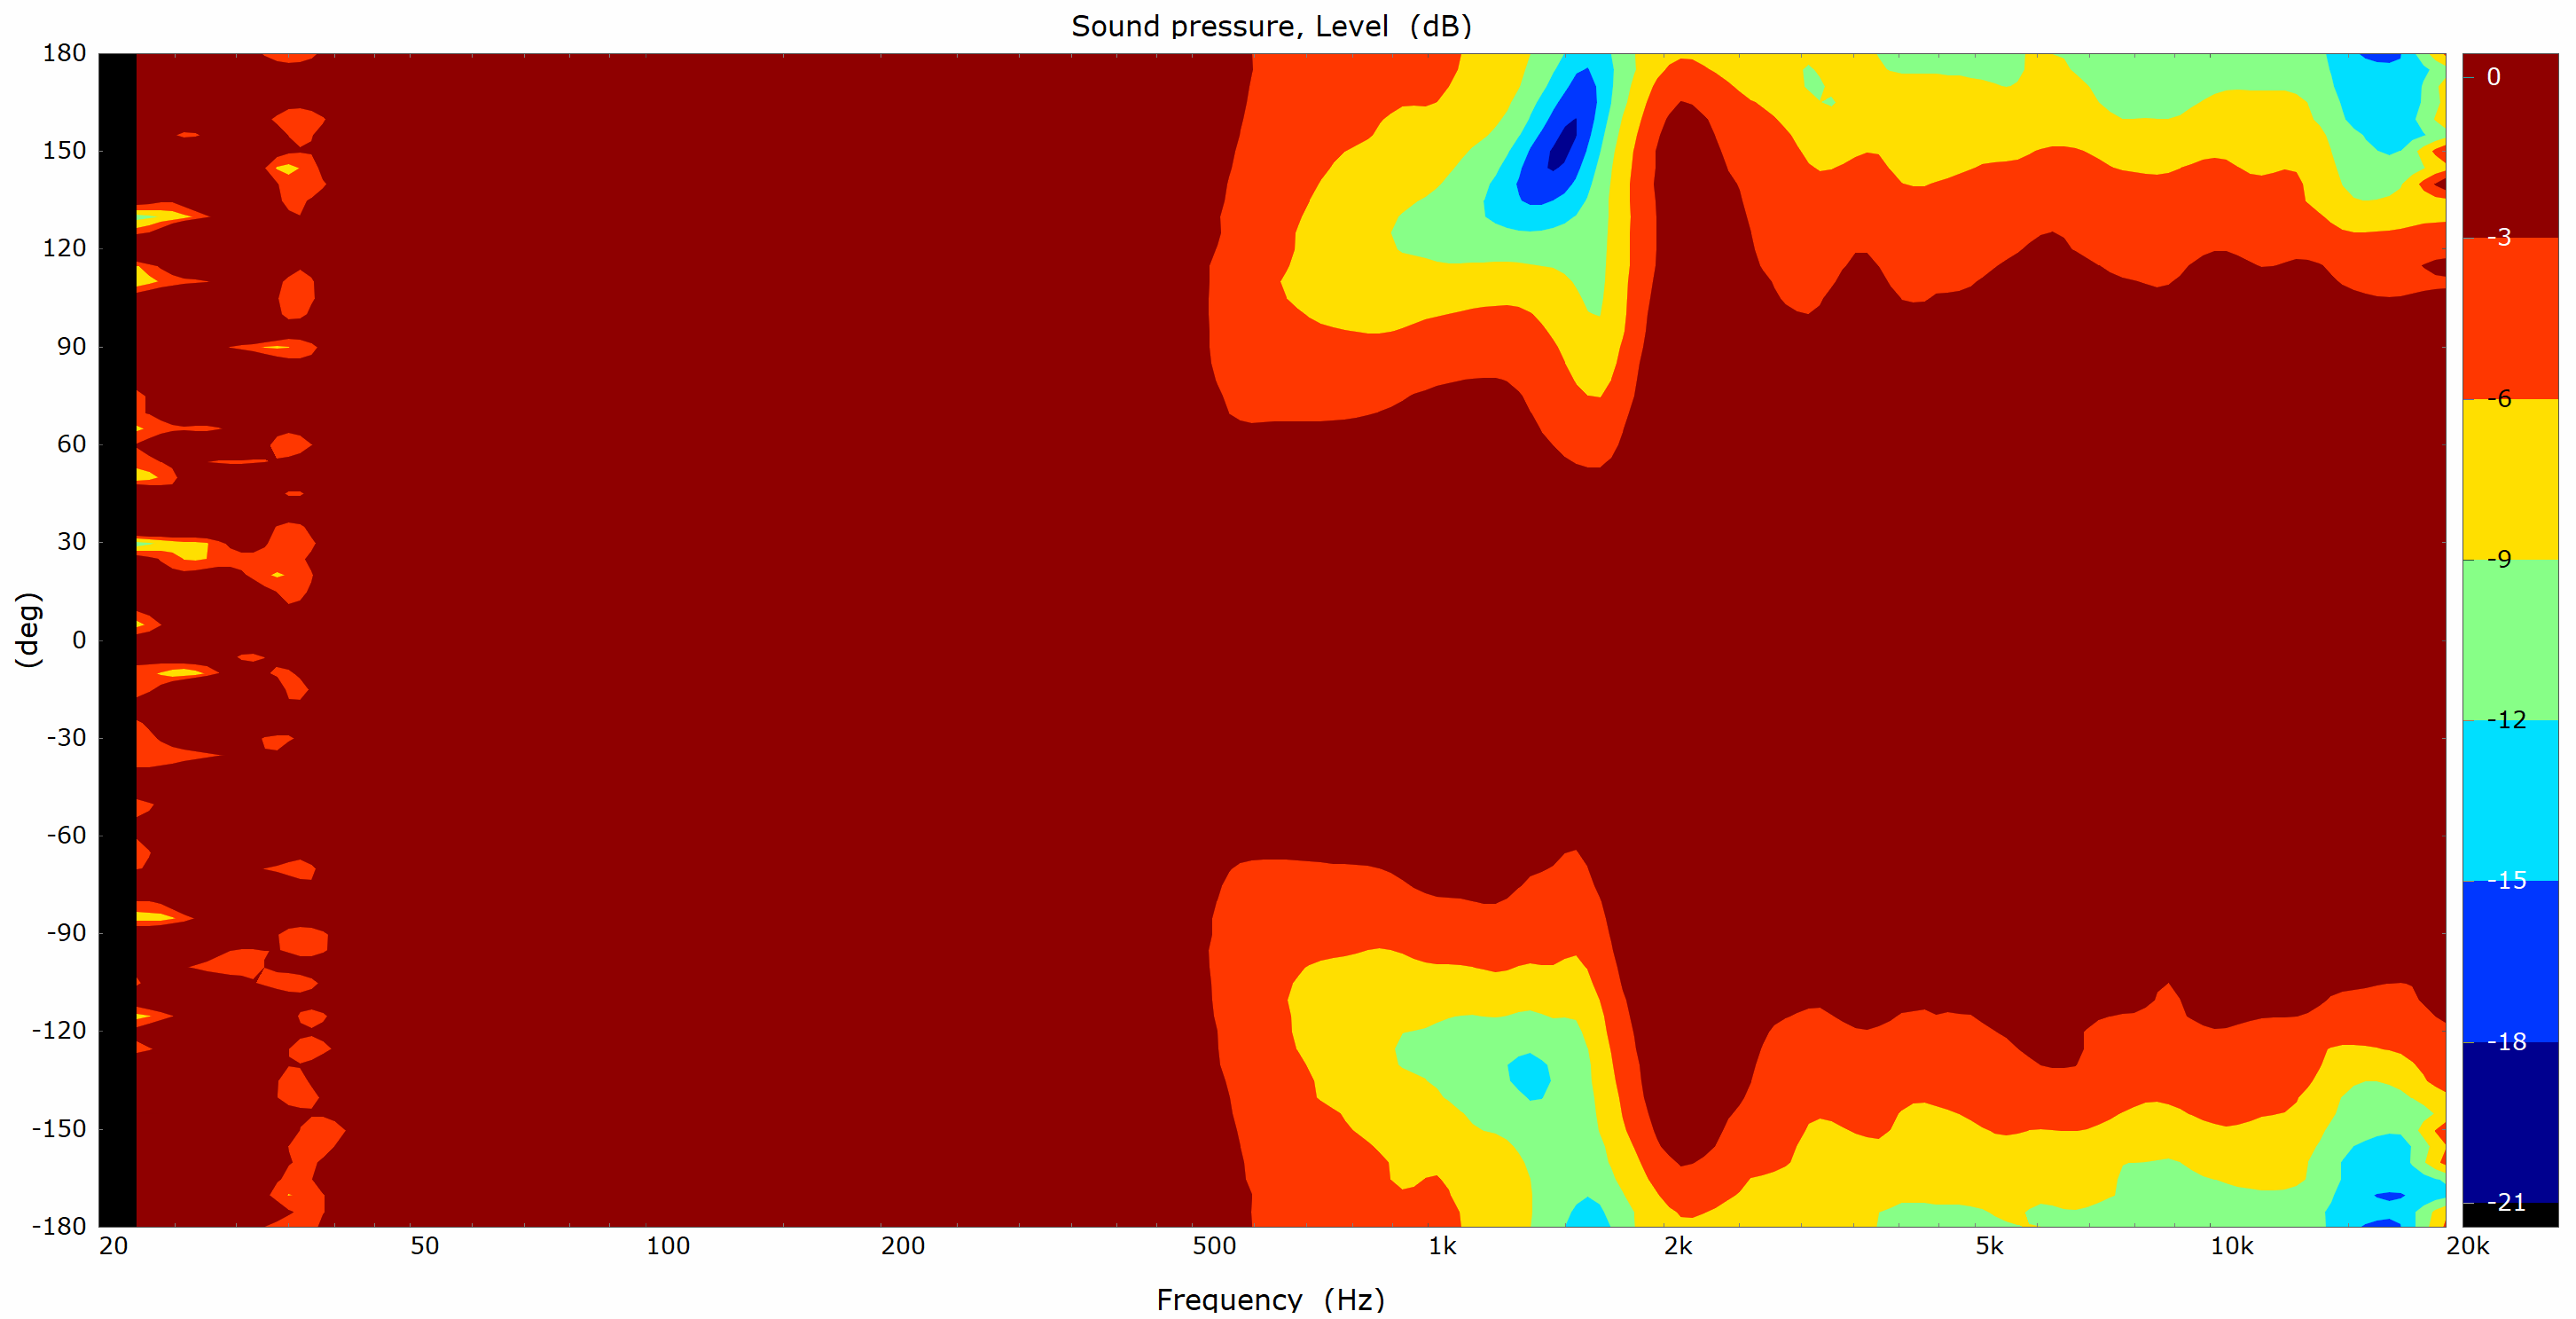
Landscape and ceiling-mounted orientation
Line drawings and dimensions
 |  |
 |  |
Important safety information
- Read these instructions.
- Keep these instructions.
- Heed all warnings.
- Follow all instructions.
- Do not use this apparatus near water.
- Clean only with dry soft cloth. Household cleaners or solvents can damage the finish on your Sonos products.
- Do not block any ventilation openings. Install in accordance with the manufacturer’s instructions.
- Do not install near any heat sources such as radiators, heat registers, stoves, or other apparatus that produce heat.
- Protect the power cable from being walked on or pinched, particularly at plugs, convenience receptacles, and the point where they exit from the apparatus.
- Only use attachments/accessories specified by the manufacturer.
- Unplug this apparatus during lightning storms or when unused for long periods of time.
- This product does not have any user-serviceable parts. Do not open or disassemble or attempt to repair it or replace any components. Refer all servicing to Sonos qualified service personnel. Servicing is required when the apparatus has been damaged in any way, such as power-supply cable or plug is damaged, liquid has been spilled or objects have fallen into the apparatus, the apparatus has been exposed to rain or moisture, does not operate normally, or has been dropped.
- The Mains plug should be readily available to disconnect the equipment.
- Warning: To reduce the risk of fire or electric shock, do not expose this apparatus to rain or moisture.
- Do not expose apparatus to dripping or splashing and do not place objects filled with liquids, such as vases, on the apparatus.
- Connections between this device and external equipment must be made using a shielded cable in order to maintain compliance with FCC radio frequency emission limits.