Sonos Sub takes your audio experience to the next level—
-
Instantly adds a dimension of deep bass impact to your audio listening experience.
-
Pair Sub (Gen 3) with any other Sub and feel the bass from every corner of the room.
-
Allows placement anywhere because it’s wireless and compact—position it vertically or horizontally on any floor surface.
-
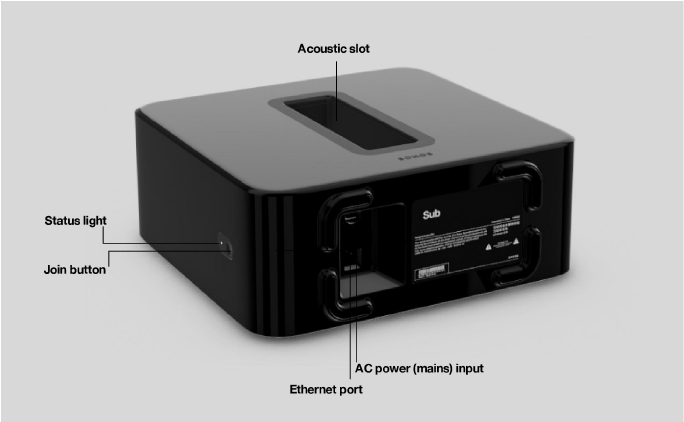
The top of the acoustic slot doubles as a handle so you can lift it.
-
Sub (Gen 3) is compatible with Sonos S2
 only.
only. -
See Getting started when you’re ready to add a Sub to your Sonos system.
Note:Sonos Sub is designed for use with most Sonos speakers, except Sonos Connect, Port and Move. Make sure you set up at least one speaker before adding Sub.
|
Join button |
Press to connect during setup. |
|
Status light |
Indicates the status. Learn more If the light is distracting, you can turn it off in your room’s settings. |
|
Use an Ethernet cable to connect Sub to your home network. |
|
|
Use only the supplied power cord to connect to a power outlet (using a third party power cord will void your warranty). Be sure to use the proper power adapter for your country. Push the power cord firmly into Sub until it is flush with the surface. |
Select a location
Choose a location—it’s designed to provide optimal sound wherever you place it.
-
Use the acoustic slot as a handle to lift Sub out of the box. You should always bend your knees when lifting heavy objects to avoid undue stress on your back.
-
Make sure at least one side of the slot is free from obstruction. If you place it vertically against a wall, don’t block the front opening. If you place Sub horizontally on the floor, don’t put anything on top of it.
-
Sub is designed to sit on the floor. You can place it in a corner, against the wall, behind, under, or next to any piece of furniture on any kind of floor surface.
-
Position Sub either vertically or horizontally. If you’re going to use it horizontally, you can attach permanent felt feet (available upon request, contact Sonos Support). See Attach feet (optional) for more information.
Note:Sub contains strong magnets. Don’t place it near equipment that is sensitive to magnetic fields.
If you’re placing Sub horizontally on a floor, you can attach permanent felt feet (available upon request, contact Sonos Support) to protect your floor. If you’re putting it on a rug or using it vertically, no need to adhere the felt feet.
Note:The felt feet are not removable—a strong adhesive will keep them permanently attached to Sub.
-
Lay Sub down so the Sonos logo is facing down. Make sure you adhere the felt feet to the side that doesn’t have the Sonos logo.
-
Place the enclosed guide on one corner of the unit and fold the flaps over the edge.

-
Peel the backing off one of the feet.
-
Press the felt foot (sticky side down) onto the unit inside the circular portion of the guide.
-
Attach the other 3 felt feet the same way.
Attach the power cord and plug in Sub. Be sure to push the power cord firmly into Sub until it is flush with the surface.
If you don’t have the app, download it from the app store. You’ll use it to set up and control your Sonos system. See Getting started. Make sure you set up at least one speaker before adding Sub.
Note:After Sub is paired with a Sonos speaker, you won’t see it displayed separately in  . Any changes you make to that Sonos speaker (volume, mute, music selection) will also affect Sub.
Sub’s settings are set during the initial setup process, but you can make changes anytime.
-
Go to the sound settings for the room that’s associated with your Sub.
-
Tap Sub Audio.
-
Choose one of the following options:
It appears as room (+Sub) in your list of rooms.
-
Sub: Choose On or Off to turn the sound from Sub on and off.
-
Sub Level: Use the slider to increase or decrease volume. (You can use this setting to match the subwoofer level to the level of your main speakers.)
-
Phase Control: Choose 0° or 180° to set the phase control for your Sonos Sub or third-party subwoofer. This can help integrate your subwoofer with other speakers in the room. (You’ll see this setting when you pair a Sonos Sub or third-party subwoofer with a Sonos Amp or Connect:Amp.)
-
Crossover Frequency: Adjust the frequency at which the sound transitions to the subwoofer. By default this is 80 Hz.
You may wish to choose a different crossover frequency if:
-
The main speakers sound distorted at high volumes—moving to a smaller speaker size setting can help.
-
Your attention is drawn to Sub’s location while listening to music—moving to a larger speaker size setting can help.
1
Compact
110 Hz
2
100 Hz
3
90 Hz
4
Bookshelf / Ceiling
80 Hz
5
70 Hz
6
Floor
60 Hz
7
50 Hz
-
Recalibrate Sub. If you move your Sub to another location, purchase new speakers, or just want to adjust the sound after initial setup, you can recalibrate Sub (Android devices only).
-
Select the size of your stereo speakers (Connect:Amp only).
-
Press Play
 to compare the volume of two test sounds, A and B, and then select No Difference, A is louder or B is louder.
 -
Press Play
 to listen to a test sound, and then select the level you prefer.
Pair Sub with a different speaker
You can easily pair Sub with a different Sonos speaker (except the Sonos Connect).
If you’re moving Sub to a new room, wait for the status light to stop flashing after you plug it back in.
-
Go to the sound settings for the room that’s associated with your Sub.
-
Remove Sub.
-
You can pair Sub with a different Sonos product or choose not to use Sub right now. It will appear on
 as Sub (unused) until you pair it with another Sonos speaker.
It appears as room (+Sub) in your list of rooms.
|
Feature |
Description |
|---|---|
|
Amplifier |
Two Class-D digital amplifiers. |
|
Speakers |
Two force-canceling speakers positioned face-to-face for deeper, richer sound and zero cabinet buzz or rattle. |
|
Dual Acoustic Ports |
Tuned to enhance Sub performance. |
|
Frequency Response |
Plays down to 25 Hz. |
|
All Digital Sound |
All filter settings, active equalization, and time alignment are done digitally through state-of-the-art DSP (Digital Signal Processing) circuitry for zero-loss audio quality and energy. |
|
Automatic Equalization |
The system automatically adjusts audio settings across all connected components. |
|
Networking* |
|
|
Ethernet Port |
One 10/100 Mbps Ethernet port. You can plug a Sonos product directly into your router if your WiFi is unstable. |
|
Wireless Connectivity |
Connects to WiFi network with any 802.11a/b/g/n 2.4 or 5 GHz broadcast-capable router. |
|
General |
|
|
Auto-switching 100-240 V, 50-60 Hz 2 A AC universal input. |
|
|
15.3 x 6.2 x 15.8 in. (389 x 158 x 402 mm) |
|
|
36.3 lb (16 kg) |
|
|
Operating Temperature |
32° F to 104° F (0° C to 40° C) |
|
Storage Temperature |
-4° F to 158° F (-20° C to 70° C) |
|
Multiple Orientations |
Stand upright or lay flat for flexible placement. |
|
Rubber and Felt Feet |
Built-in rubber feet; optional felt feet. |
|
Supported Devices |
Sub is designed for use with most Sonos speakers, except Sonos Connect, Port and Move. |
|
Package Contents |
Sonos Sub, power cord, and Quickstart Guide. |
* Specifications subject to change without notice.
|
1.Read these instructions. |
|
2.Keep these instructions. |
|
3.Heed all warnings. |
|
4.Follow all instructions. |
|
5.Do not use this apparatus near water. |
|
6.Clean only with dry soft cloth. Household cleaners or solvents can damage the finish on your Sonos components. |
|
7.Do not block any ventilation openings. Install in accordance with the manufacturer’s instructions. |
|
8.Do not install near any heat sources such as radiators, heat registers, stoves, or other apparatus that produce heat. |
|
9.Protect the power cable from being walked on or pinched, particularly at plugs, convenience receptacles, and the point where they exit from the apparatus. |
|
10.Only use attachments/accessories specified by the manufacturer. |
|
11.Unplug this apparatus during lightning storms or when unused for long periods of time. |
|
12.Refer all servicing to Sonos qualified service personnel. Servicing is required when the apparatus has been damaged in any way, such as power-supply cable or plug is damaged, liquid has been spilled or objects have fallen into the apparatus, the apparatus has been exposed to rain or moisture, does not operate normally, or has been dropped. |
|
13.The Mains plug should be readily available to disconnect the equipment. |
|
14. |
|
15.Do not expose apparatus to dripping or splashing and do not place objects filled with liquids, such as vases, on the apparatus. |
